
This is where store teams can quickly search, view, add or track any asset linked to their store — whether it’s a fridge or a food license. You’ll also find a deleted assets tab for anything removed earlier. Perfect spot to check what’s active, expired, or due for update.
Create a New Asset Entry
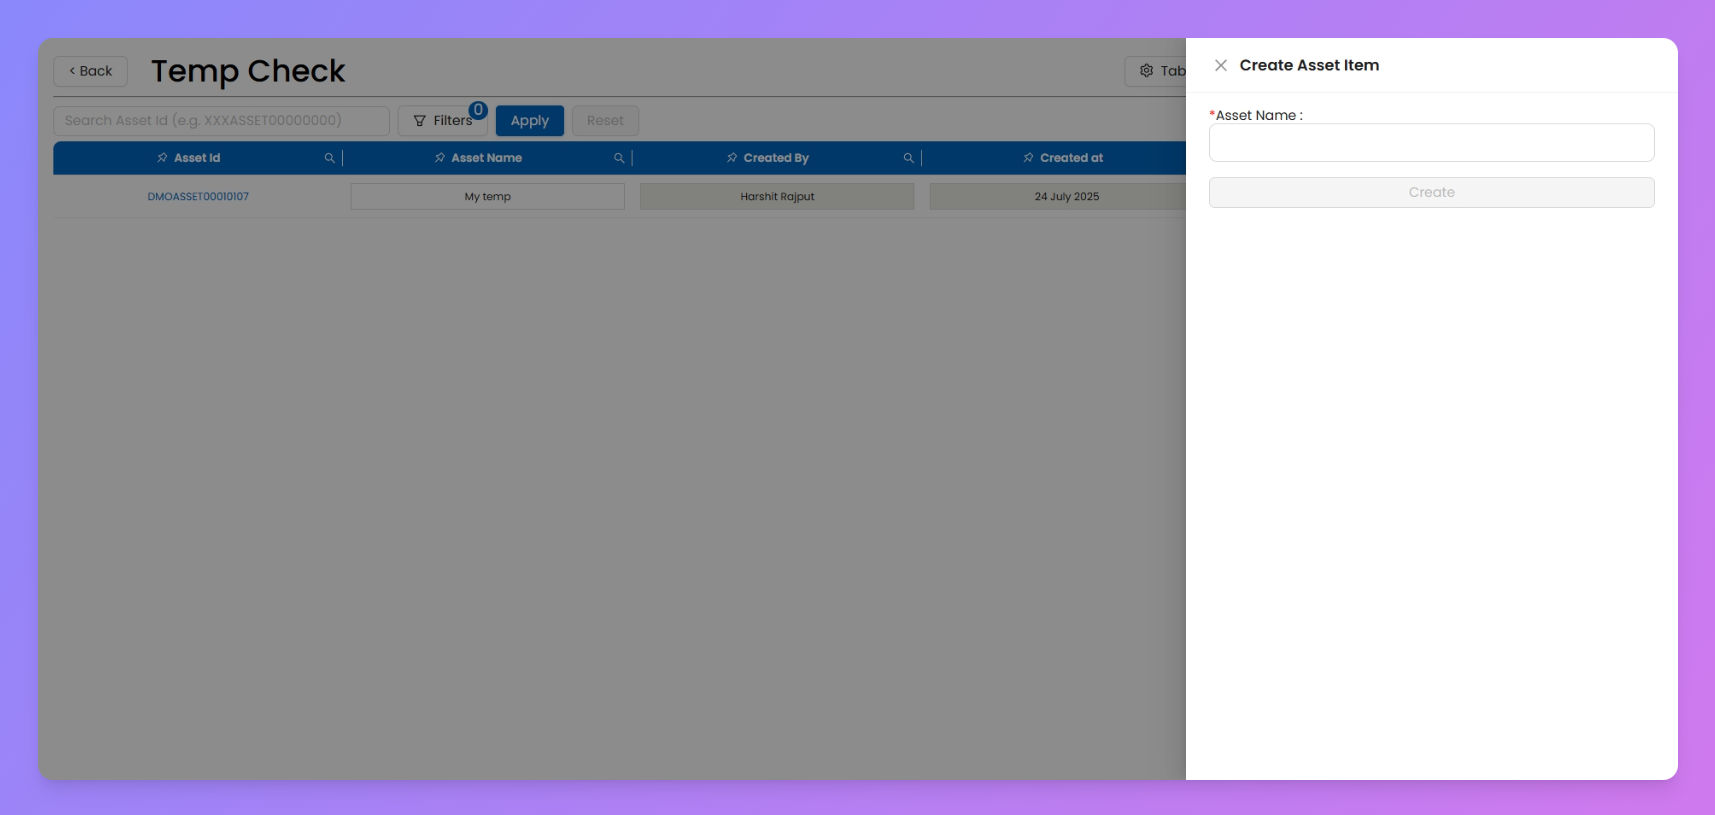
Adding a new asset item is super quick! Depending on how your Asset Table was configured in Creator Mode, the fields you see might change.
Steps to Add a New Asset
- From the Asset Table, click Create Entry.
- Fill in the required fields (these vary by configuration):
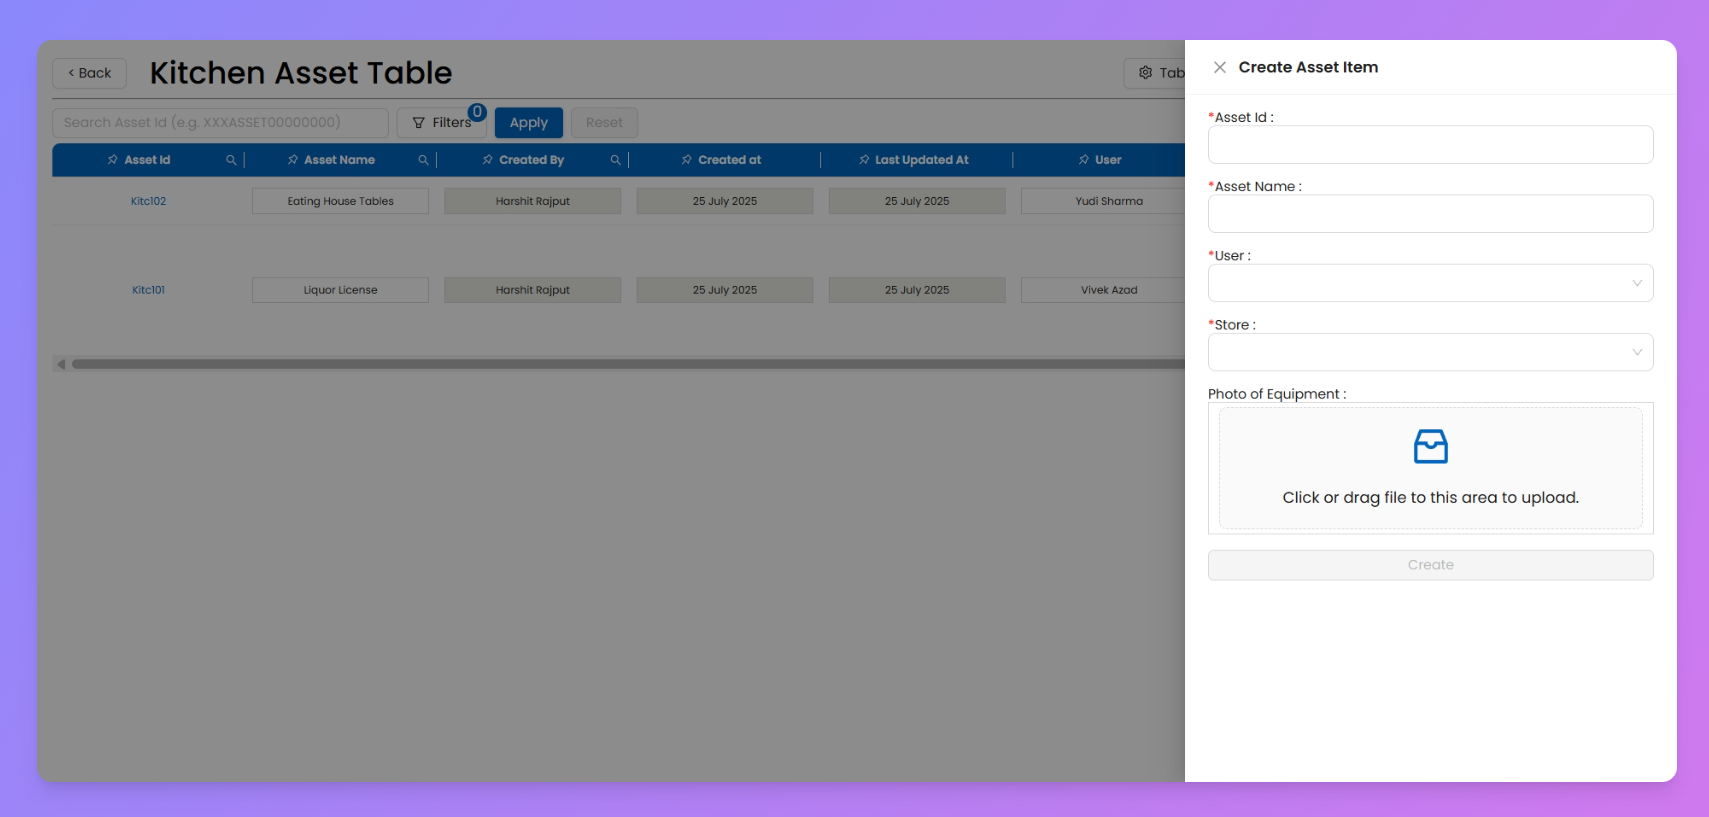
- Asset Name → Always required.
- Asset ID → Shows up if your admin has enabled custom IDs.
- User / Store → Only visible if your Asset Table is set to Scoped Assignment (Limited) and you’ve selected User/Store while configuring.
- Custom Fields → Any extra fields added in the Build tab (like Photo of Equipment).
- Hit Create and your asset entry is saved instantly.
Field Visibility Rules (inside Asset item Form)
- If Scoped Assignment (Limited) is used → You’ll be asked to map the asset to a specific User and/or Store.
- If Global Assignment is used → No User/Store fields will appear — the asset stays visible to everyone allowed under the global setup.
- If Custom Asset ID is enabled in Advanced Settings → You can type in your own Asset ID.
- If extra fields were added in the Build tab (e.g., Photo of Equipment), they’ll appear here.
Note : The entry form layout is tied to the Asset Table’s configuration, not individual users. This means everyone creating items in the same Asset Table will see the same fields. However, if your org uses multiple Asset Tables (with different configurations), the entry forms may vary from one table to another.
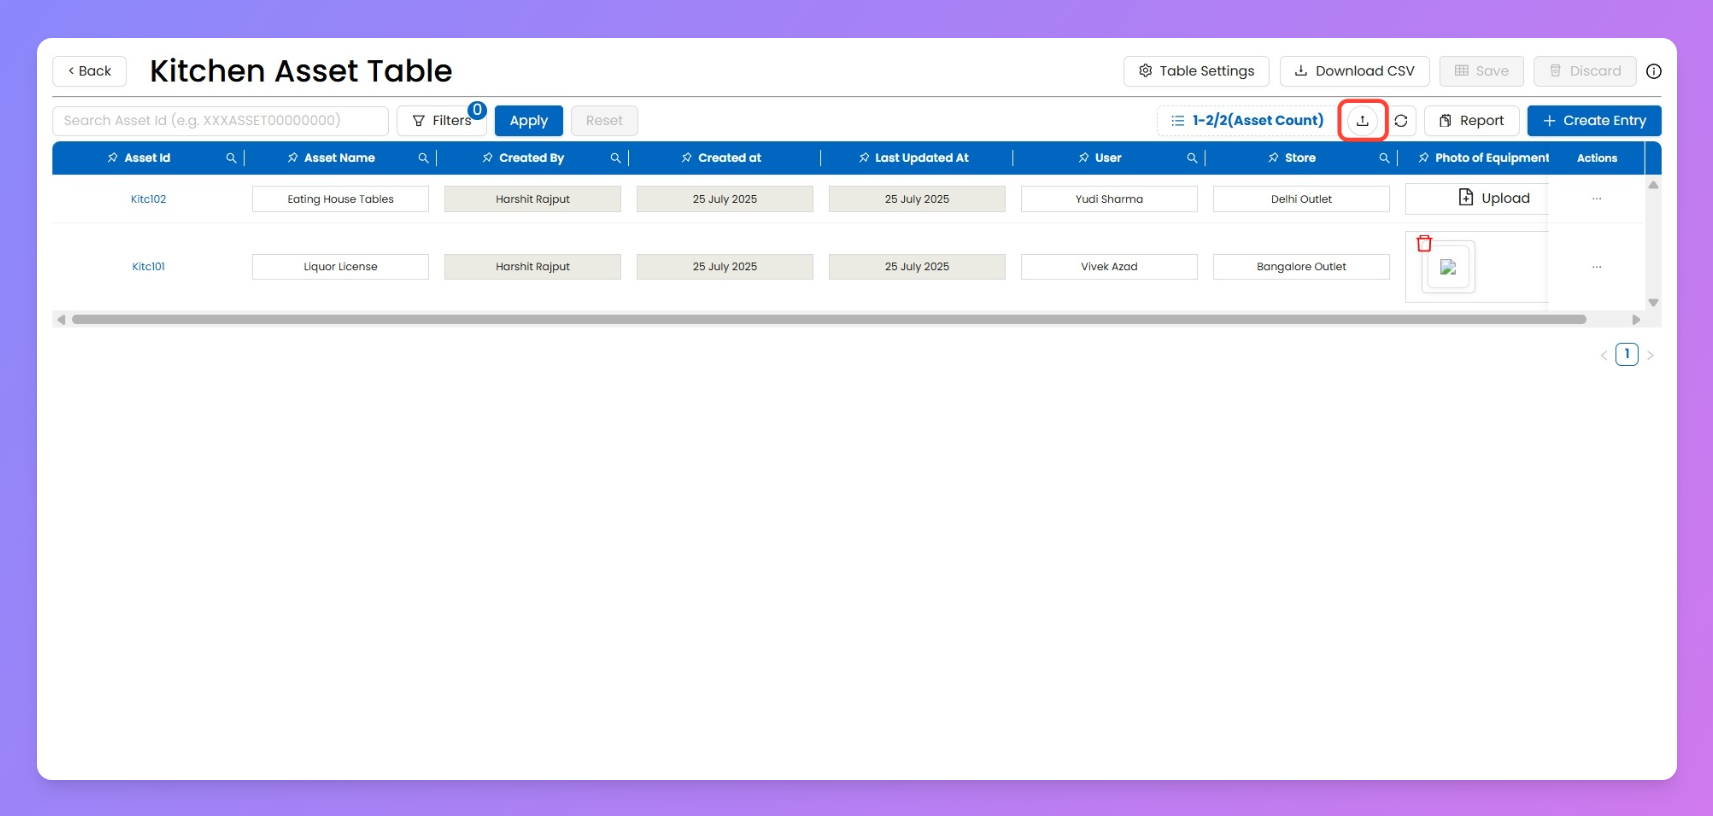
Bulk Upload Asset Items
When you’ve got a long list of assets to add (like 50 kitchen equipments or 100 store licenses), doing it one by one is painful. That’s where Bulk Upload saves the day — upload everything at once using a simple CSV template.
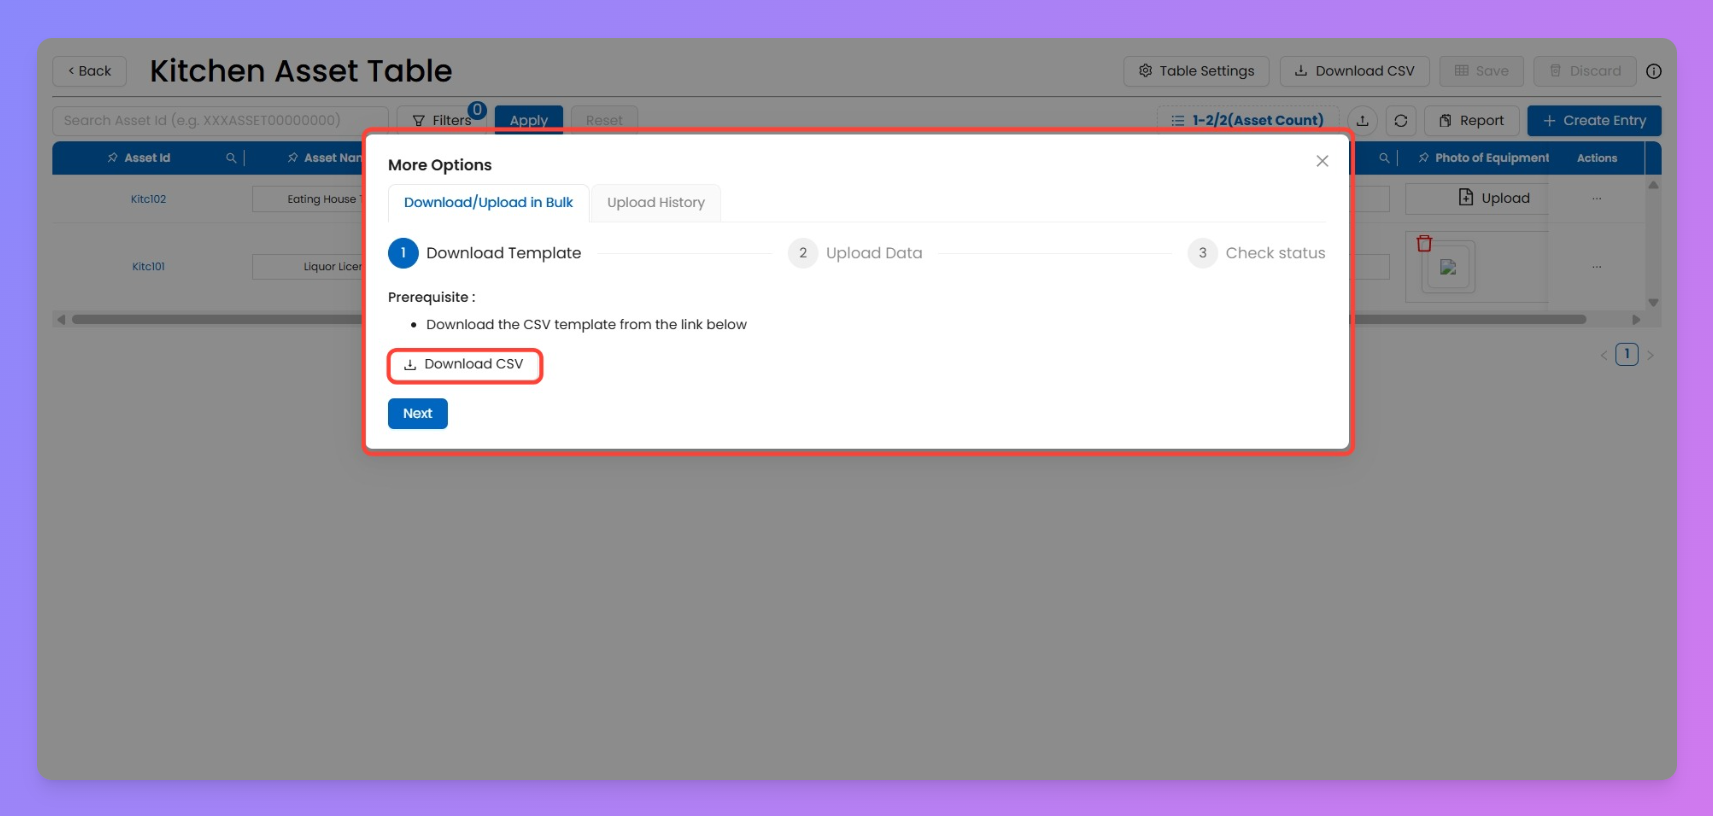
How to Bulk Upload Assets
- Download the Template
- Click the Upload button in your Asset Table.
- Hit Download CSV Template.
- This template automatically includes the fields you configured while setting up the Asset Table.
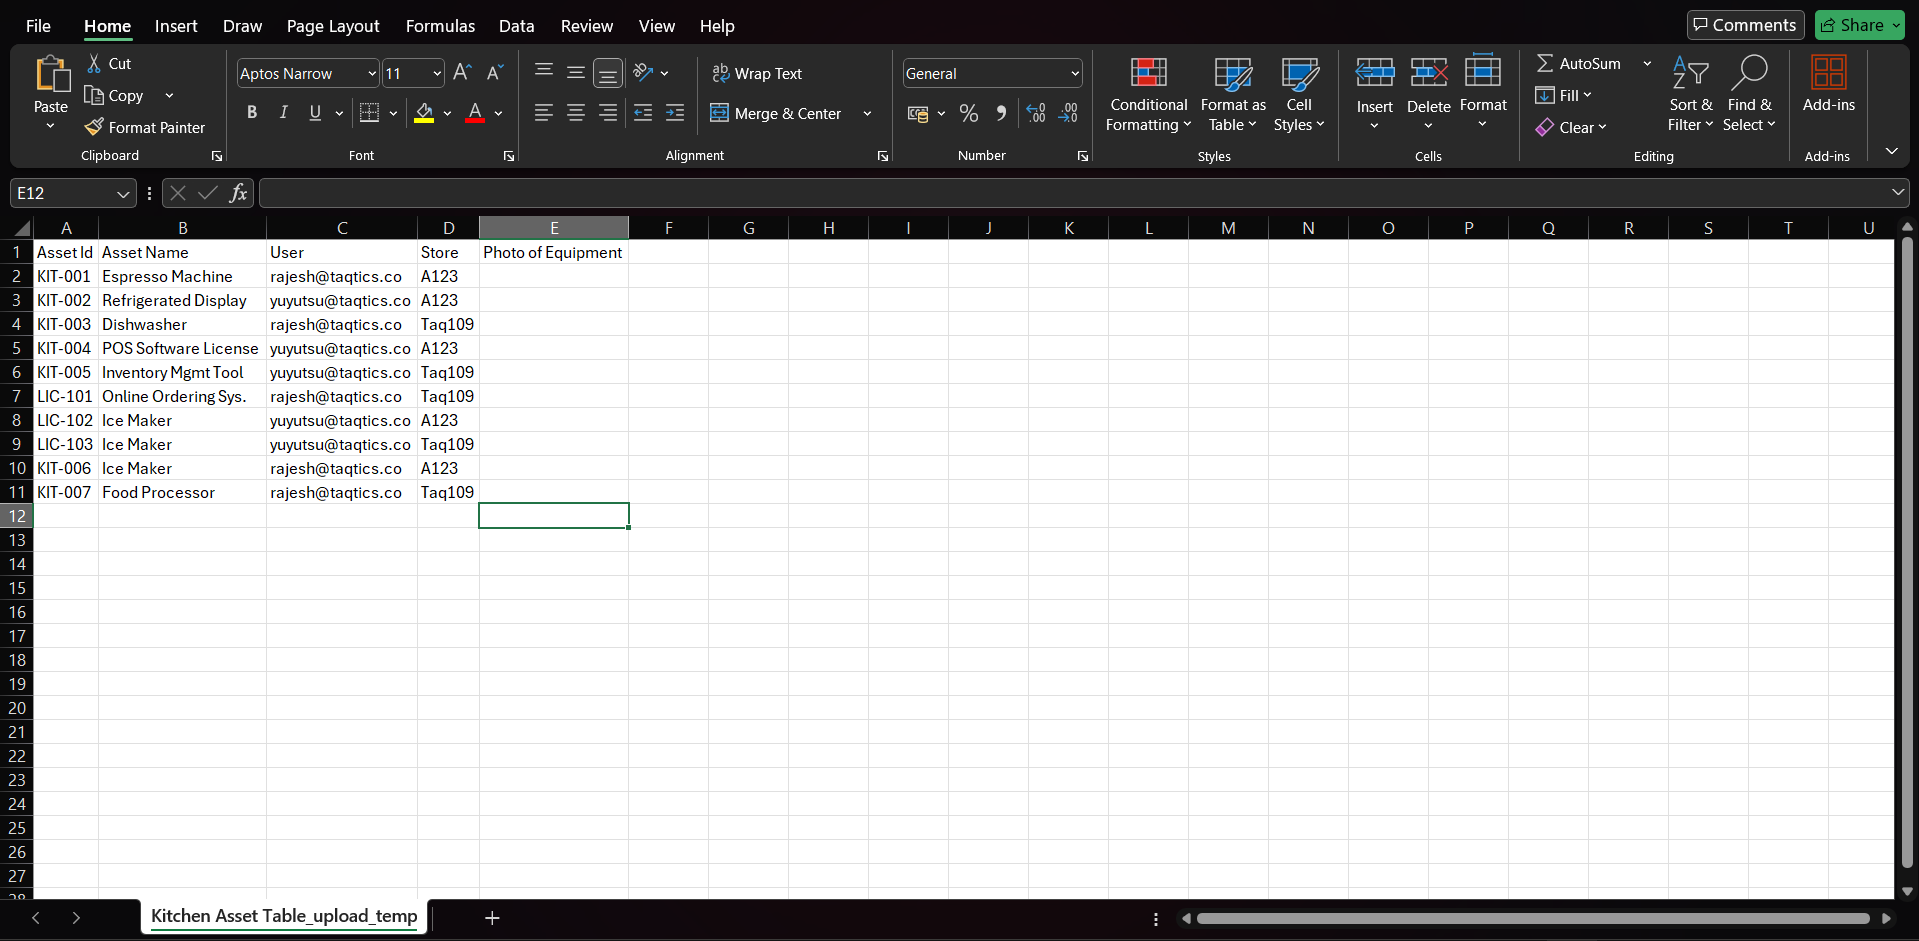
- Fill in Your Data
- Open the CSV file and enter asset details under the provided fields.
- Make sure you follow the format rules:
- Store → enter the Store Entity ID (as configured while creating your store).
- User → enter the User email ID as created in Manage Users.
- Date → use DD-MM-YYYY format.
- Time → use HH:MM:SS format.
Add info like Users and other custom fields you set in the Asset Table.
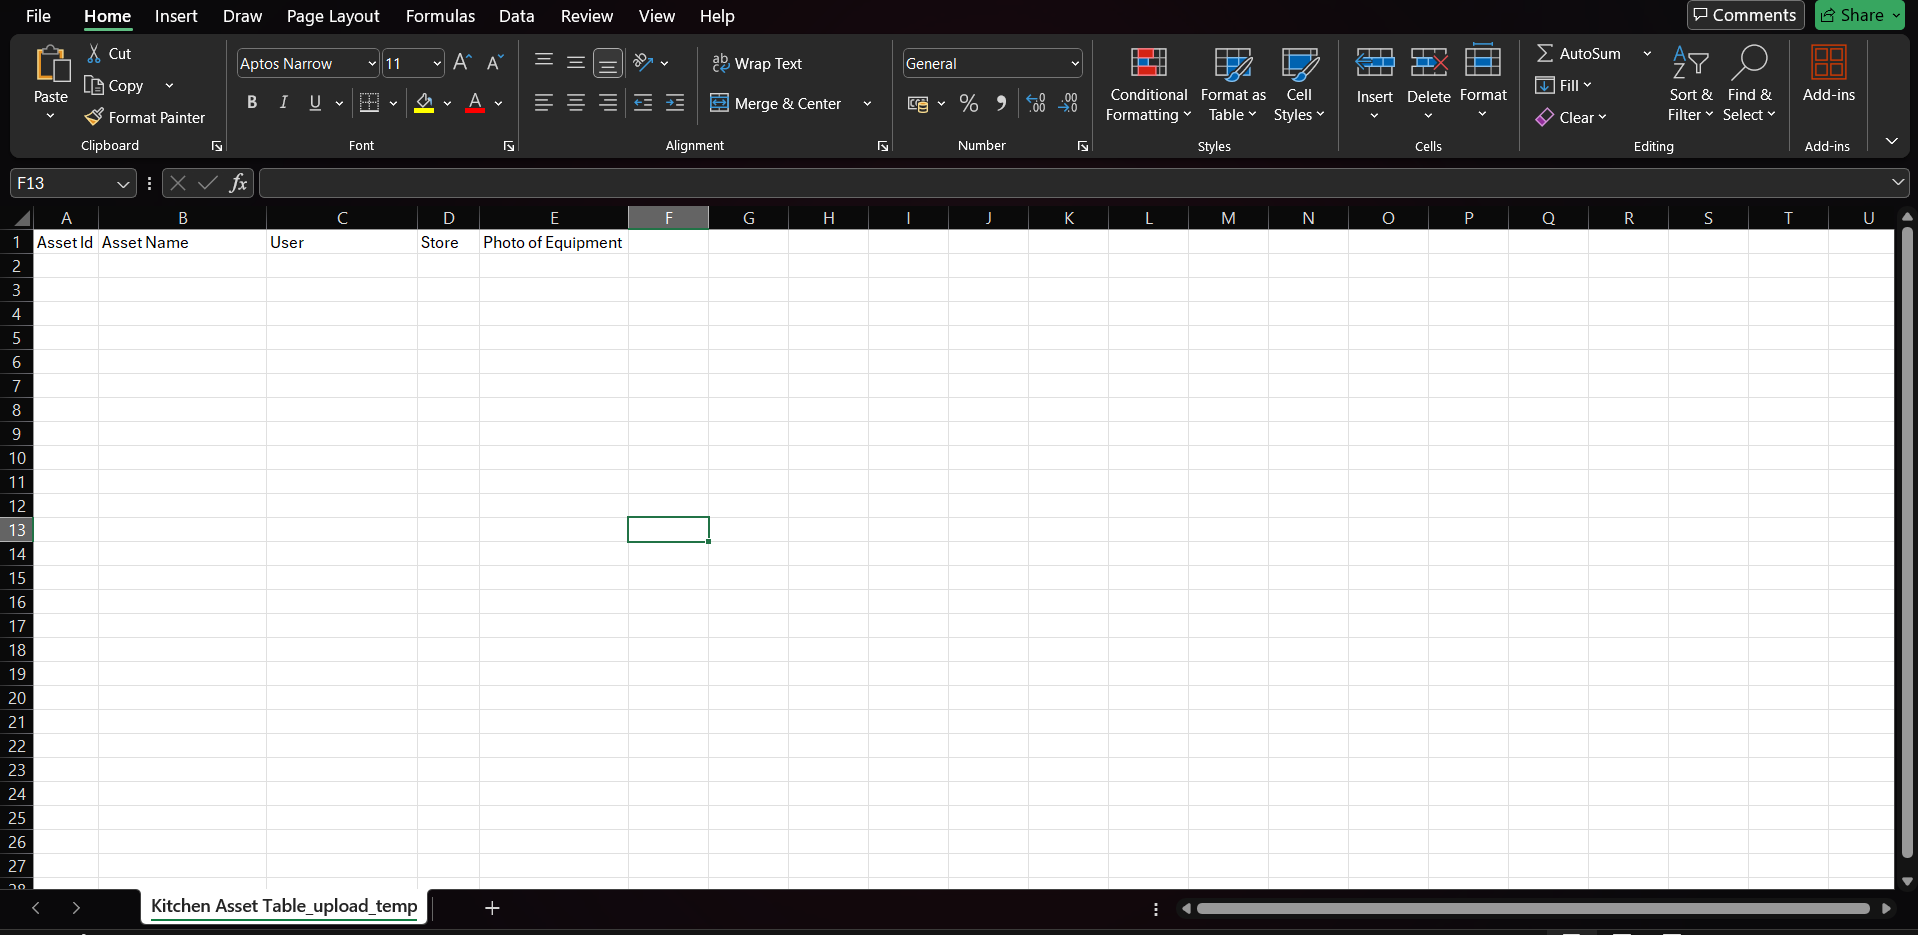
Note: File Upload fields (like the Photo of Equipment column in the CSV below) can’t be filled through bulk upload since attachments can’t be added via CSV. That’s why this column is left blank during the upload.
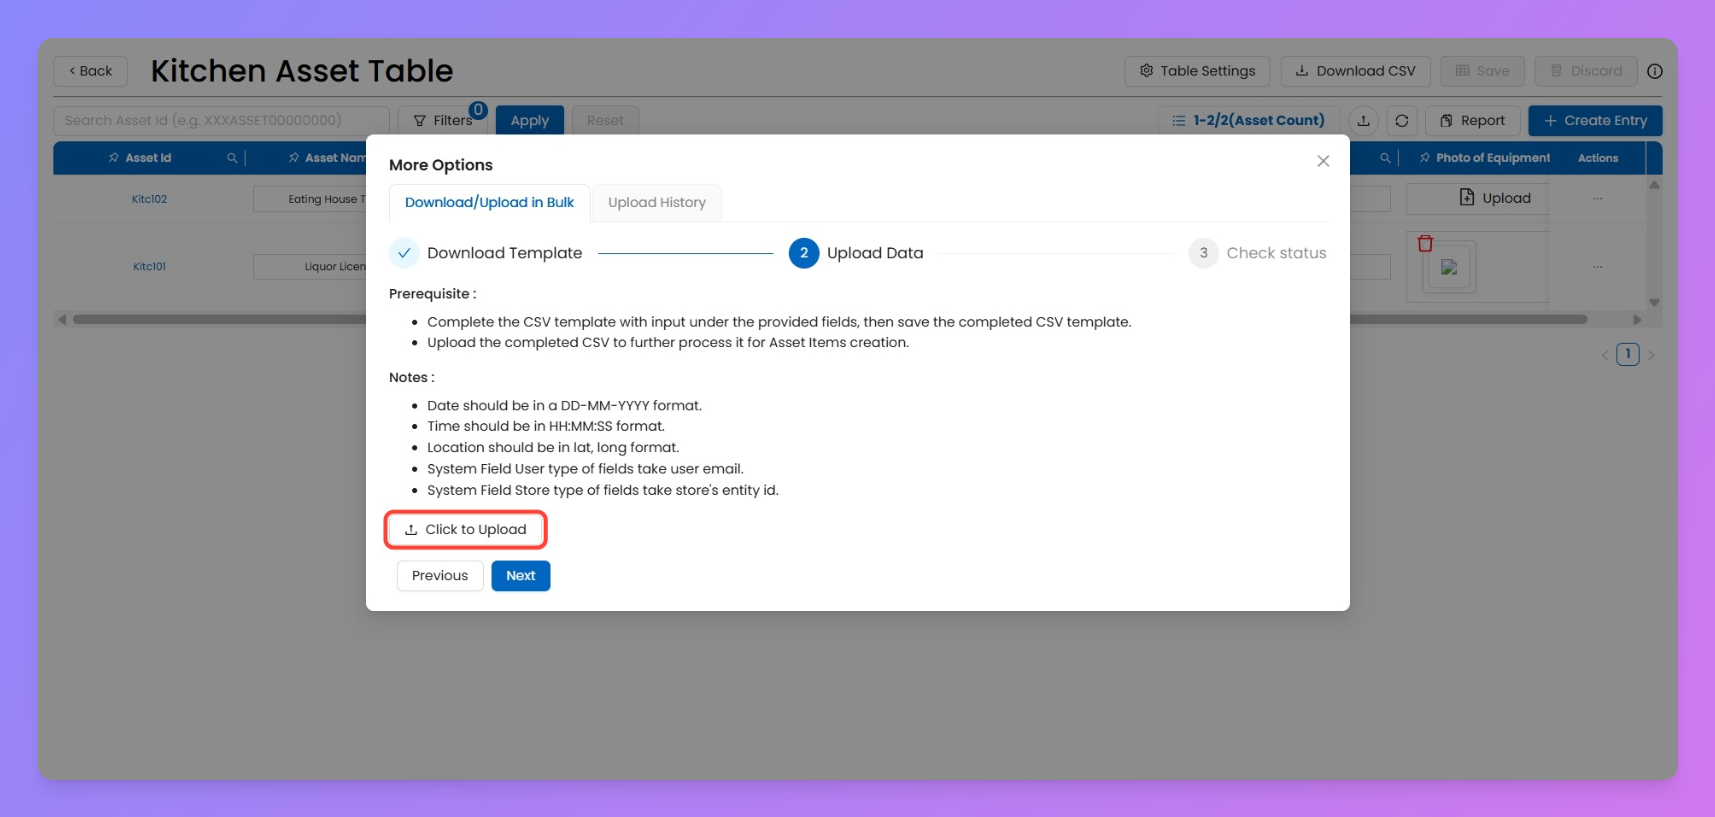
- Upload Your File
- Come back to the Asset Table.
- Choose Click to Upload and select your filled CSV file.
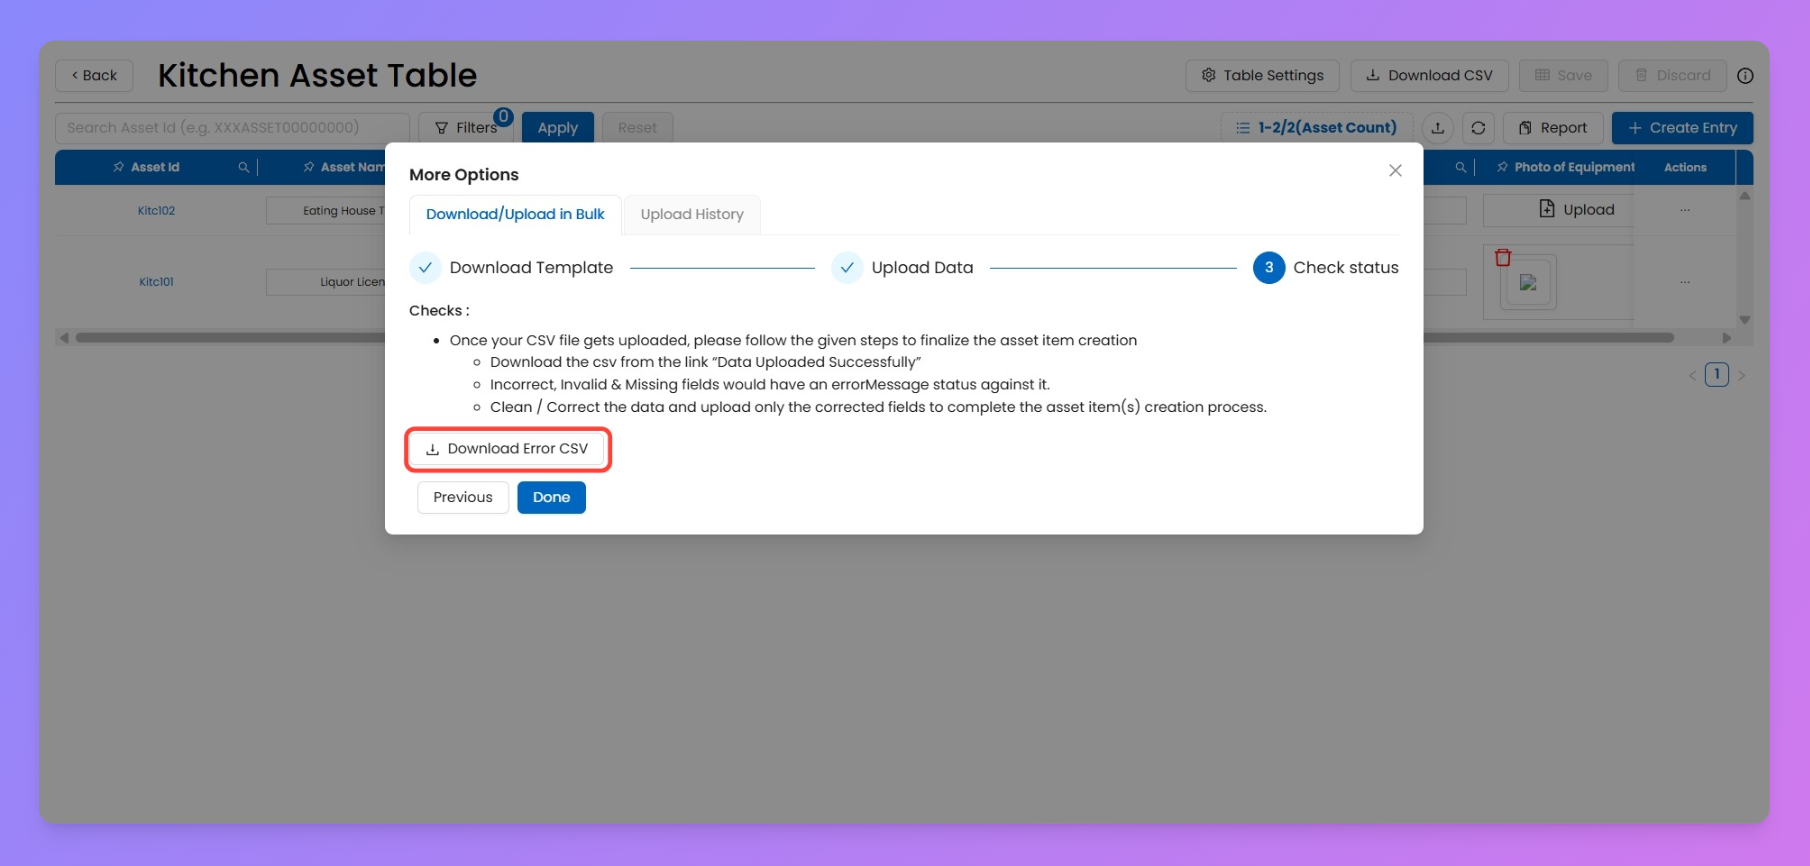
- Check Status
- The system will validate your data.
- If errors exist, download the Error CSV, fix the issues, and re-upload.
- Once clean, your assets will appear in the Asset Table instantly.
Note
Bulk Upload uses the field/column setup from your Asset Table. So every row in the CSV becomes a new Asset Item with the same structure.
Manage Your Assets: Edit, Delete, or Transfer Ownership
Edit an Asset Item
If the asset item is assigned to you (or you created it), you can update its details right inside the Asset Table.
Steps:
- Open your Asset Table.
- Find the asset row you want to edit.
- Click directly on the cell you want to update (except Asset ID, Created By, and Created At, which are locked).
- Type the new info and hit Save — your change is saved instantly.
Locked fields (like Asset ID, Created By, and Created At) cannot be edited.
Delete an Asset Item
Use this to remove any outdated or incorrect asset record.
Steps:
- Open the Asset Table.
- Find the item using Search or Filters.
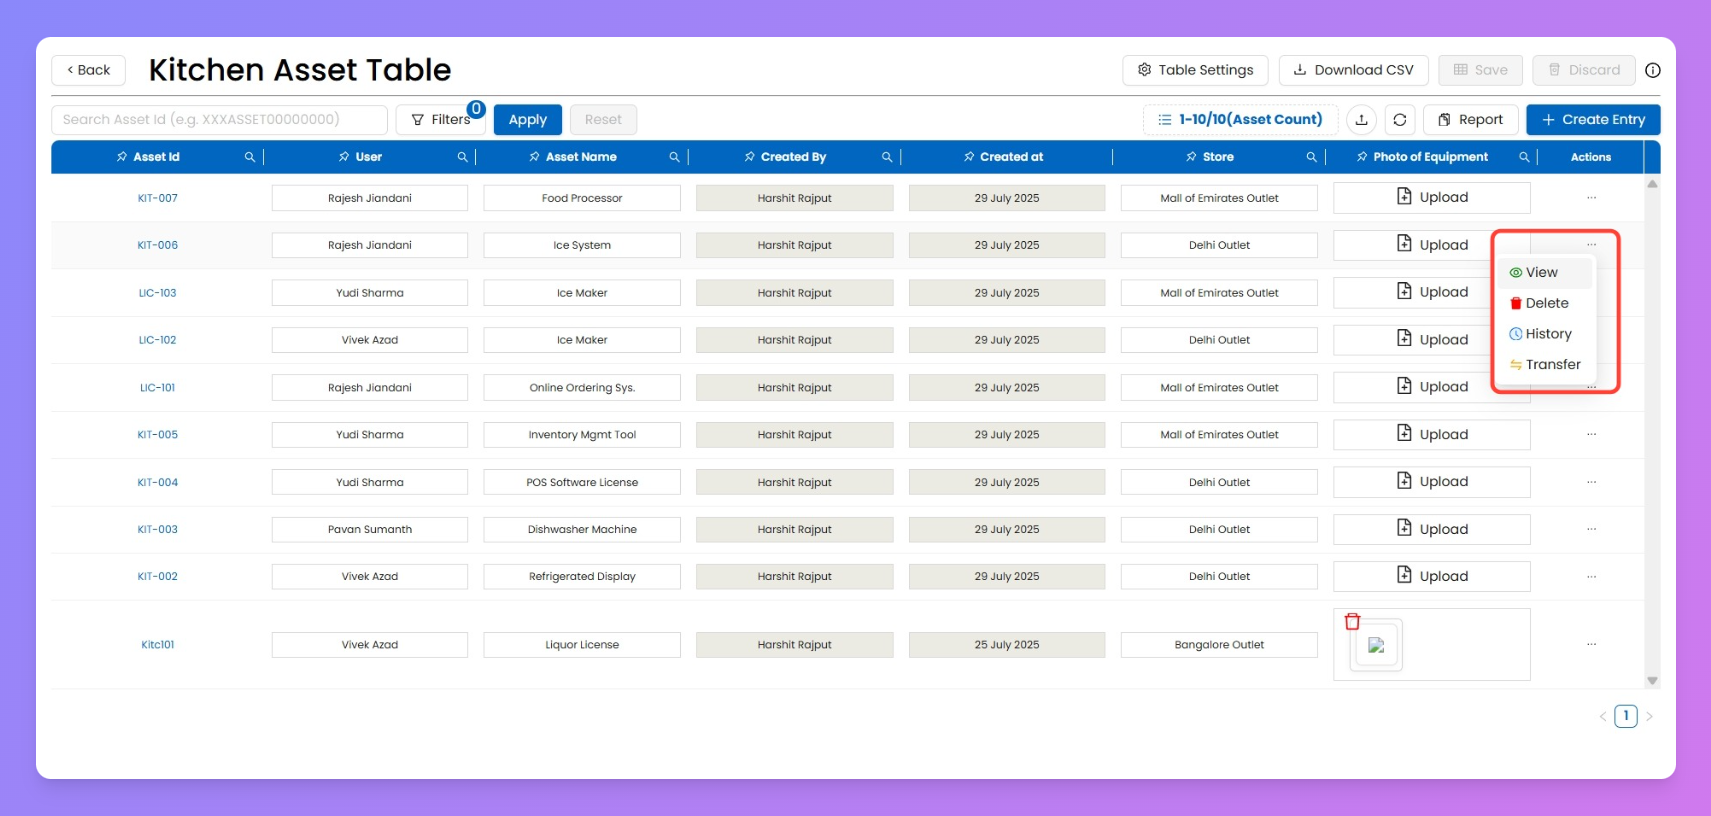
- Click the Delete (🗑️) icon in the Action column.
- Confirm deletion in the popup — once deleted, the item is permanently removed.
Note: Editing, deleting, or even creating a new Asset Item may be restricted if the Configurator has locked these operations under Accessibility Settings in Creator Mode.
Transfer Ownership of an Asset
Use this when an asset needs to be reassigned to a different user or store.
Steps:
- Go to the Asset Table.
- Find the asset you want to transfer.
- Click the Transfer (⇄) icon in the Action column.
- Select the new User and/or Store from the dropdown.
- Save changes — the asset ownership will update instantly.
Transferred assets automatically show up under the new owner’s account view.
Search & Filter Your Assets
Managing hundreds of assets? Don’t sweat it — Taqtics gives you quick ways to track down exactly what you need. Whether you’re looking up a single item by its ID or slicing through a big table with filters, you can find assets in seconds.
1. Quick Search (Asset Management Page)
Perfect for when you already know the Asset ID.
- From the left sidebar, click on Asset Management.
- On the Search View page, type the Asset ID in the search bar.
- Hit Search — you’ll land straight on that asset, no matter which table it belongs to.
2. Advanced Filters (Inside Asset Table)
Use this to narrow results across larger sets of assets items from your asset table.
- Open your Asset Table from the same section.
- Tap the Filters button at the top.
- Choose filters like User, Store, Created Date, or Status.
- Click Apply to instantly see your refined list.
💡 Pro Tip: You can stack multiple filters together to drill down and find exactly what you’re after.
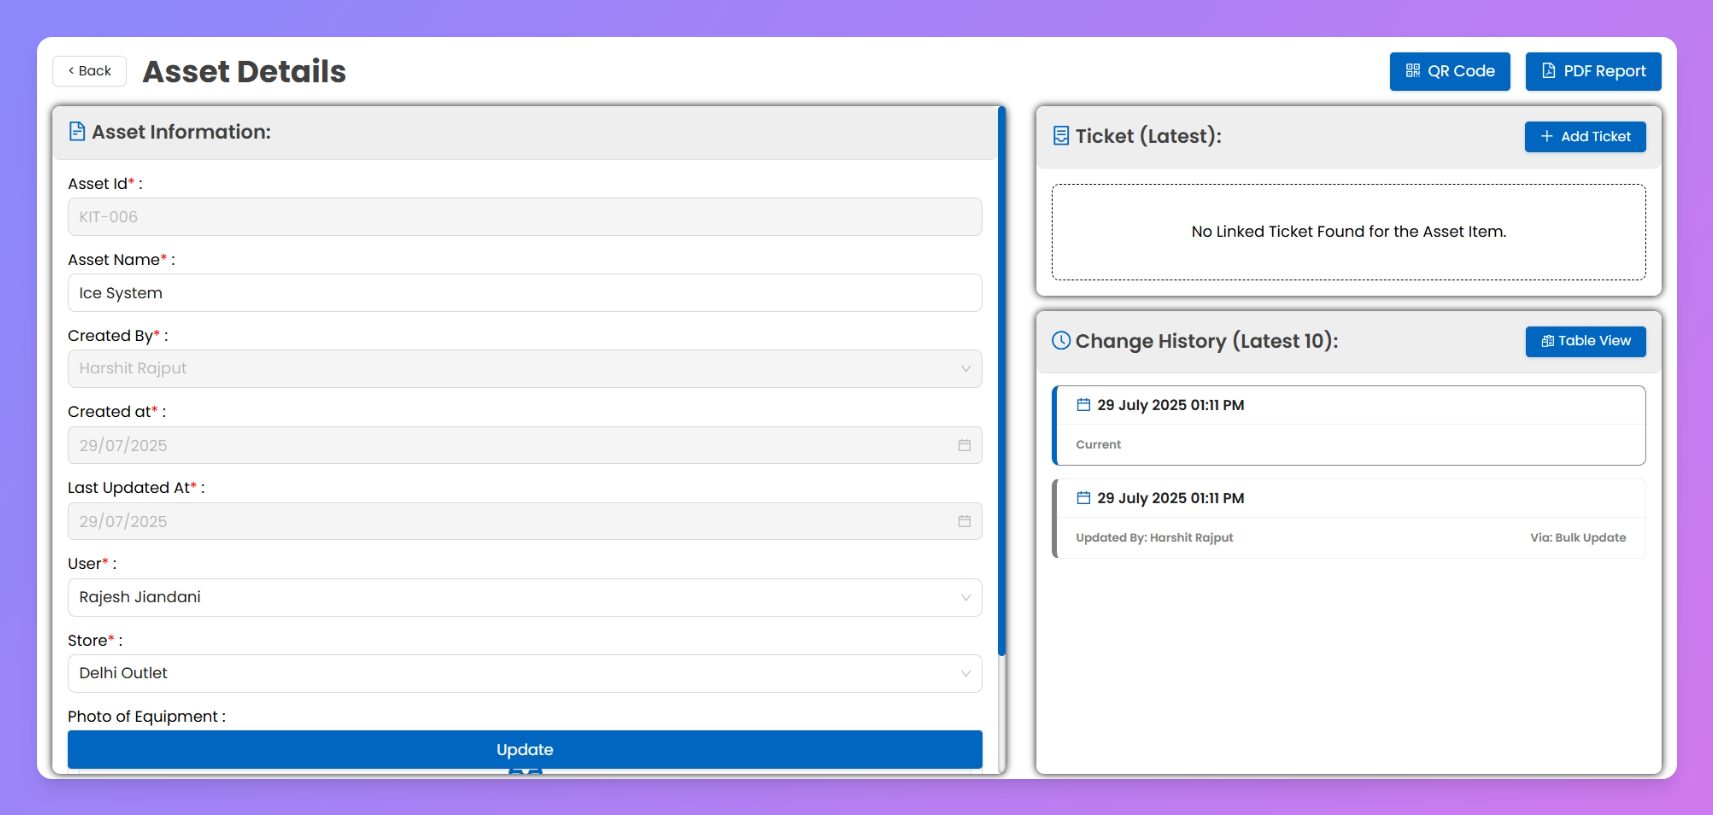
View Full Asset Details
Sometimes you need to drill down into a specific asset for more context. The Asset Details view gives you the complete picture of a single asset item — including its ID, name, store, creator info, and linked data.
You can get here in two ways:
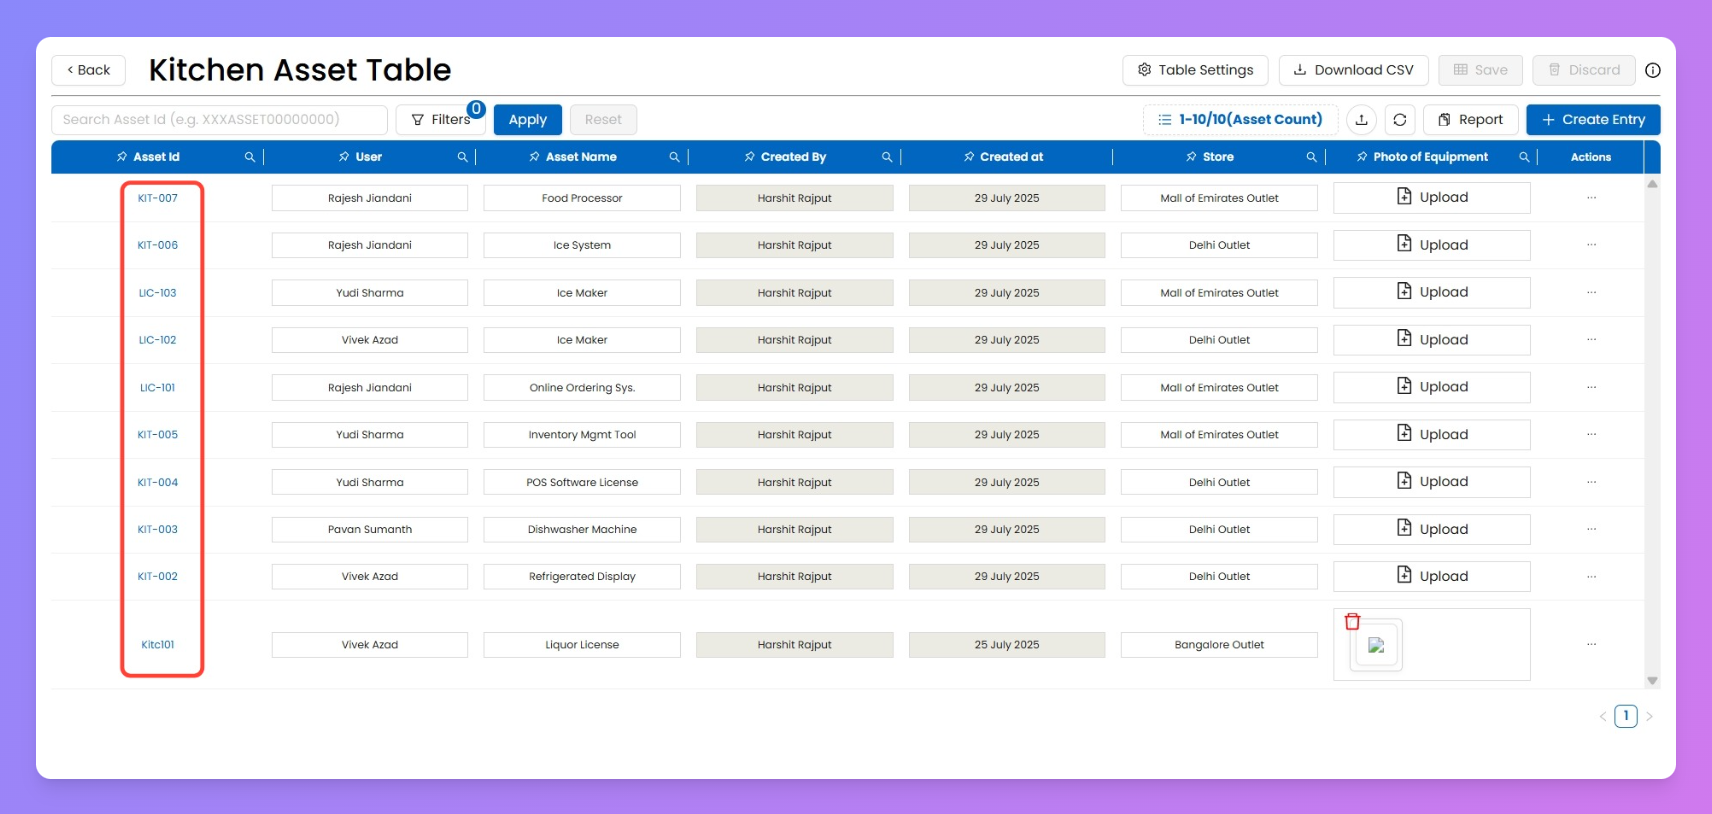
1. Click on the Asset ID
- From your Asset Table, click directly on the Asset ID in the first column.
- This instantly opens the full details for that specific asset.
2. Use the View Option
- On the right-hand Action column of your Asset Table, click View.
- You’ll be taken to the Asset Details page for the selected entry.
💡 Pro Tip: Asset Details is your go-to place to see everything about a specific asset in one screen like raising tickets and checking history etc.
Download CSV Report
Need an offline copy of your asset data? With just one click, you can download a CSV file containing all the fields currently configured in your Asset Table. This export makes it easy to share, analyze, or back up your asset info outside of Taqtics.
How to Download
- Go to your Asset Table.
- On the top-right, click Download CSV.
- The system instantly generates a CSV file with all fields (default + any custom fields you added).
- Open the file in Excel to view or analyze.
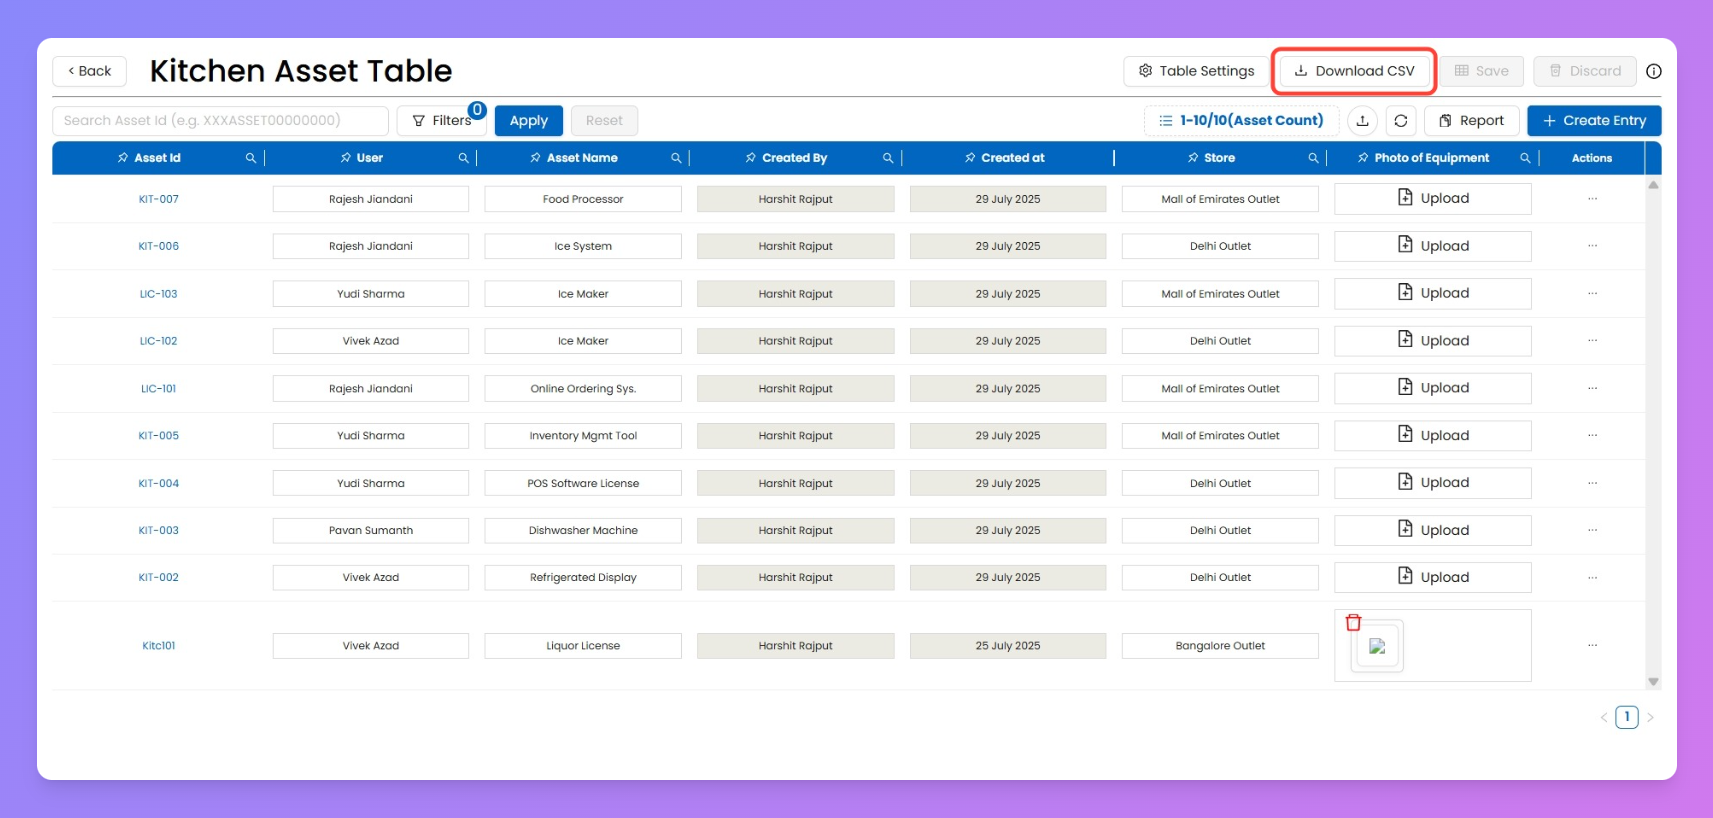
Note: The CSV will mirror your Asset Table setup — so any fields you’ve added (like Vendor, Expiry Date, or Location) will appear in the export automatically.
Configure Column View of Asset Table
Make your Asset Table work your way! You can control which columns show up, reorder them, and hide the ones you don’t need — so your view stays clean and focused.
How to Configure Columns
- Go to your Asset Table.
- Click on Table Settings (top-right).
- In the Column Display & Order Configuration popup:
- Reorder Columns: Drag and drop columns up or down to set the order.
- Show/Hide Columns: Use the checkboxes to select which fields should appear.
📌 Note: Asset ID is always pinned as the first column — it can’t be moved or hidden.
- Click Save to apply changes.