
Before assigning tasks or launching any workflows, your platform needs people — that’s where this section comes in. You’ll define who’s part of your team, map them to the right stores, and make sure each user has a designation that matches your org’s real-life structure.
Taqtics lets you manage users, designations, teams, and even custom tags — all under one roof. This is the foundation for everything you’ll do inside the platform.
Create your Store Designations
Store designations let you map your company’s roles (like Cashier, Store Manager, Visual Merchandiser) against Taqtics Roles. This ensures every designation has the right level of access inside the platform.
View & Manage Designations
- From Creator Mode → to Manage Users → Designation.
- You’ll see a grid of all designations, their reporting designation, and their mapped Taqtics Role (e.g.,
admin,storeManager,storeEmployee).
- From here, you can edit ✏️ or delete 🗑️ existing designations.
To learn about Taqtics Roles - click here 👉 Feature permission by designations
Add a New Designation
- Click + Add Designation.
- Enter:
- Designation → Name of the role (e.g., Cash Supervisor).
- Reporting Designation → Who this role reports to (optional).
- Role → Choose from system roles (
admin,storeManager,storeEmployee,nonCreatorCompanyAdmin).
- Click Create Designation.
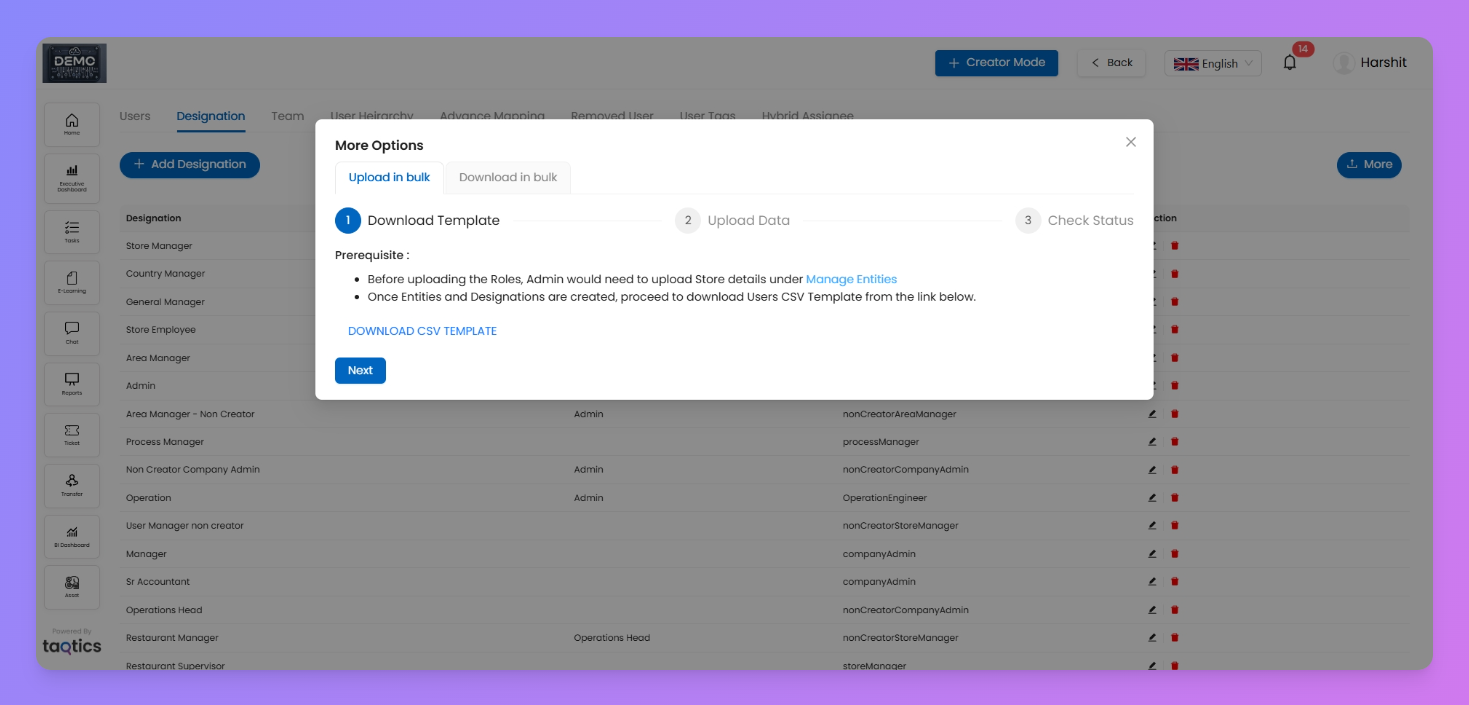
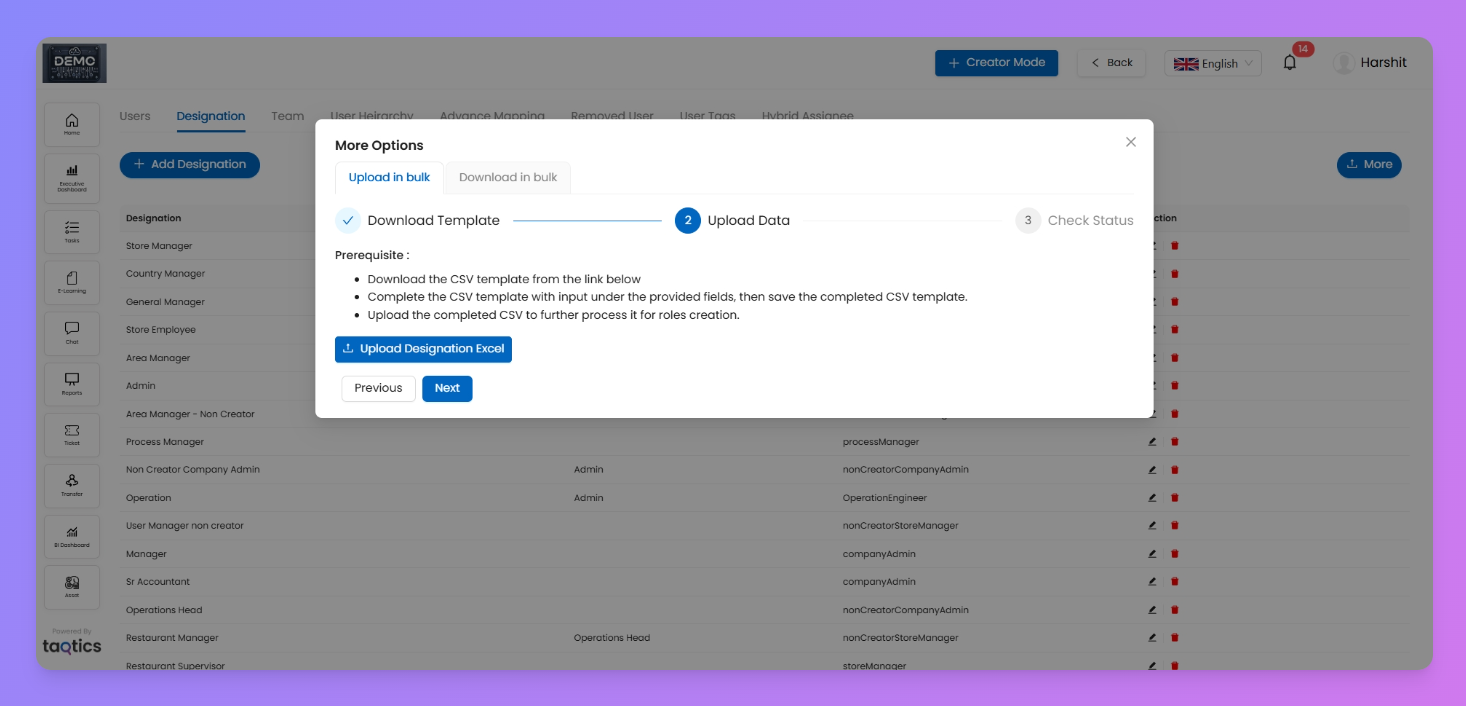
Bulk Upload Designations
- Click More → Upload in Bulk.
- Follow the 3 steps:
- Download CSV Template → Fill in your designation details.
- Upload Data → Import your completed CSV.
- Check Status → Review if the upload was successful.
Create and Configure Users
Once your entities and designations are ready, it’s time to bring in your team. Creating a user in Taqtics isn’t just about filling a form — you also decide whether they’ll get login access, assign them checklists, and tag them for filters.
How to Create a New User
- Go to Creator Mode → click on Manage Users
- Click the
+ Add Userbutton
- Start filling out the user form:
Field | Required? | Notes |
Entity | ✅ | Select the store/unit |
Name | ✅ | Enter full name |
Employee ID | ❌ | Optional field |
Email | ✅ | Add email address |
Valid Email | Toggle | If ON → user will receive email login link. If OFF → you must set a default password |
Password | Auto | Visible only if Valid Email is OFF |
Phone Number | ❌ | Optional |
❌ | Optional field | |
Designation | ✅ | Must be pre-created |
Assign Processes | Optional | Select checklists directly, if already created, to assign to the user |
Optional | Choose from any existing user-level tags |
- Once all fields are done, click
Create User
🔐 Valid Email ON = user sets their own password through the mail sent on their email🔒 Valid Email OFF = you set the default login.
When editing a newly created user without a Manager assigned, the Manager field will now be mandatory. You’ll be prompted to fill in the reporting manager before saving.
Important:
Creating designations, adding your users, and setting up your stores are the minimum steps needed to start using Taqtics.
Once these are in place, you’ve got your people and stores inside the platform — ready to be assigned to processes, audits, courses, or asset items.
Create and Manage User Teams
Teams help you group users under a shared label — like
East Zonal Team, Store Ops Leads, or Audit Team. You can use these later for assignments of issue tickets and asset tickets.Steps to Create a Team
- Tap on Creator Mode (top-right of your screen)
- Head to Teams tab under Manage Users
- Click ➕ Create New Team
- In the popup:
- Give your team a name
- Pick users to add into the team
- Hit Create — and you're done
You’ll see the team listed right below, with options to edit or delete anytime.
Customize User Table Columns
You can choose which fields to display in your User Table to match your needs.
How to Select Fields
- Go to Creator Mode → Manage Users.
- Click the Settings icon (⚙️) on the top right of the user grid.
- A pop-up will appear listing all available fields.
- Tick the boxes for the fields you want to see.
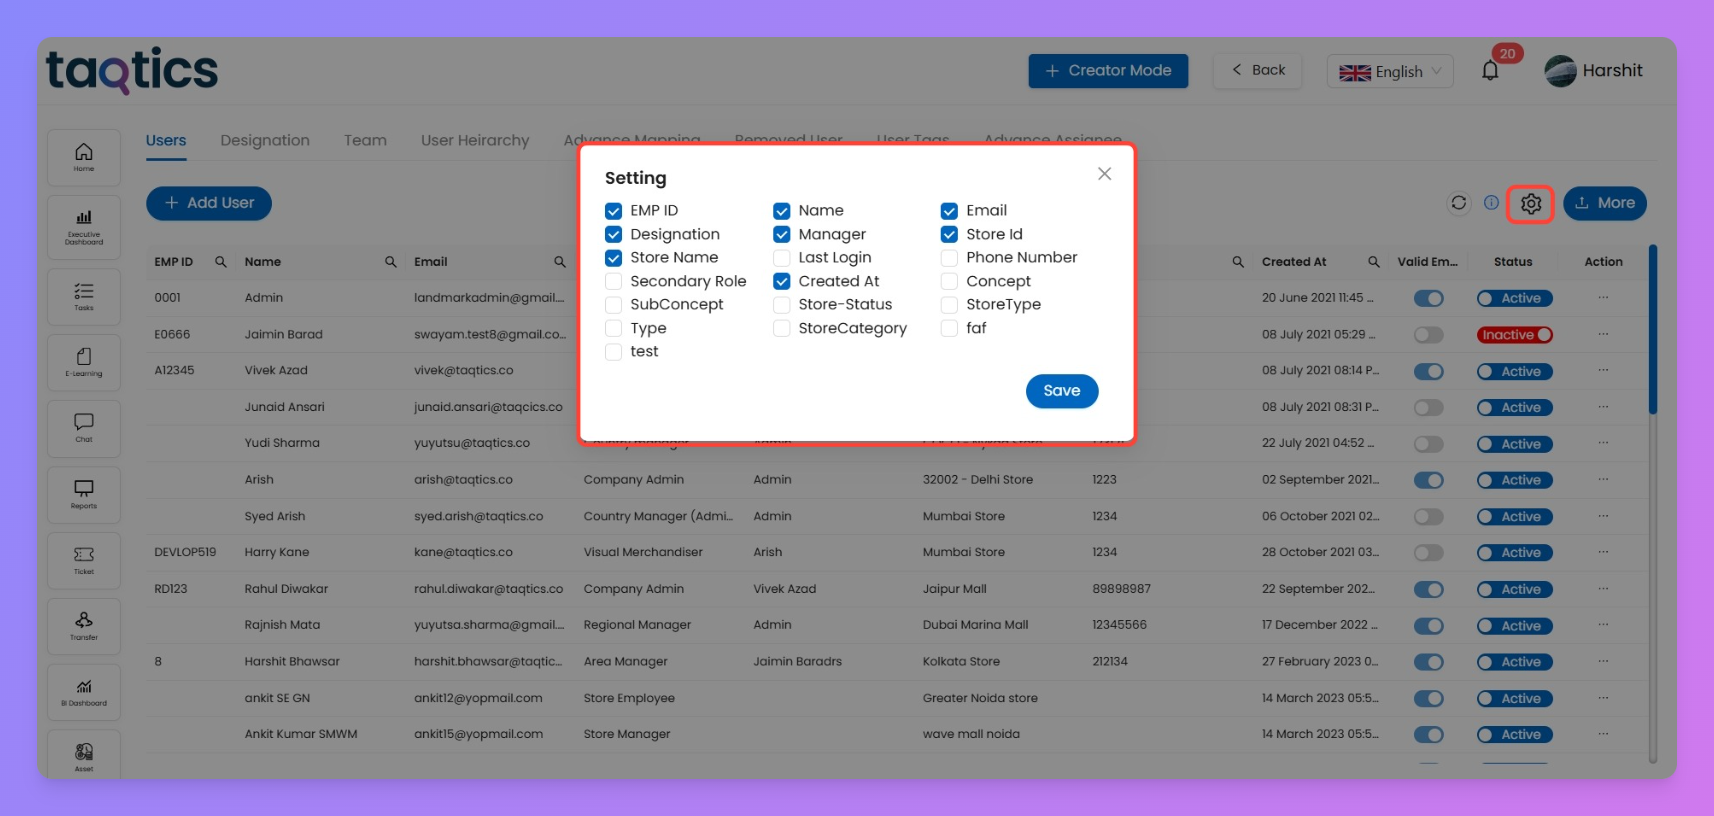
- Click Save to apply changes.
Important
- You can select a maximum of 8 fields at a time.
- Changes are applied instantly to your current view.
Give Users Access to More Store Reports
This feature lets you give a user access to store-level reports (Processes or Audits) even if those items are not directly assigned to them.
Once mapped, the user will be able to view submission data for the selected stores under Store Reports in their My Reports section.
When to use this
- A user needs to view reports for additional stores that are not in their default mapped list.
- An Area Manager, for example, already has access to 5 mapped stores but wants to review reports for 3 more stores managed by someone else.
This mapping does not assign any processes or audits to them — it only grants report access.
Steps to Give Report Access
- Go to Creator Mode.
- Open Manage Users.
- Select the Advance Mapping tab.
- Find and select the user you want to map.
- Choose the additional stores they should have report access to.
- Save the mapping.
Note: Any mapping changes will be reflected in the reports within 24 hours.
💡 Tip:
If you want a user to get the report for a specific process only (instead of all processes for a store), assign them as a Process Manager for that process.
User Hierarchy
The User Hierarchy is an automatically generated tree view that shows the reporting structure of all users in your organization.
How it Works
- When creating a new user, the Manager field is optional.
- When editing an existing user, the Manager field becomes mandatory.
- Any user without a manager will appear in the Admin hierarchy (leftmost column).
- Any user with a manager assigned will appear under that manager’s branch in the hierarchy.
- The blue tag next to each name shows their Designation.
Sample Hierarchy
plain textAdmin (Taqtics Admin) │ └── Vivek Azad (Area Admin) │ │ │ ├── Rahul Diwakar (Regional Manager) │ │ │ │ │ └── Jaimin Barad (Showroom Manager) │ │ │ │ │ └── Harshit Bhawsar (Store Manager) │ │ │ └── Meet Kapadia (Store Admin) │ ├── Yudi Sharma (Country Manager) │ ├── Arish (Company Manager) │ │ │ └── Syed Arish (Accountant Manager) │ ├── Rajnish Mata (Regional Manager) │ ├── Nadeem E (Showroom Manager) │ ├── John Doe (Showroom Manager)
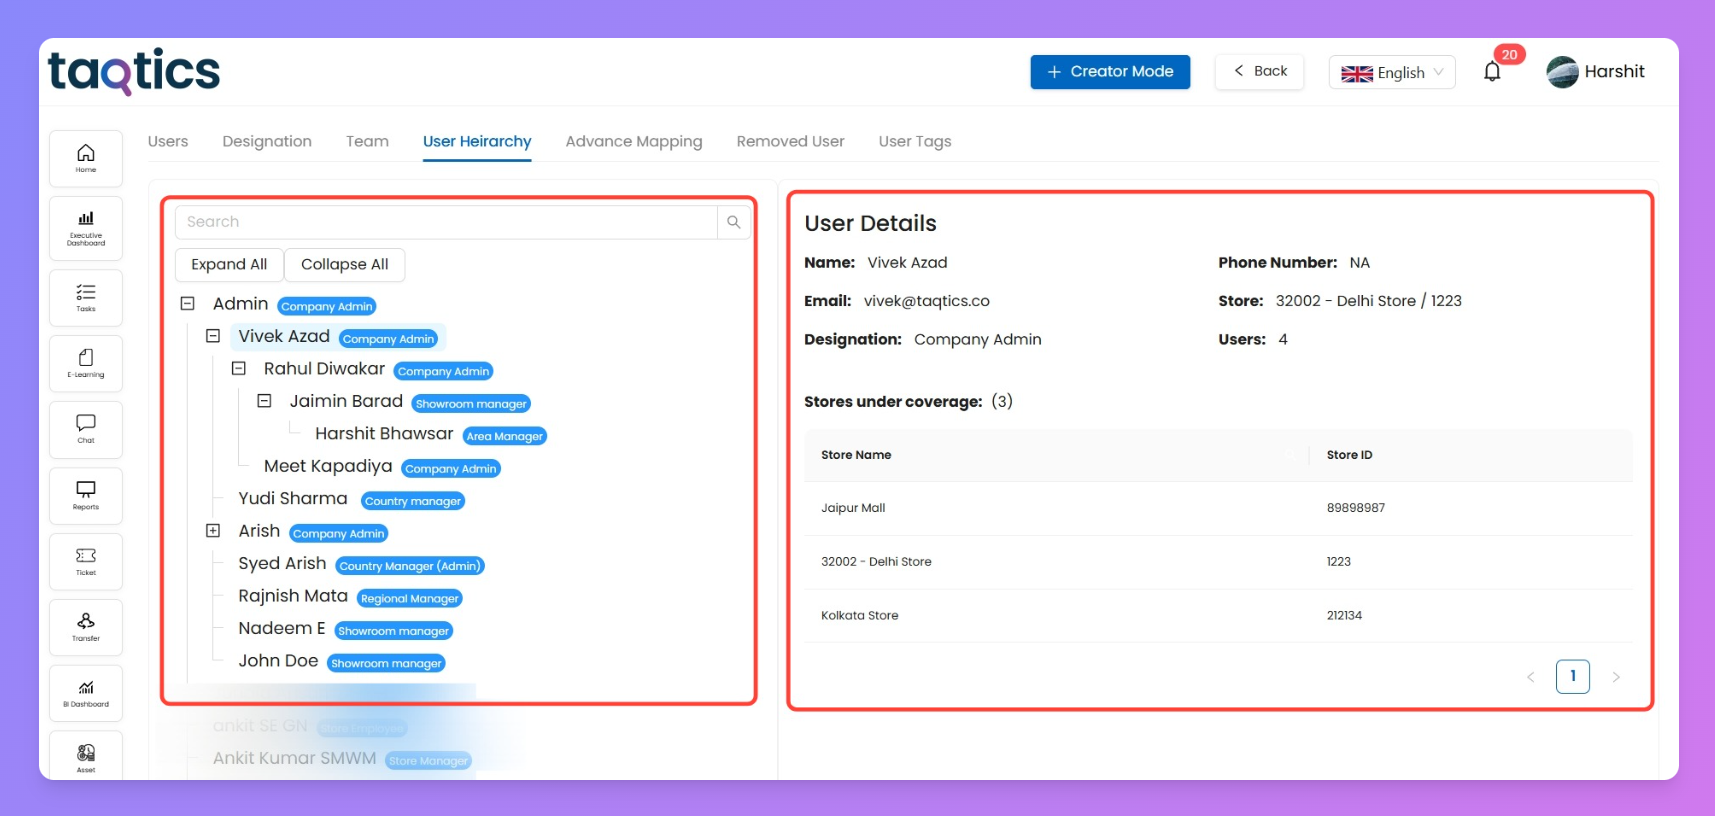
User Details in the Hierarchy
When you click on any user inside the User Hierarchy, their User Details panel opens on the right-hand side.
What You’ll See
- User Info (Top Panel)
- Name – The selected user’s full name.
- Email – The registered email ID.
- Designation – The role assigned to the user.
- Store – The store they are primarily mapped to.
- Users – The number of direct reports (people mapped under them).
- Stores Under Coverage (Bottom Table)
- Shows all stores covered by the user, based on the hierarchy.
Coverage means the user has reporting access to the stores their direct and indirect reports belong to.
Example
If you click on Vivek Azad in the hierarchy:
- The User Details panel shows Vivek’s basic info and the number of users under him.
- The Stores Under Coverage table lists Jaipur Mall, Delhi Store, and Kolkata Store.
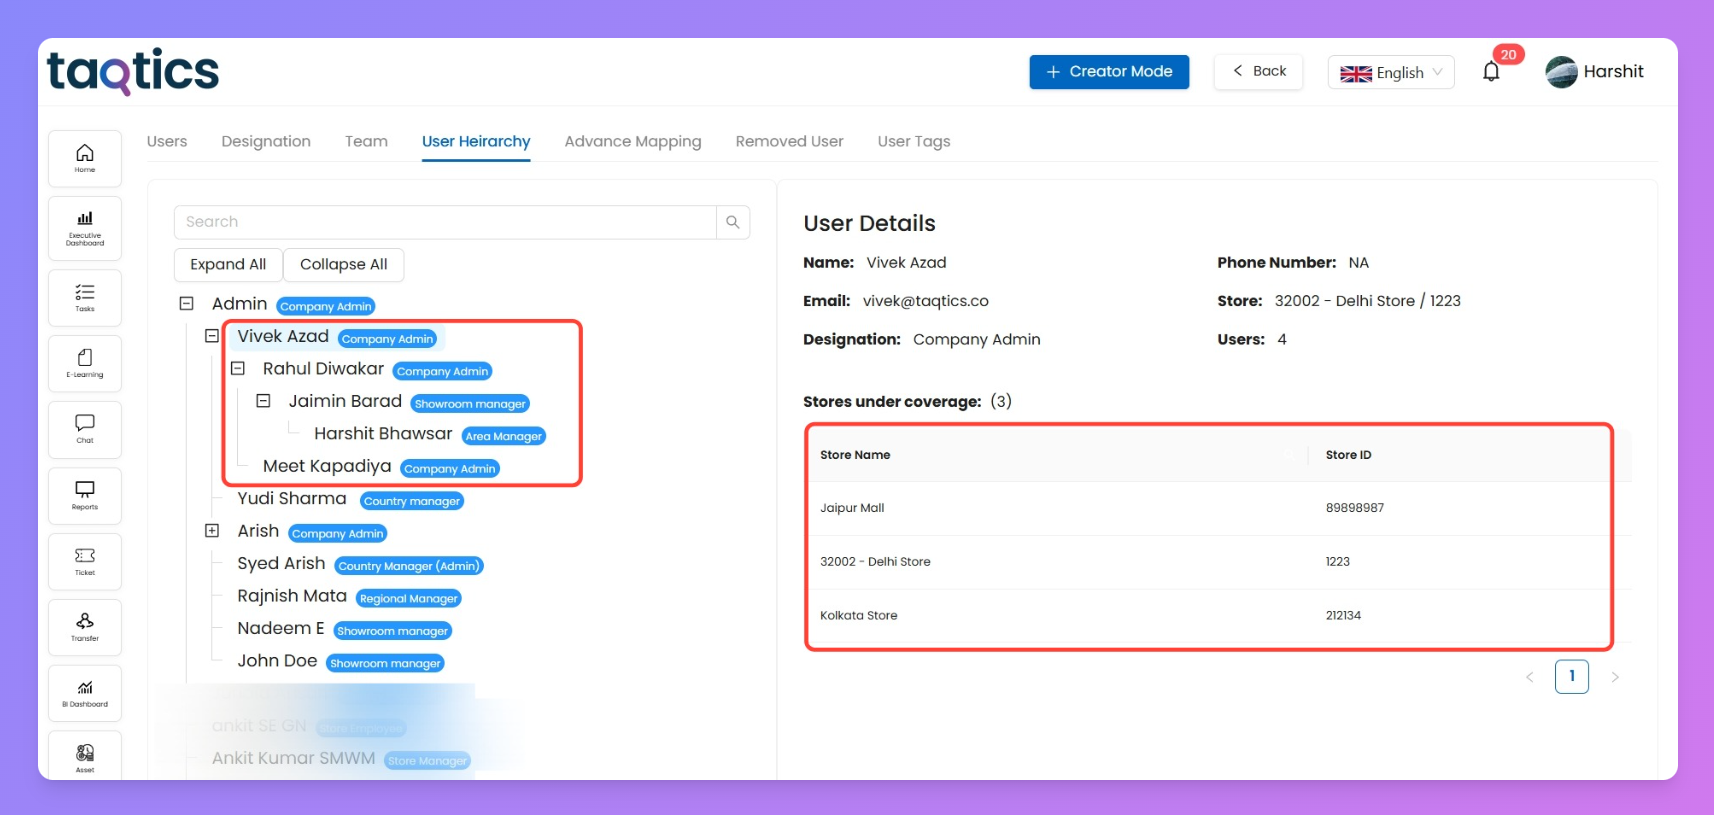
- This means:
- Rahul Diwakar, Jaimin Barad, Harshit Bhawsar and Meet Kapadia (under Vivek in the hierarchy) are mapped to these respective stores.
- Vivek automatically gets coverage of these stores and can view their Store Reports without being directly assigned to each store.
If a user appears directly under Admin with no manager assigned, it means they are not reporting to anyone in the hierarchy. Assigning a manager later will automatically move them to the correct branch.
Create and Manage User Tags
User Tags help you add extra, flexible labels to your users — like
Trained, Region, Certification, or Outlet Type. You define both the tag name and the values allowed under that tag (like Yes/No, or a list of regions).Once configured, these tags will appear as fields when creating or editing a certificate — so you can tag them the way your org needs.
Steps to Create a User Tag
- Log in to Taqtics
- Click on Creator Mode (top-right)
- Go to Manage Users → open the User Tags tab
- Click ➕ Create New Tag
- Enter the tag name (e.g.,
Trained,Zone,Certified)
- Add the values you want under the tag (like
Yes/No, orNorth/South/East/West)
- Toggle ON if the tag should be mandatory during user creation
- Hit Create
Once done, the tag will appear as a dropdown field while creating or editing users.
View Removed Users (Read-Only)
Once a user is removed from your organisation, their details aren’t lost — they move to the Removed Users list.
This section works as a read-only archive, so you can always check which users were removed and when.
What you’ll see here
Each removed user appears in rows with these details:
Column Name | What it Means |
Name | The name of the removed user |
Email | User’s registered email address |
Designation | The role assigned to the user (e.g., Store Manager, Admin) |
Manager | The reporting manager linked to the user |
Store ID | ID of the store the user was mapped to |
Store Name | Name of the store the user was mapped to |
Last Login | Last login date and time before removal |
Deleted On | Timestamp when the user was removed |
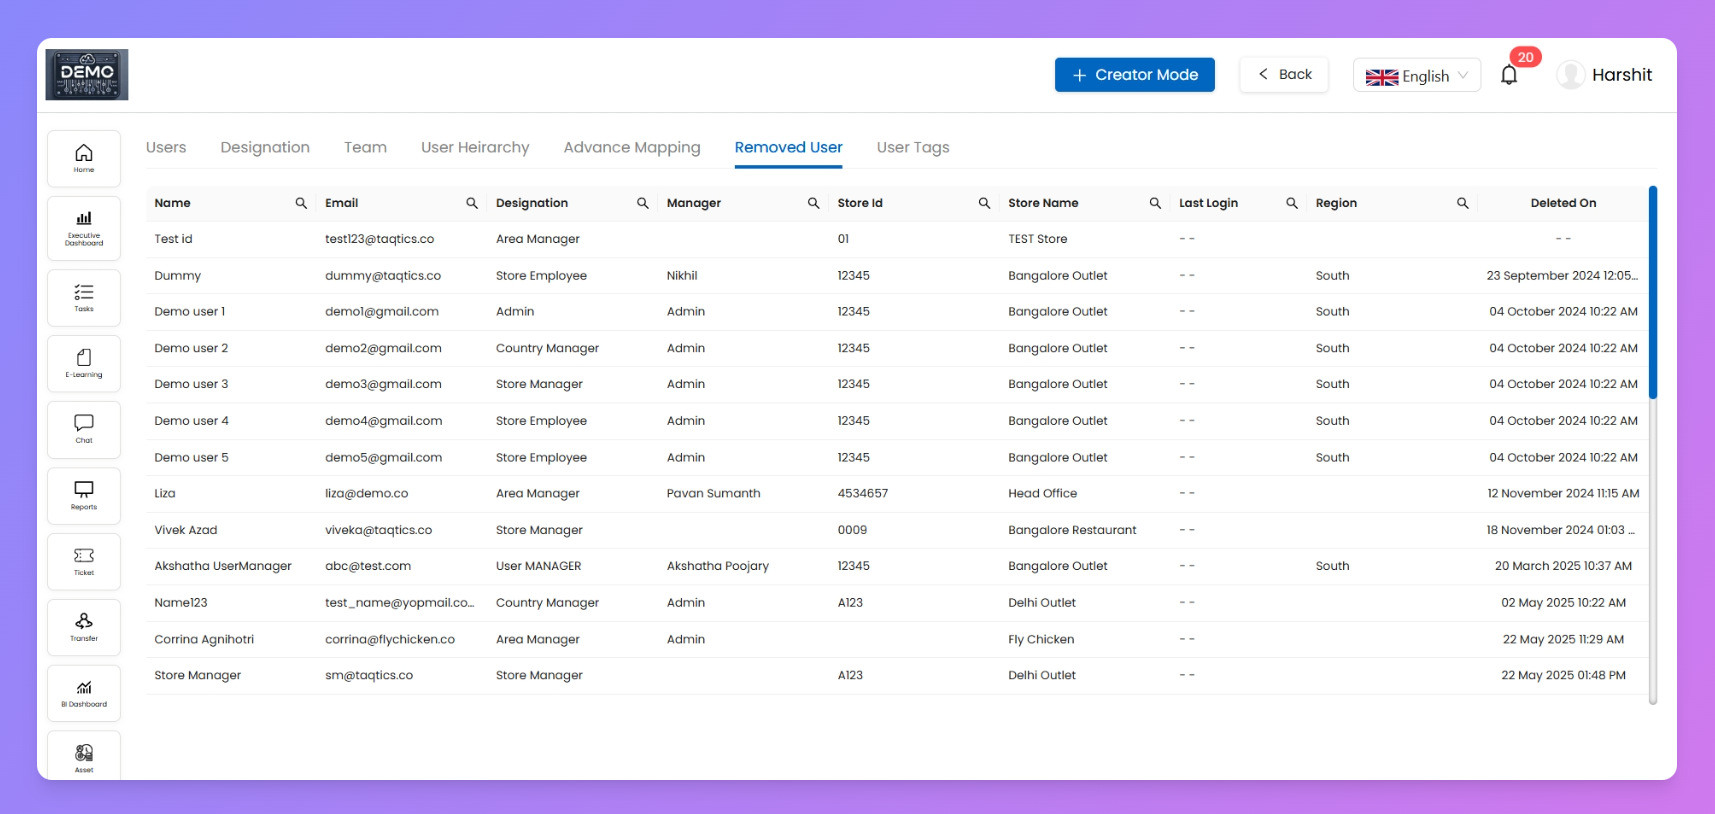
ℹ️ Note:
This is a view-only table. You can’t restore a user from here — it’s meant for audit and recordkeeping purposes.
Hybrid Assignee Profile
The Hybrid Assignee Profile lets you manage store-level assignments in a flexible way. Instead of assigning only by user, designation, or team, you can now create profiles that map users to stores and roles. This makes it easier to ensure the right person gets the right task.
You can use Hybrid Assignee Profiles for:
- Process Approvals
- Action Point Assignees
- Action Point Closures
Why Hybrid Assignee?
Earlier, assignments were limited:
- User-specific → fixed list of users.
- Designation-specific → fixed role across all stores.
- Team-specific → fixed team regardless of store.
With Hybrid Profiles, you can now configure different users for different stores under the same profile. Example:
- Store A & B → Area Manager gets Action Points.
- Store C → Store Manager gets Action Points.
Set Up & Manage a Hybrid Profile
- Go to Manage Users → Hybrid Assignee.
- Click + Add Profile → give your profile a name. (e.g., Operations Team, HR Team, Line Managers).
- Your profile will now appear in the grid. Click the ⚙️ Settings button beside the profile name to configure it.
- On the settings screen, you’ll see three tabs:
- Individual Assignment
- Bulk Assignment → Select users + stores → click Bulk Assign.
- Quick Assign by Designation → Pick a designation + stores → users with that designation get assigned automatically.
- Common Assignment
- Select a user → click Add Common Assignee. That user is mapped to all stores.
- Miscellaneous Settings
- Rename your Hybrid Assignee Profile anytime.
- At the bottom, you’ll see:
- Save → Save your changes.
- Copy Profile → Creates a duplicate of the same profile in the grid.
- Remove Profile → Deletes the profile.
- Cancel → Discards changes and returns to grid.
👉 After saving, don’t forget to click Publish to activate the profile
How It Works in Assignments
- Process Approvals → Select Hybrid Profile as the approver group.
- Action Point Assignee → Assign Action Points to the profile instead of fixed users/designations.
- Action Point Closure → Define who can close based on store-specific profiles.
⚡ Note: Hybrid Assignee Profile works alongside existing assignment methods. If selected, it takes top priority.