
Before you start rolling out checklists, audits, or any operational workflows in Taqtics, you first need to define where the work happens — your stores or entities. In this section, you’ll create your organizational locations and customize them further using tags. Tags help you group, filter, and analyze store performance across different dimensions like region, format, or operational status. From store creation to tagging, this is your first step to getting Taqtics tailored to your real-world structure.
How to Reach This Page
This step is common for managing Entities, Tags, and Removed Entities.
- Log in to your Taqtics account.
- Click on the Creator Mode (top-right corner).
- Go to the Admin Studio column.
- Click on Manage Entity.
You'll now land on the main page to manage your organization’s store-level structure.
Create Your Entity (Store/Unit/Location)
This section helps you set up each store or unit as an "Entity" inside Taqtics. Once created, these entities become assignable units for processes, audits, tickets, and reports.
Steps to Create an Entity:
- On the Manage Entity screen, click the Entity tab (if not already selected).
- Click on
➕ Add Entity.
- Fill out the entity creation form with the following details:
Field | Description |
Entity Name | Store or unit name (e.g., Pune Flagship Store) |
Entity ID | Optional ID But important for Asset Bulk upload |
Address, Area, City, State, Country | Location details |
Longitude & Latitude | Helps with geo-verification (optional but recommended) |
Store Radius | Must be between 100 to 1000 meters – defines the valid submission boundary |
Add Tags to the Entity (Optional)
If your organization has created custom tags (e.g., Zone, Category), those will be available to select as well. Want to learn how to create custom tags?
- Once done, hit
Create Entity. Your entity will now be visible across process assignment, reporting, and more.
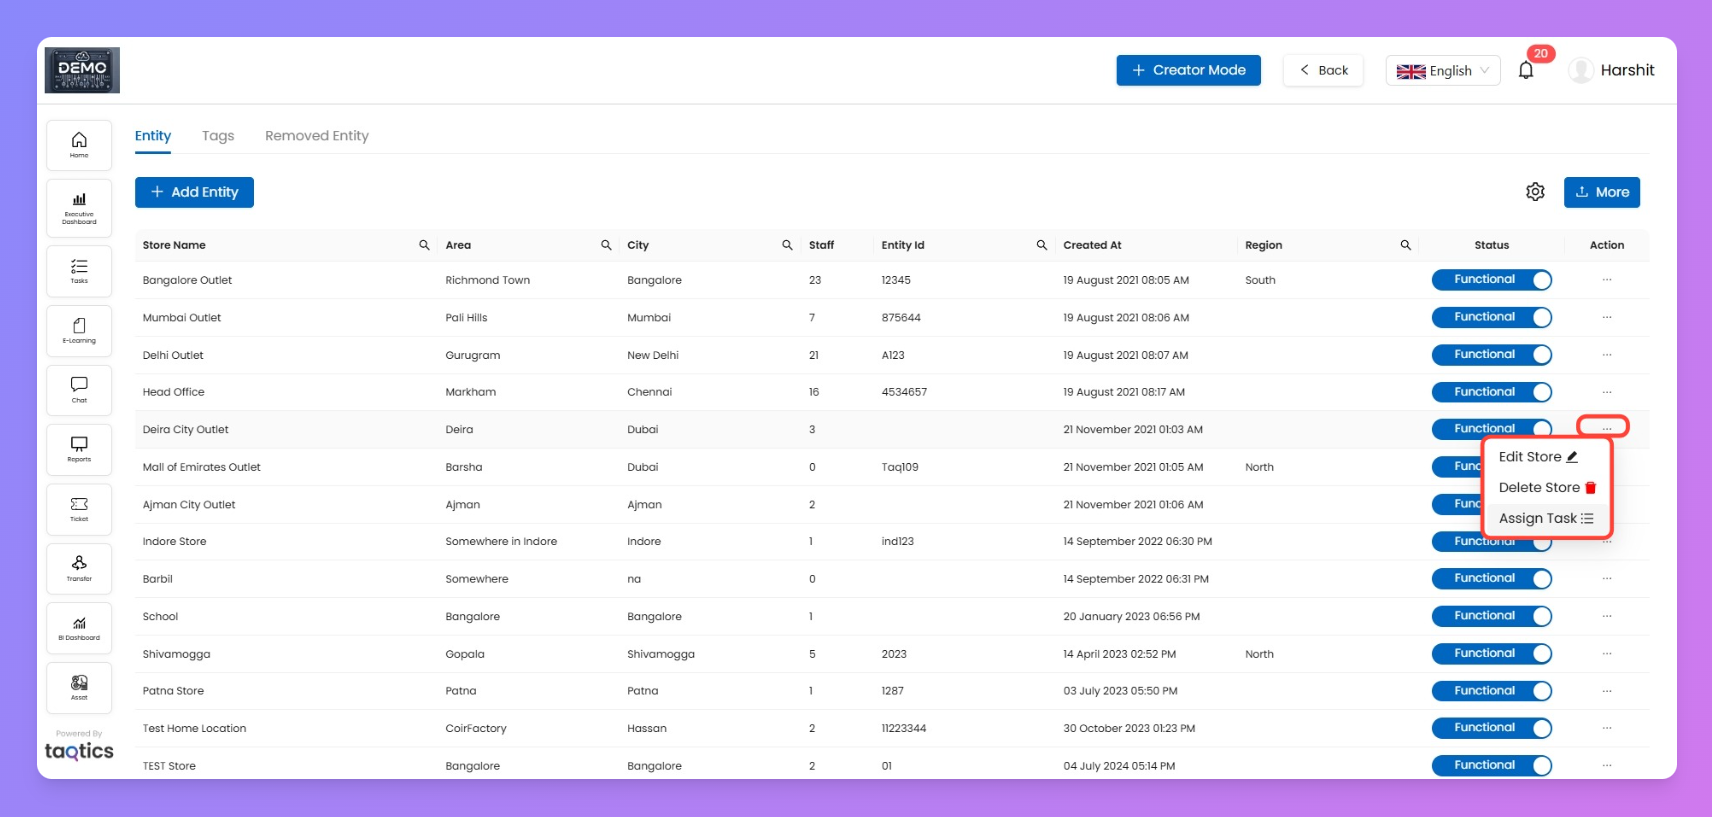
Store Actions Menu
From the Entity page, click the … button in the Actions column to manage a store.
Available Options
- Edit Store
- Update the store’s details such as name, area, city, or any other field.
- Delete Store
- Permanently removes the store from the active list.
- The deleted store will move to the Removed Entity tab and can be restored if needed.
- Assign Task
- Add or remove checklists (processes or audits) for that store.
- If no processes are currently assigned, the dialog will appear empty.
Assign or Unassign Tasks to a Store
From the Entity page you can quickly add/remove checklists (processes or audits) for a store—no need to open each checklist.
How to Use
- Go to Entity and find the store.
- In Actions, click … → Assign Task.
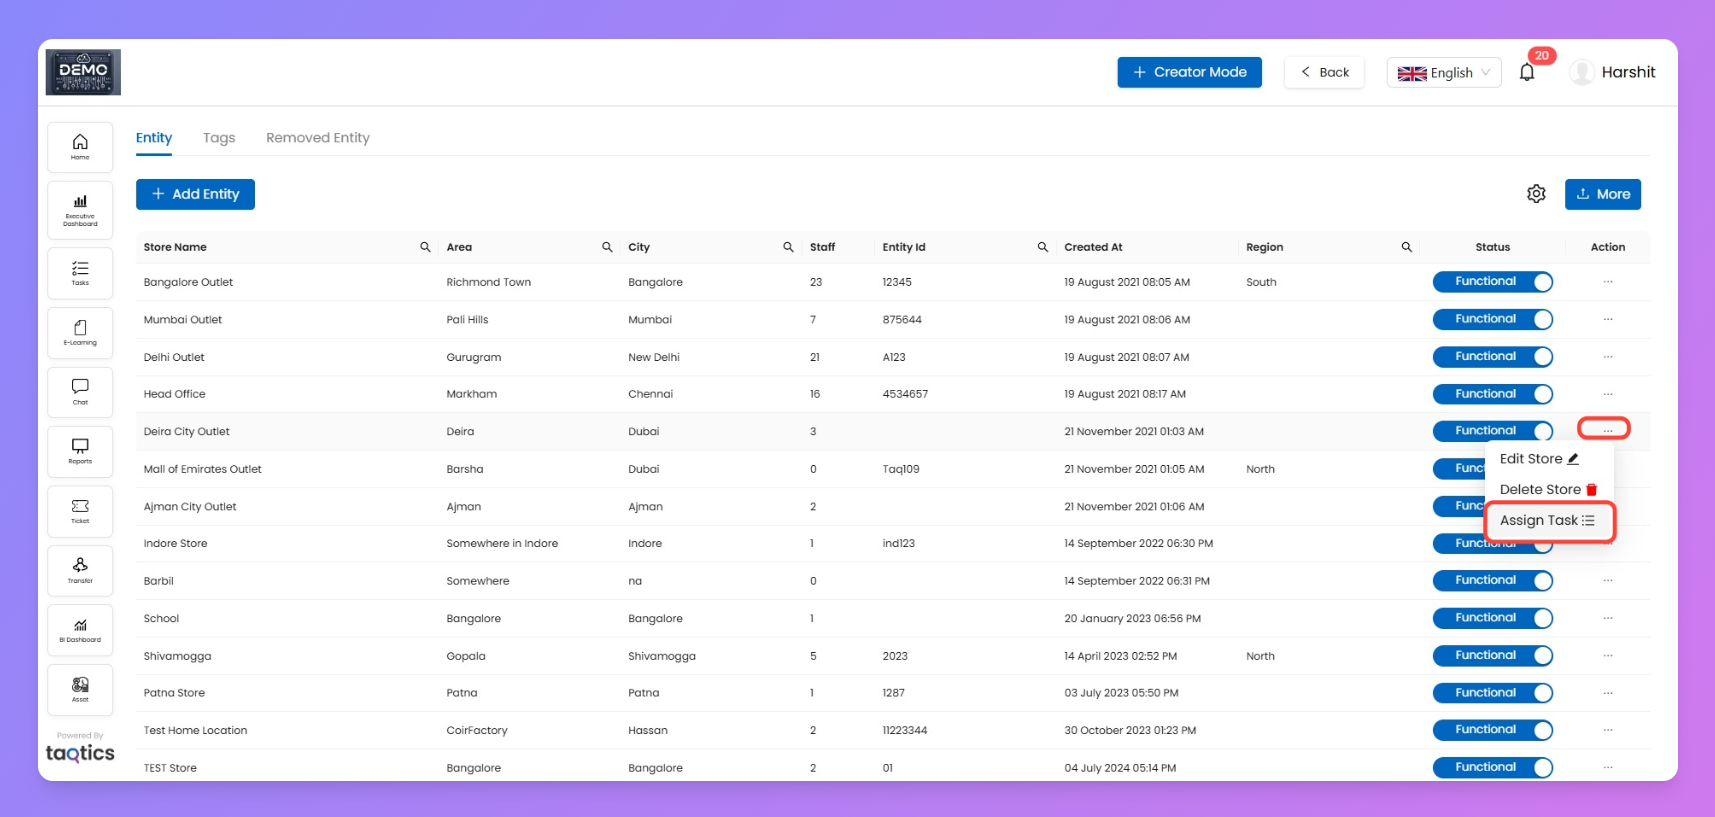
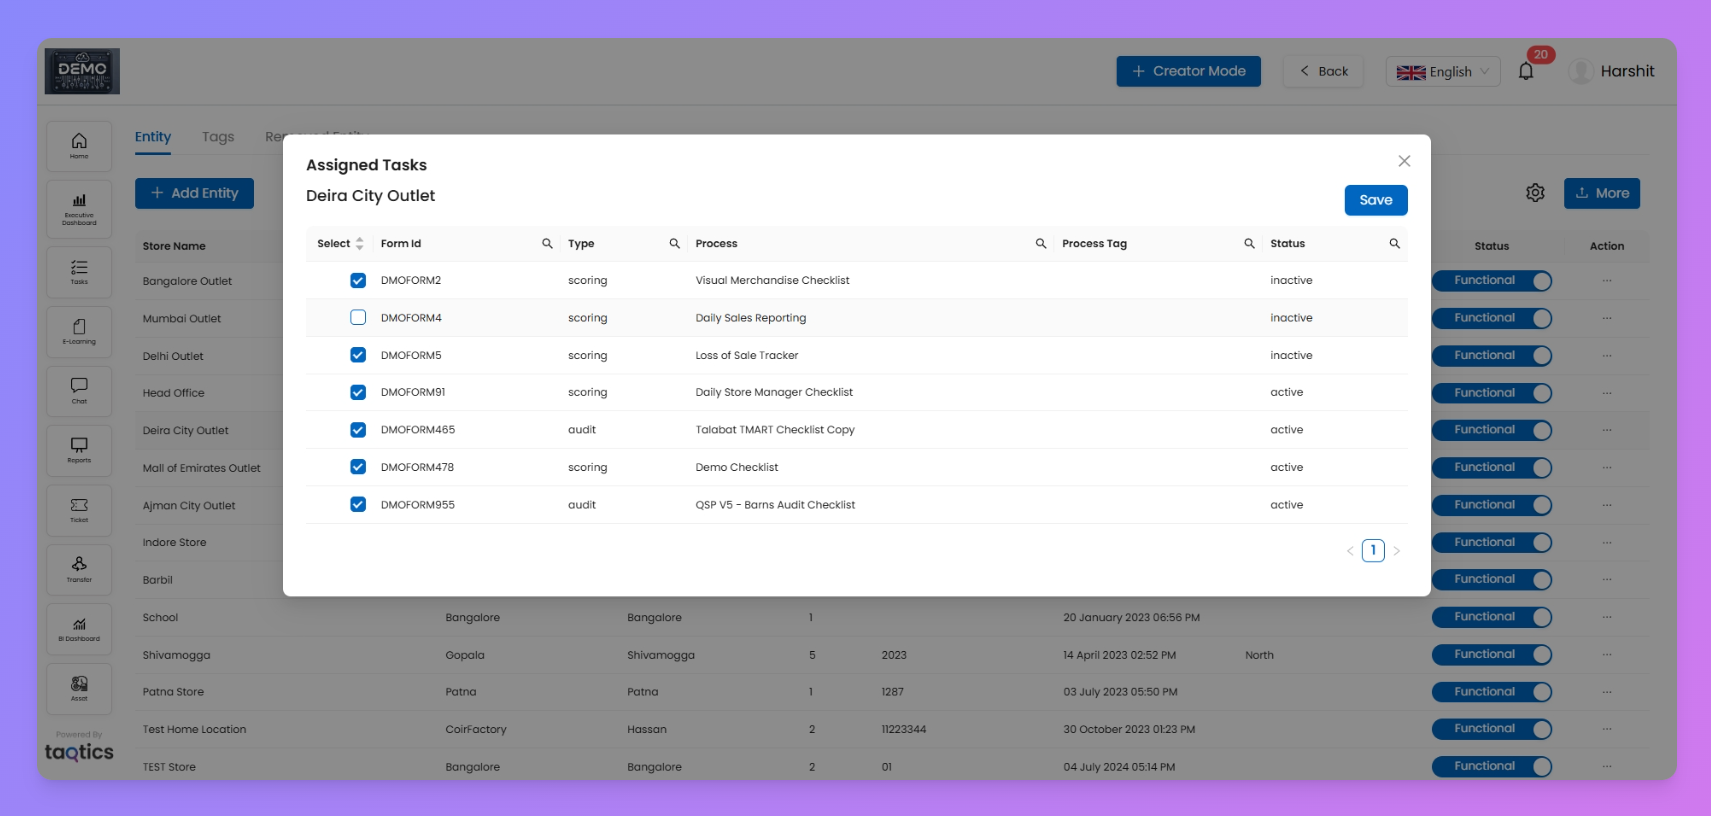
- In the popup, check ✅ a checklist to assign it to the store or uncheck ❌ to remove it.
- Click Save.
Note
- If no processes are currently assigned to that store, the checklist dialog will appear empty.
Store Status
- Functional – It remains visible across features, including Executive Dashboard and Heat Map creation.
- Non-Functional – The store is inactive and will be excluded from the Executive Dashboard and Heat Map creation.
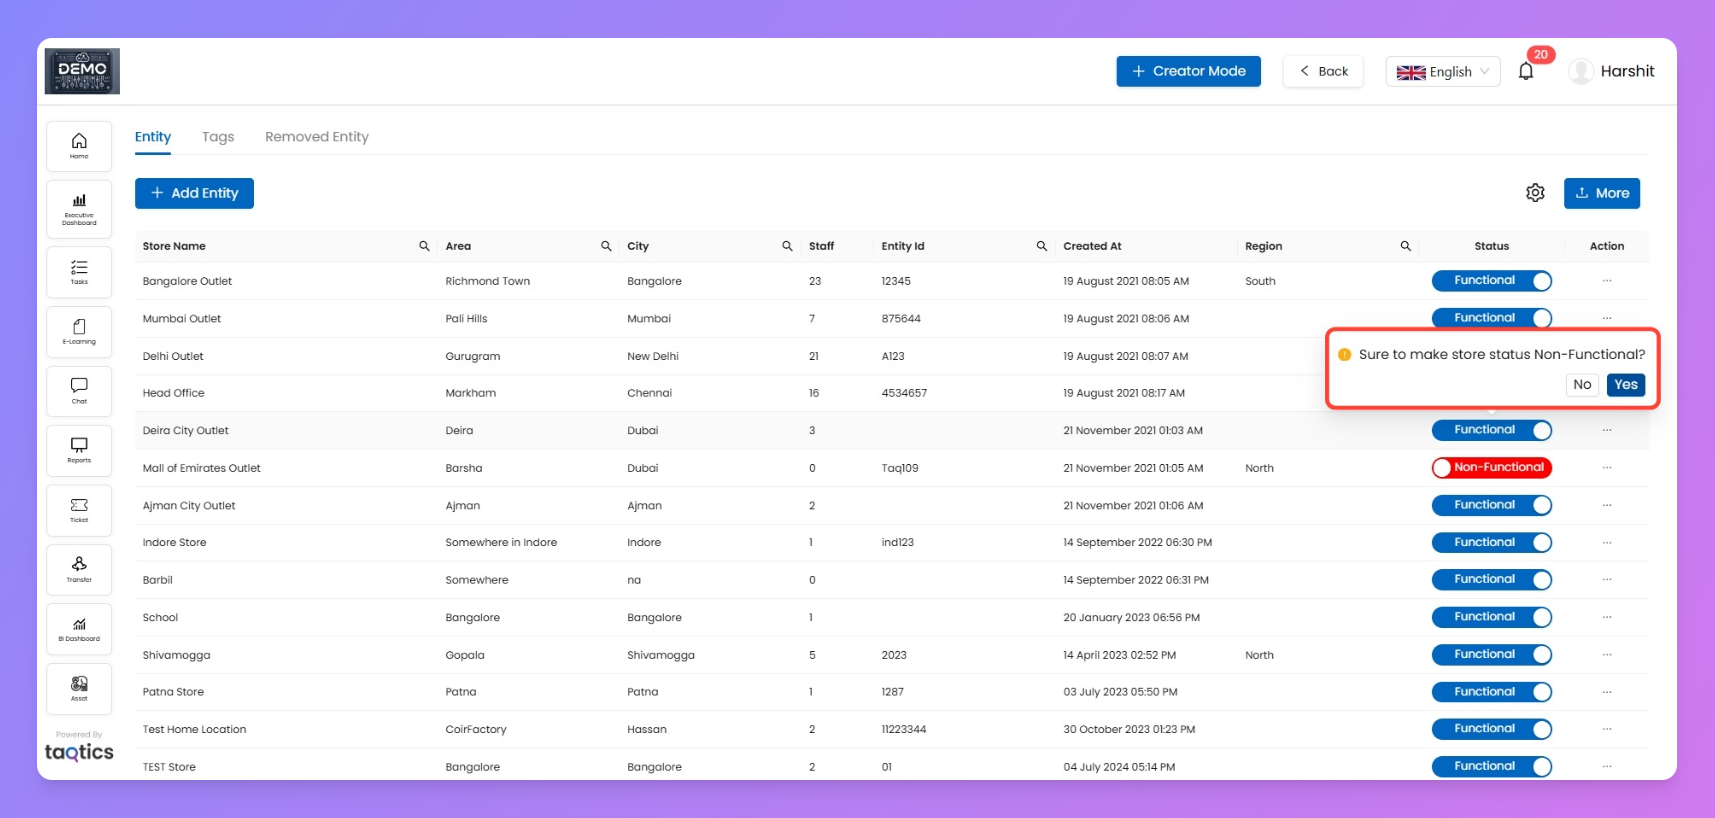
Important
- Switching a store to Non-Functional does not automatically remove its assigned processes.
- If you want the store to stop receiving active tasks, you must manually unassign those processes using the Assign Task option in the Actions menu.
Customize Store Table Columns
You can customize the columns visible in your Stores grid table to match the information you need.
How to Select Fields
- Click the Settings (⚙) icon on the top right of the store list.
- A list of available fields will appear (e.g., Store Name, Country, Area, City, Staff, Entity ID, etc.).
- Tick the checkboxes for the fields you want to display in your grid.
- Click Save to update your view.
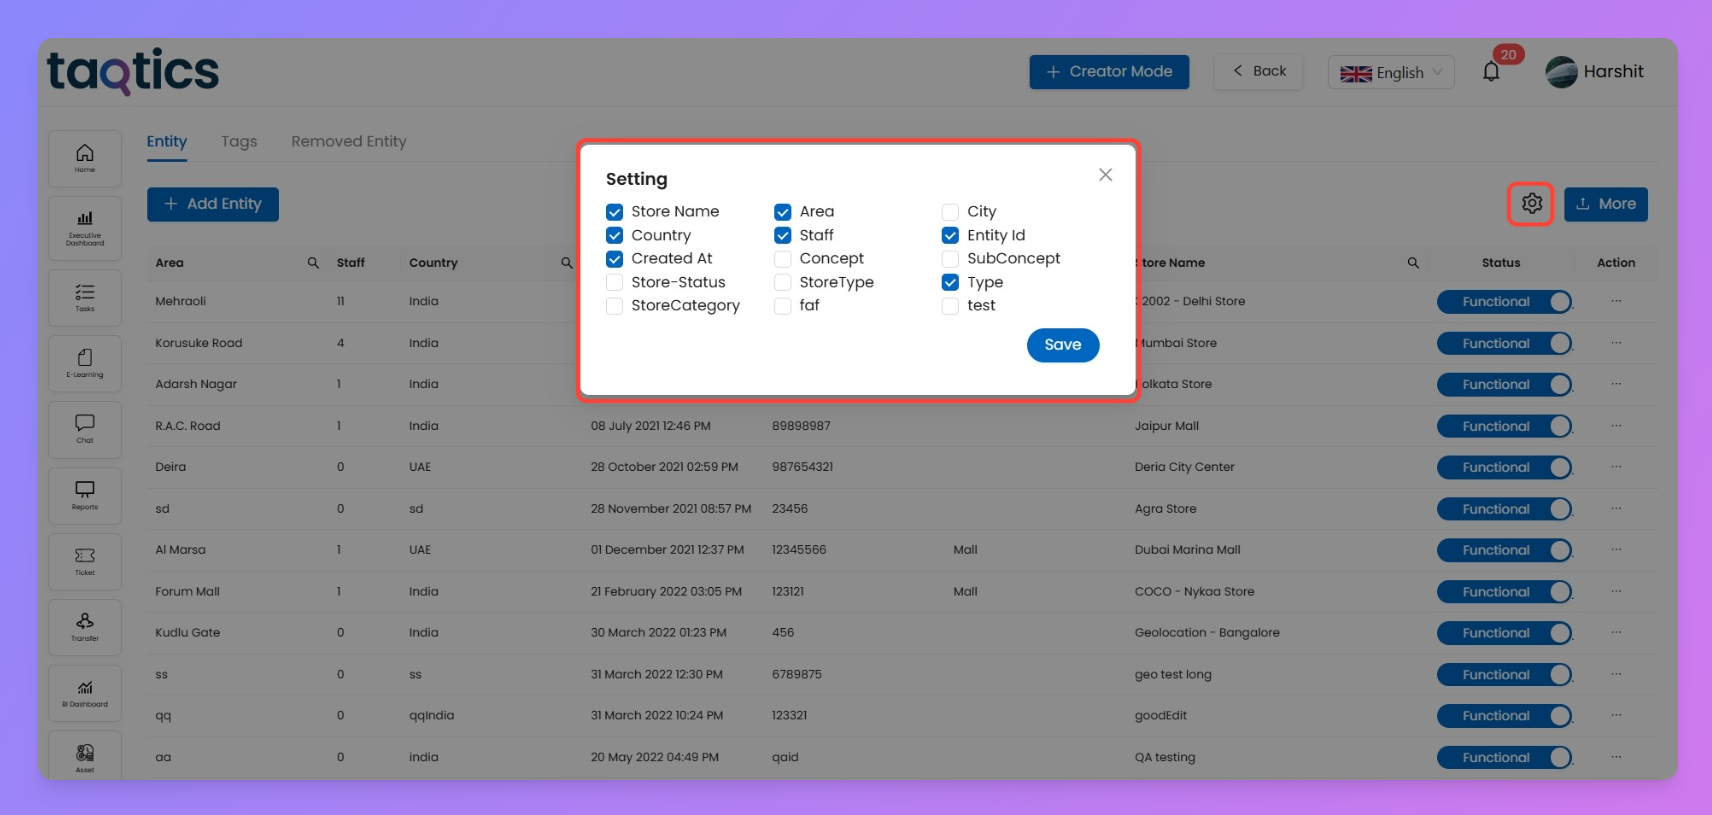
Important
- You can select a maximum of 7 fields at a time.
- Changes are applied instantly to your current view.
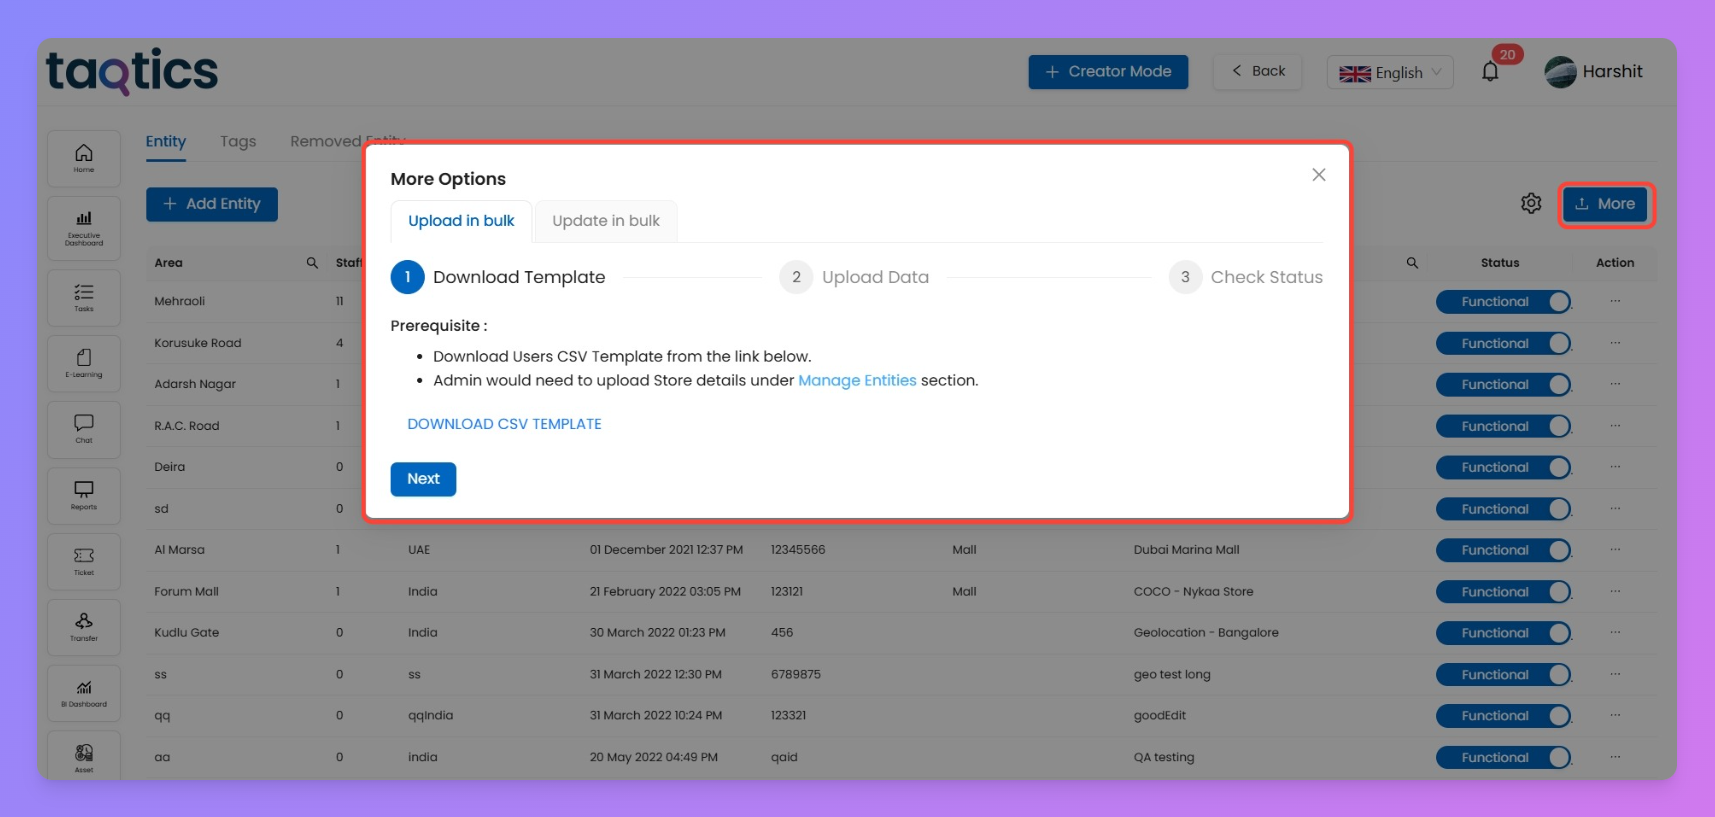
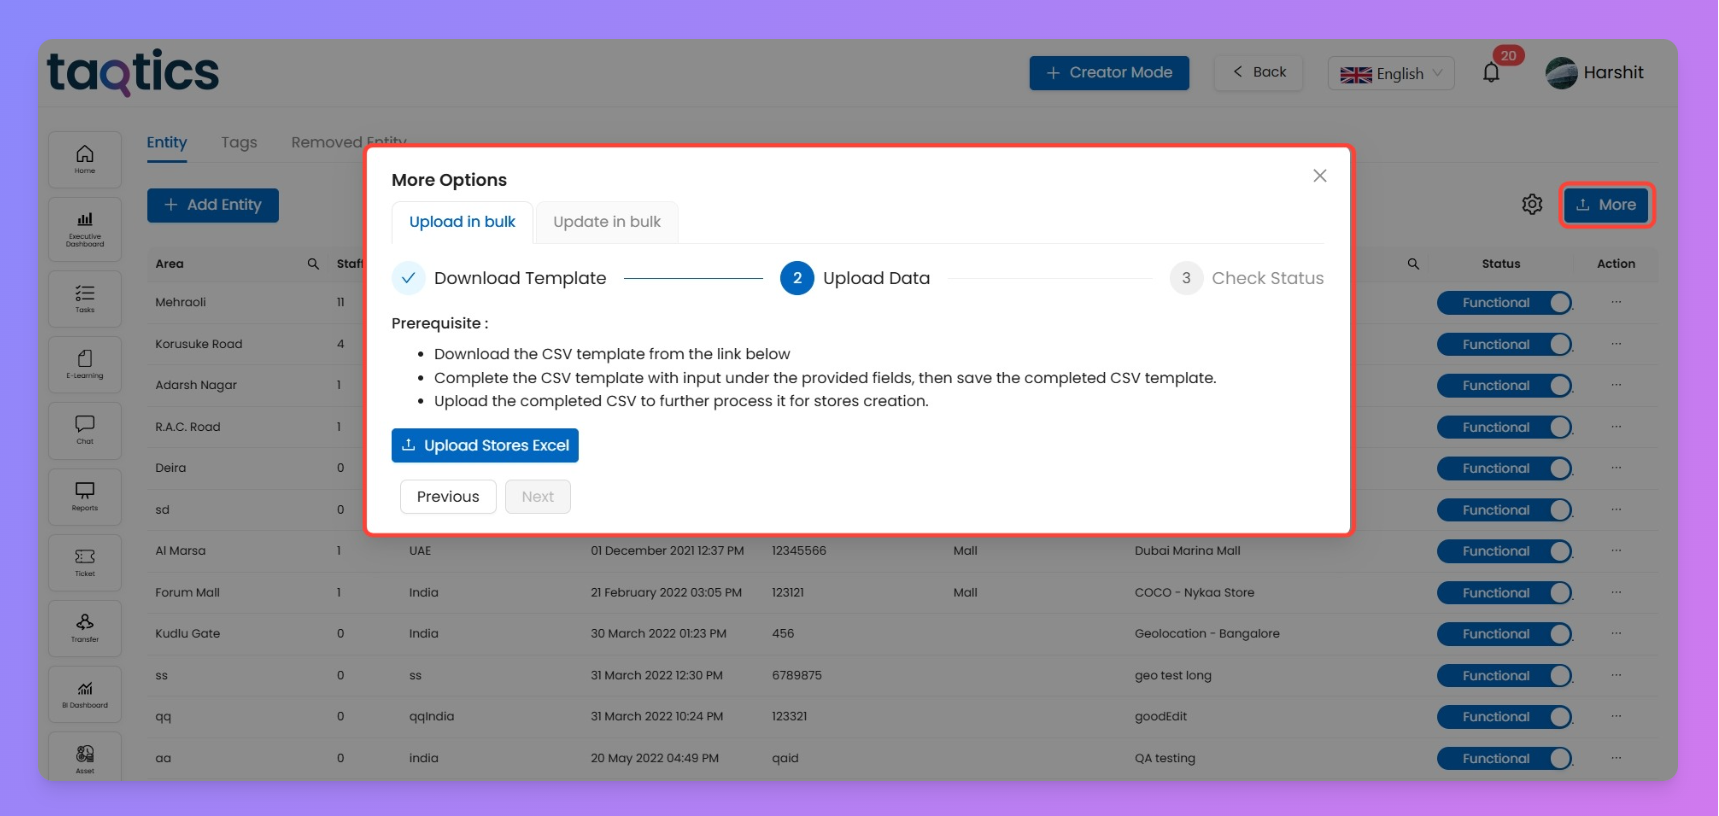
Bulk Upload Stores
When you have multiple stores to add (e.g., 50+ outlets), doing it one by one is time-consuming. The Bulk Upload feature lets you add them all at once using a simple CSV template.
How to Bulk Upload Stores
1. Download the Template
- Go to the Entity tab in Manage Entities.
- Click More → Upload in Bulk.
- Hit Download CSV Template.
- This template automatically includes all the fields required for creating stores.
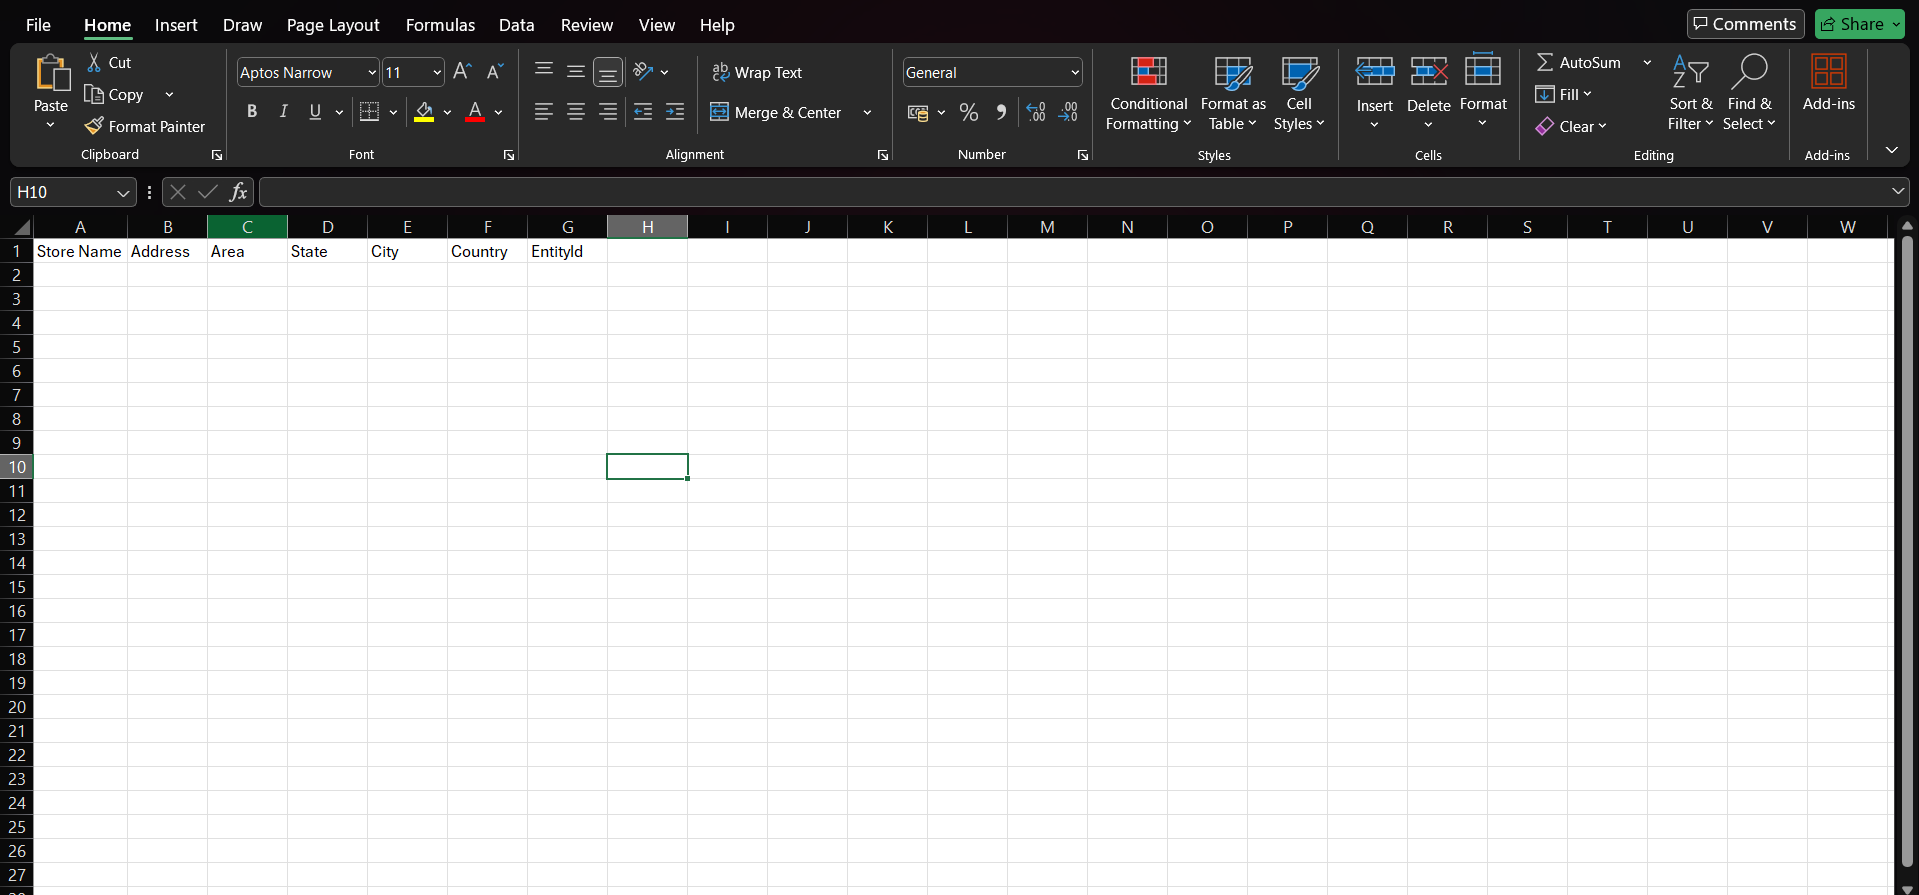
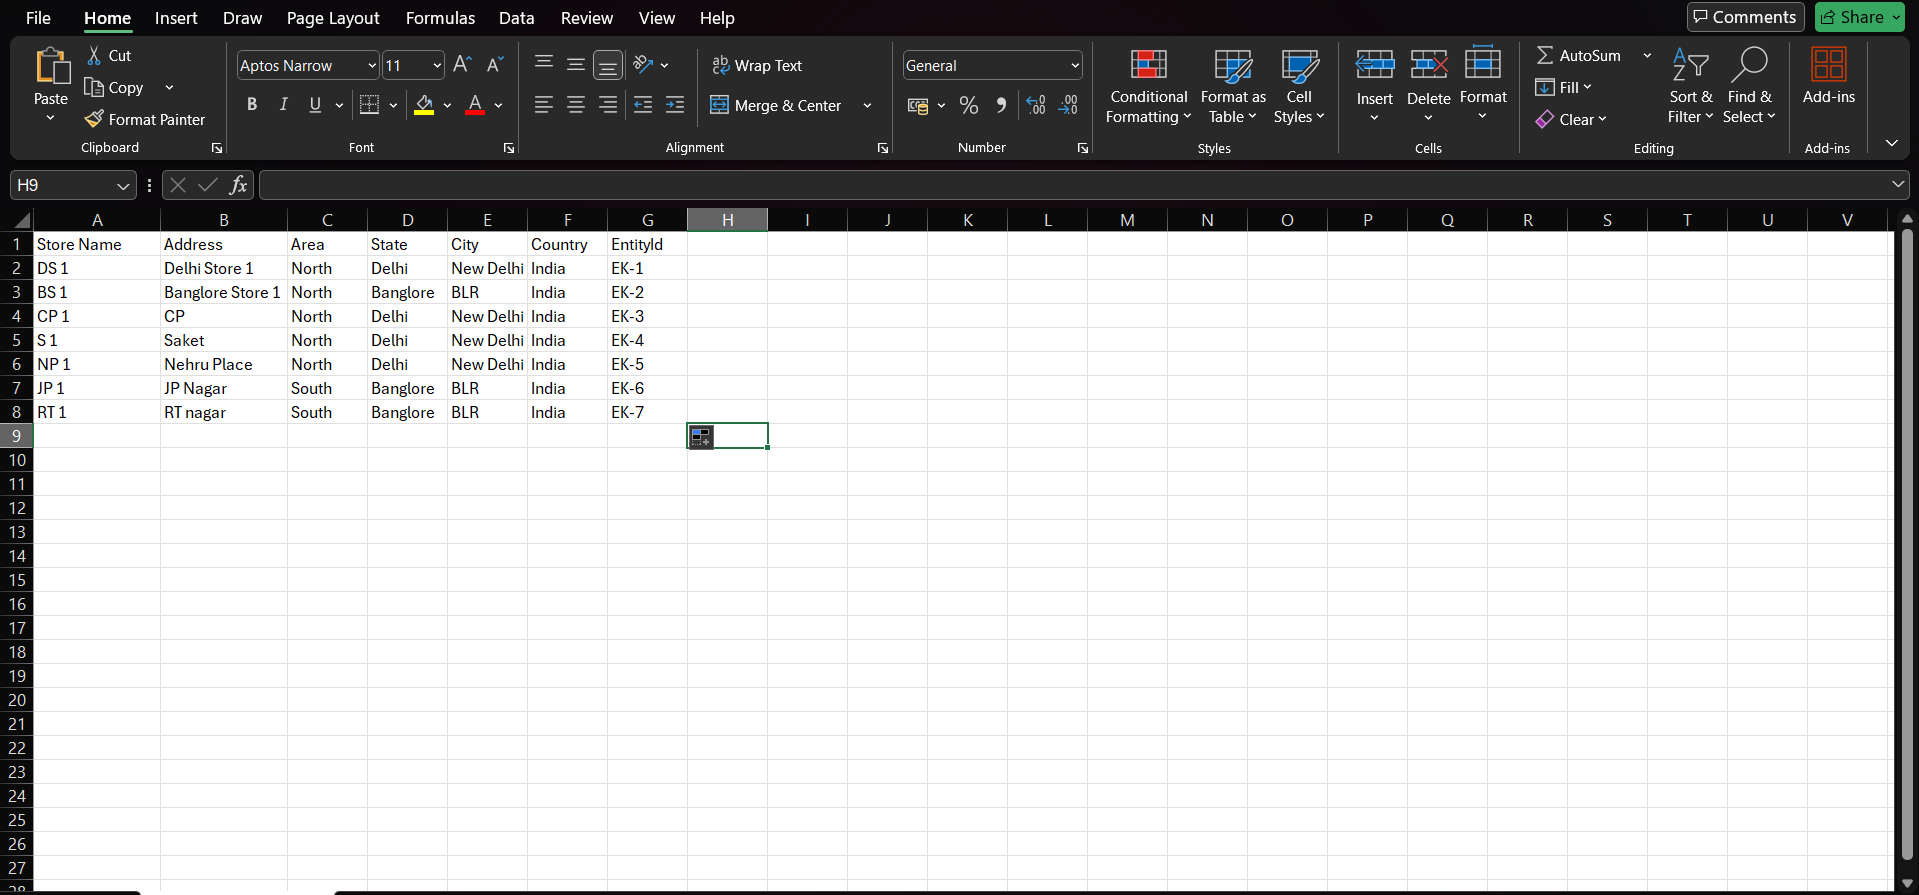
2. Fill in Your Data
- Open the CSV file and enter store details under the provided columns.
- Follow the required format for each field:
- Store Name → Full name of the store.
- Address, Area, State, City, Country → Fill accurately for mapping.
- Entity ID → Unique ID for each store.
3. Upload Your File
- Return to the Upload in Bulk screen.
- Click Upload Stores Excel and select your completed CSV file.
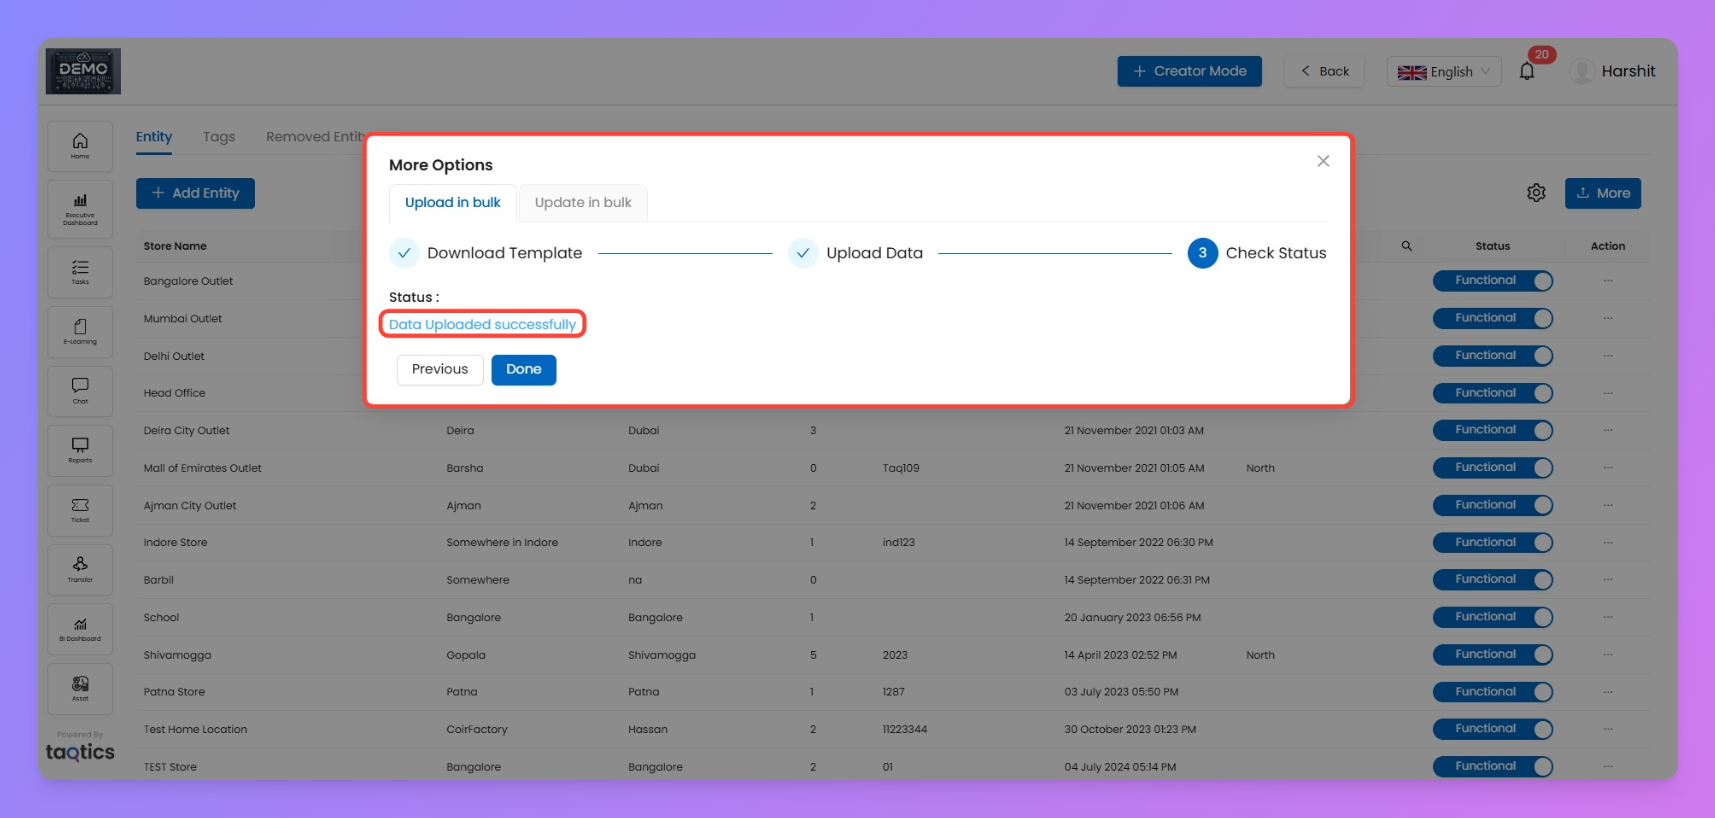
4. Check Status
- The system will validate your file.
- If errors are found, click Download Error CSV, correct the issues, and re-upload.
- Once validated, all stores will be added instantly.
Note:
Bulk Upload uses the exact column structure from the template. Every row becomes a new store entry with the same structure.
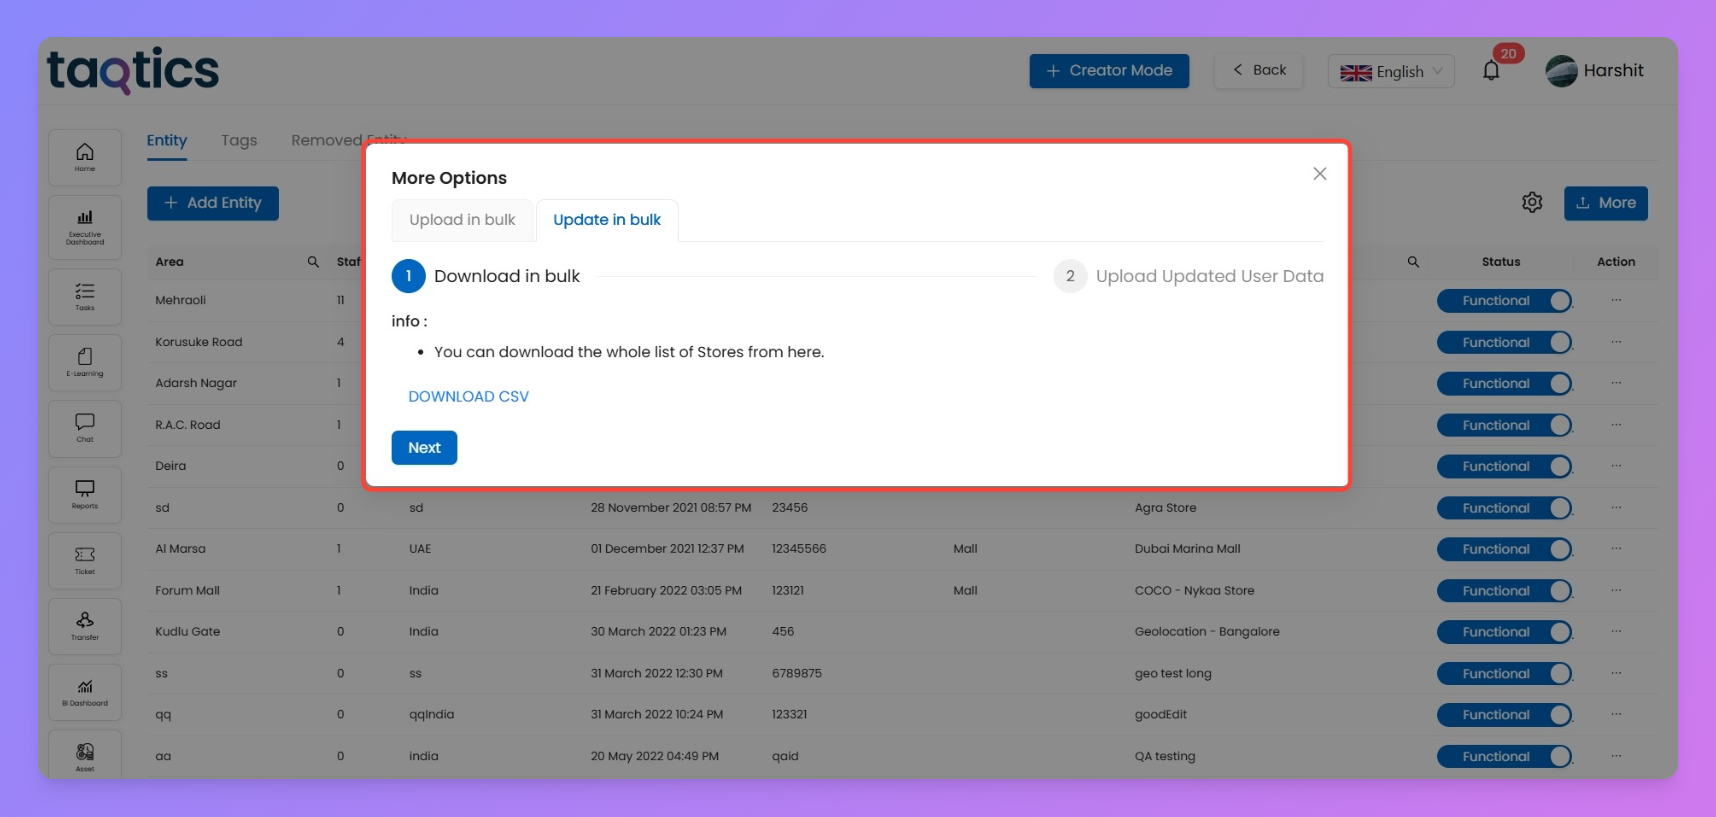
Update Stores in Bulk
Apart from creating new stores via bulk upload, you can also update existing stores in one go. This is useful when you need to make changes across multiple stores without editing each one individually.
How to Update in Bulk
- Go to the Entity tab in Manage Entities.
- Click More → Update in Bulk.
- Click Download CSV.
- This downloads a CSV containing all existing stores along with all their fields.
- Note: This is not the fresh store creation template — it contains live store data for editing.
- Make the necessary updates in the CSV.
- Save your changes.
- Return to the Update in Bulk screen and upload the updated CSV file.
What Happens Next
- The system will validate the changes.
- Once validated, the updates will reflect across all relevant stores instantly.
Add Tags to Your Entities
Tags help you label your stores in a smart way — think stuff like Zone, Store Format, Tier, or even custom groups like Franchisee Type. They make your life easier when assigning, filtering, or checking reports.
But wait — there are two ways you can create a tag in Taqtics:
1. Tag with Values (Dropdown Style)
This one gives you total control. You add the tag (like “Zone”) and also define what options should show up (like
North, South, East, West).Why use this?
So the person creating the store doesn’t have to guess or type — they’ll just pick from your dropdown.
How to do it?
- Turn ON the Create Tag with Values toggle.
- Add the list of options you want (just type and hit enter).
2. Tag without Values (Free Text)
This one's more chill. You just name the tag — like “Store Group” — and you’re done. No values to set.
What happens now?
The creator will not see a dropdown. They’ll have to manually type the value when creating the store (like “Flagship” or “Pop-Up”).
Why use this?
Great for tags where values change often or where flexibility is more important than control.
Pro Tip:
Tags aren't just for entity creation — they're powerful filters across Taqtics. You can use these tags in the BI Dashboard to break down insights by zones, formats, regions, or any custom tags you’ve set. Super handy when analyzing store performance or audit trends.
View Deleted Entities (Read-Only)
Once an entity (store/unit) is deleted from your org, it isn’t gone forever — it just moves to Removed Entities.
This section works as a read-only archive, so you can always come back and track what was removed and when.
🧾 What you’ll see here:
Each deleted entity will show up in rows with these details:
Column Name | What it Means |
Entity Name | The name of the deleted store/unit |
Area | Area mapped to the deleted entity |
City | City location of the store |
Staff | Number of mapped users (at time of deletion) |
Entity ID | ID of the entity you’ve mentioned while creating |
Created At | When the entity was originally created |
Deleted On | Timestamp of when it was deleted |
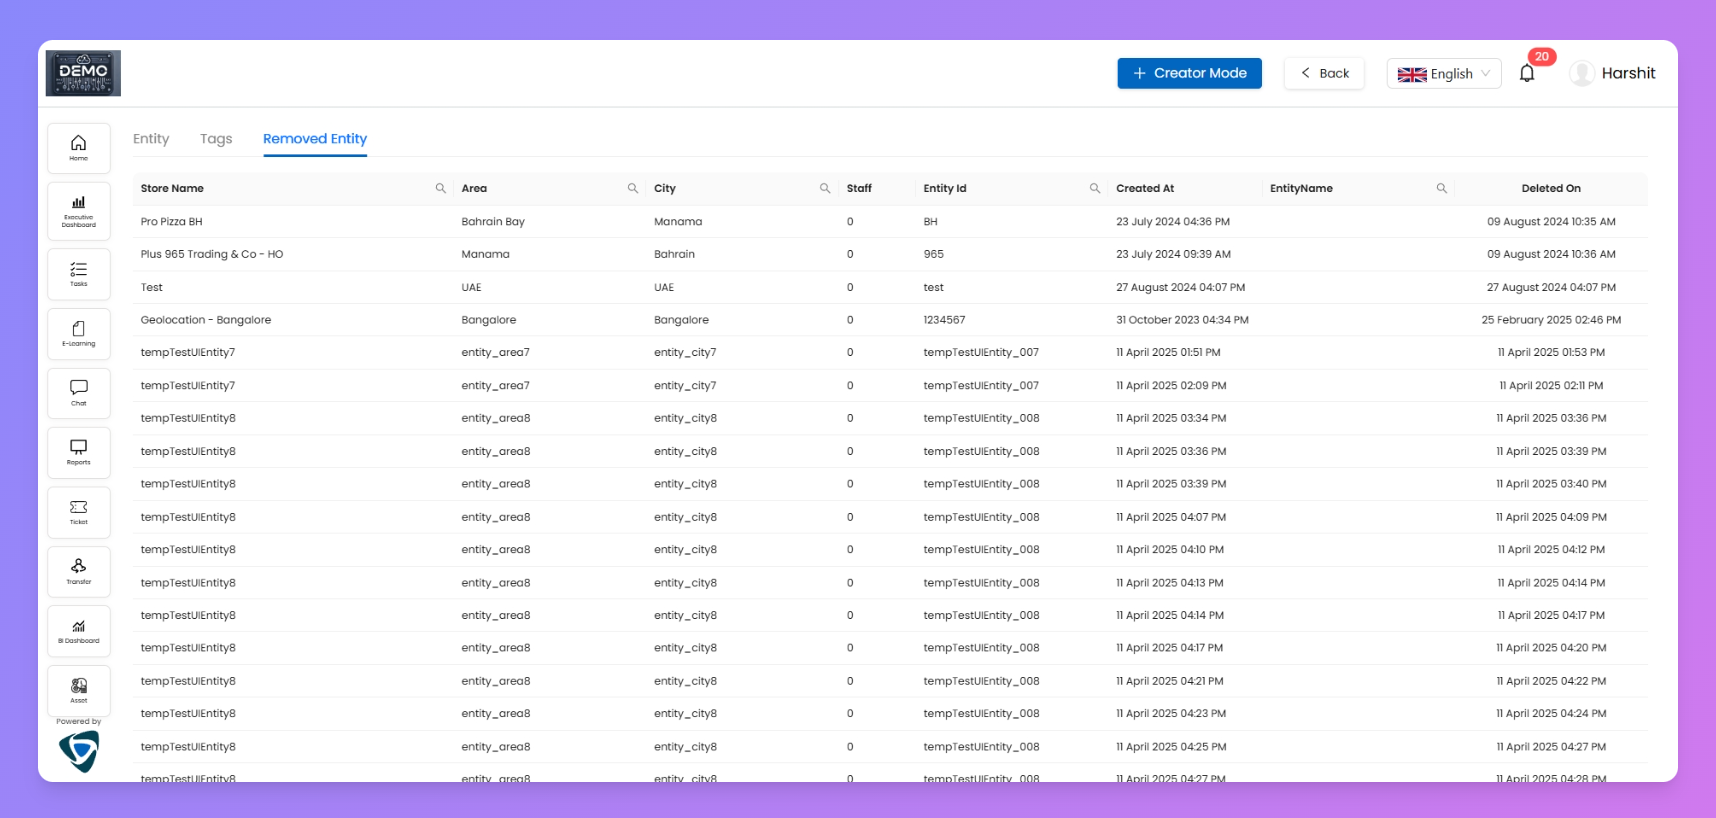
Note: This is a view-only table. You can’t restore an entity from here — it’s meant for recordkeeping.