
Want your field teams to create or update assets directly while filling a checklist? This feature helps you link an existing asset table to any Process or Audit, so that asset info (like equipment photos, license dates, or IDs) can be autofilled, updated, or even created — right from the form itself.
Whether it's a compliance audit or a new license submission, asset data gets captured instantly without switching between tabs or tools.
Section 1: Set Up Asset Integration from Process Properties
Before you configure questions, you first need to link your asset table with the checklist (process or audit). This setup happens inside the Properties tab of your process builder.
Follow the steps below:
Step-by-step: Link Your Asset Table
- Create a new Process or Audit
If you haven’t already, start building a new checklist from scratch or duplicate an existing one.
- Go to the Properties tab → Click on System Integration
In your checklist setup, scroll to the Properties tab and open System Integration.
- A) Enable ‘Asset Table Integration’ checkbox
Tick this to start linking your asset table to the process.
This allows your process to fetch and update existing asset items from the linked asset table during checklist submissions.
- B) Enable “Asset Creation” checkbox
- This allows your process to create brand new asset items directly from submissions.
Ideal for checklists where asset details are being entered for the first time (e.g., registering a new machine or uploading a new license).
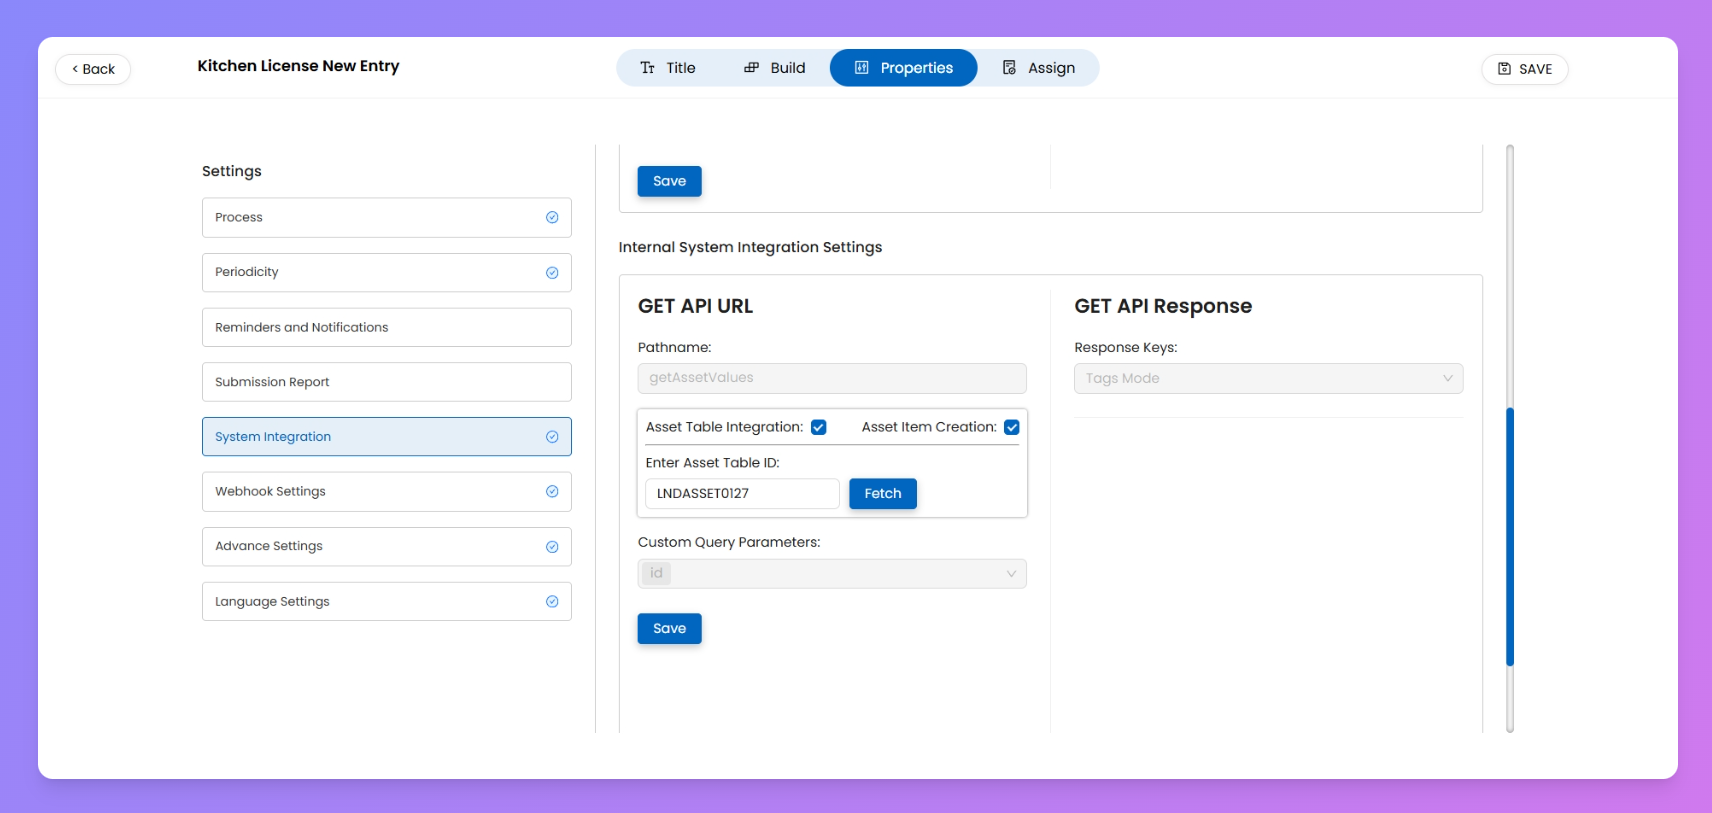
- Enter the Asset Table ID and click "Fetch"
Type in or paste the ID of the asset table you want to link. Once done, click Fetch to validate the connection.
- Click Save
Hit Save to complete the integration setup.
Section 2: Configure Questions in Build Tab
Once you're done with the System Integration setup, it's time to configure your questions inside the Build tab. This is where you define which fields from your asset table will be displayed, updated, or created via your process checklist.
This lets you read and/or update existing asset items inside a checklist — perfect when you want users to update licenses, expiry dates, or upload latest docs without switching to the asset module.
Step-by-step:
- Head over to the Build tab of your process.
- Select a supported question type:
- Short Answer (for text, alphanumeric, or numbers)
- File Upload (for photos or documents)
- On your selected Question > turn on the below Enhancement.
- Choose the enhancement type:
- Read Only – Pulls existing data from the linked asset table (user can only view and can’t change it).
- Update Only – Allows user to update a specific asset field.
- 🔁 Read & Update – Pre-fills data from the asset table but user can overwrite on it.
- Select Data Type in Short Answer type question.(Text, Number, Tag, etc.)
- Once Data Type is selected, a list of fields/column from the linked asset table (matching that data type) will appear.
- Choose the asset field/column to link this question with.
💡 Once published, users will see an Autofill option when submitting. They can enter the Asset ID to load prefilled data, and update the allowed fields as needed.
This setup lets your checklist create new asset entries directly — useful when your team needs to log new licenses, add equipment, or register assets in real-time.
Step-by-step:
- In the Build tab, configure questions for each mandatory field from your asset table.
- When configuring a question:
- Enhancements will only show "Update" on questions (no read-only, since it’s a new item).
- Data Type must match the corresponding asset field.
- Select the correct Asset Field to map your question.
- Mandatory fields from your asset table (like Asset ID, Asset Name, User, Store, etc.) will automatically turn red and must be configured before publishing.
- Optional fields (like here- Photo of Equipment, Remarks, etc.) can be added too but aren’t mandatory.
- Once everything is mapped, Save and Publish your process.
⚠️ Don’t skip mandatory fields — if they’re not configured inside your checklist, Process creation will fail.