
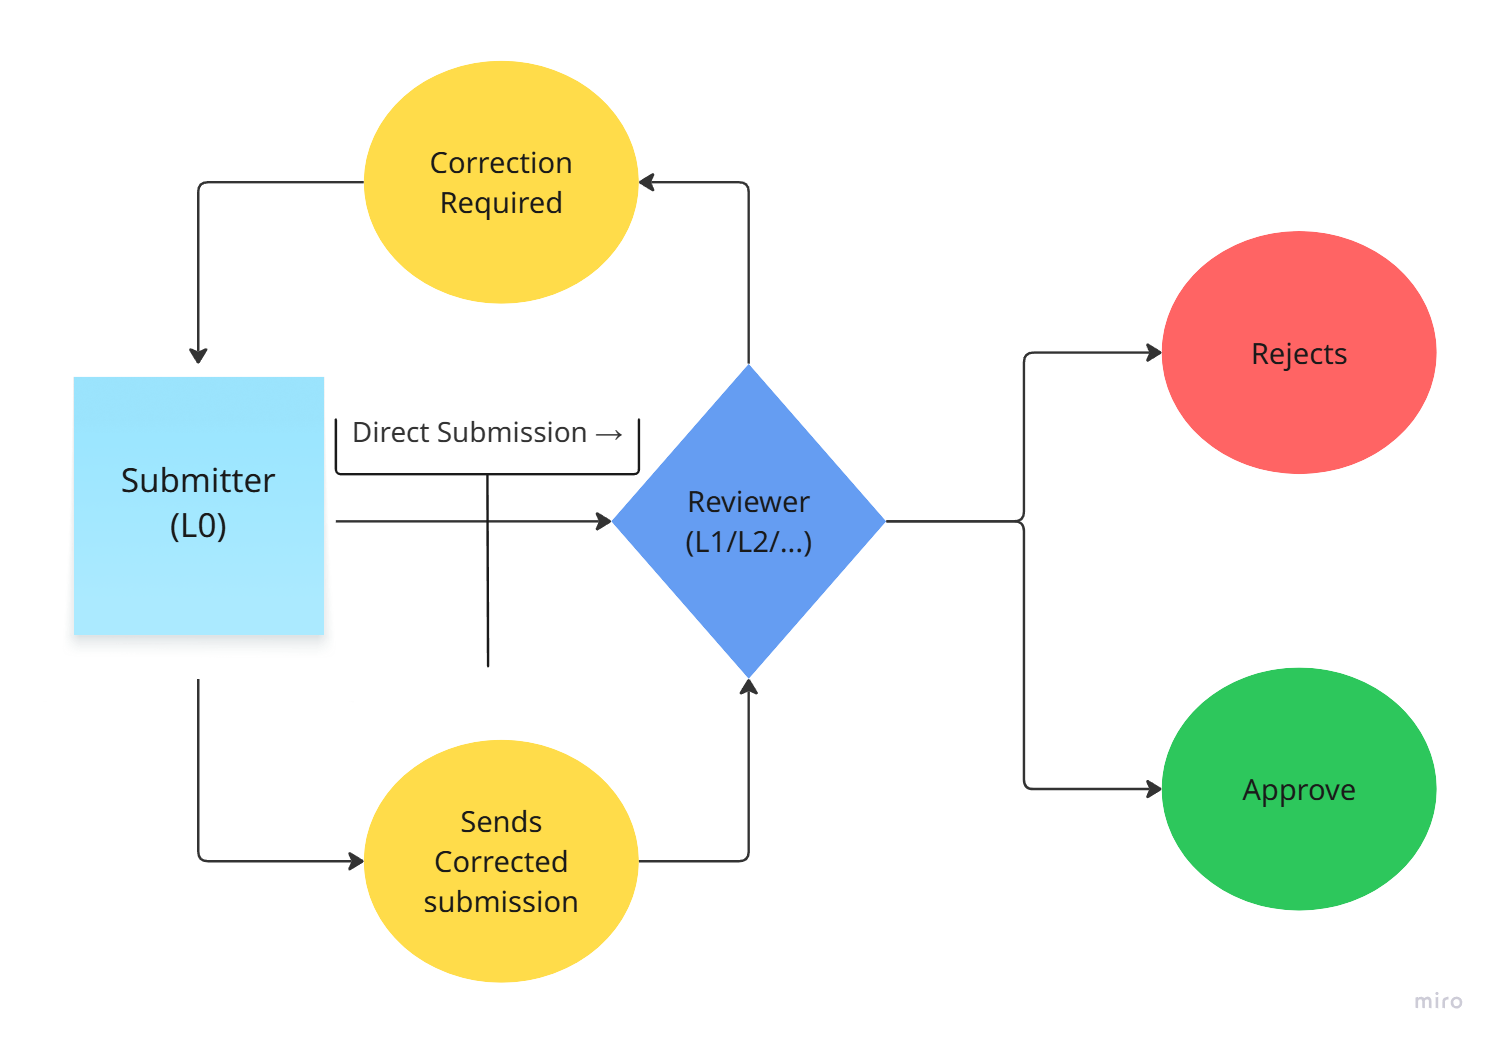
Review Settings control what each reviewer level can do (send back, reject, close) and how timelines behave. These options only appear after you’ve turned on reviews at the process level.
Accessing Review Settings
- Go to Build tab → Settings.
- Toggle Process with Review ON.
- This activates review functionality for the process.
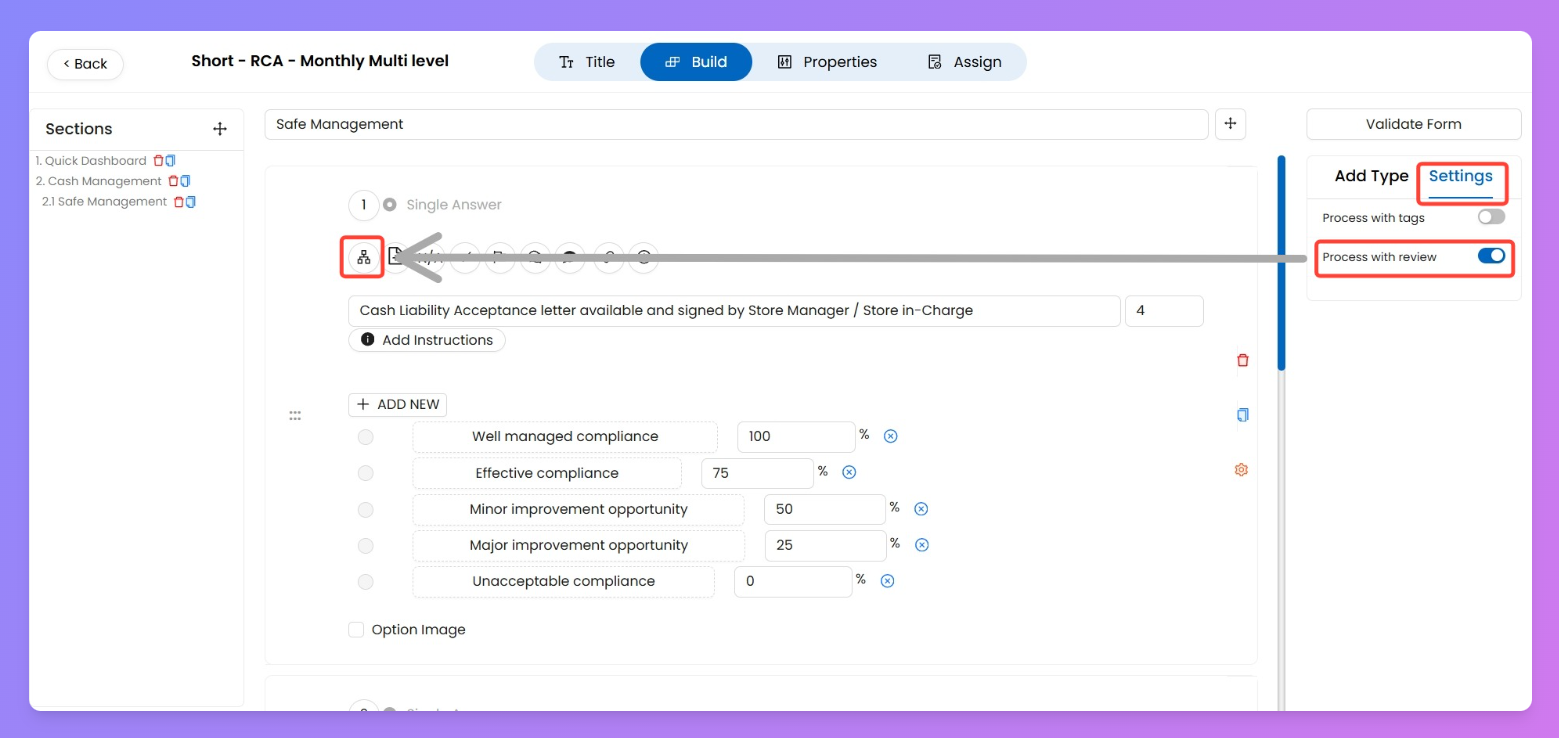
- Now go to Properties → Review Settings.
- Pick the level (L1 / L2 / L3 …) you want to configure.
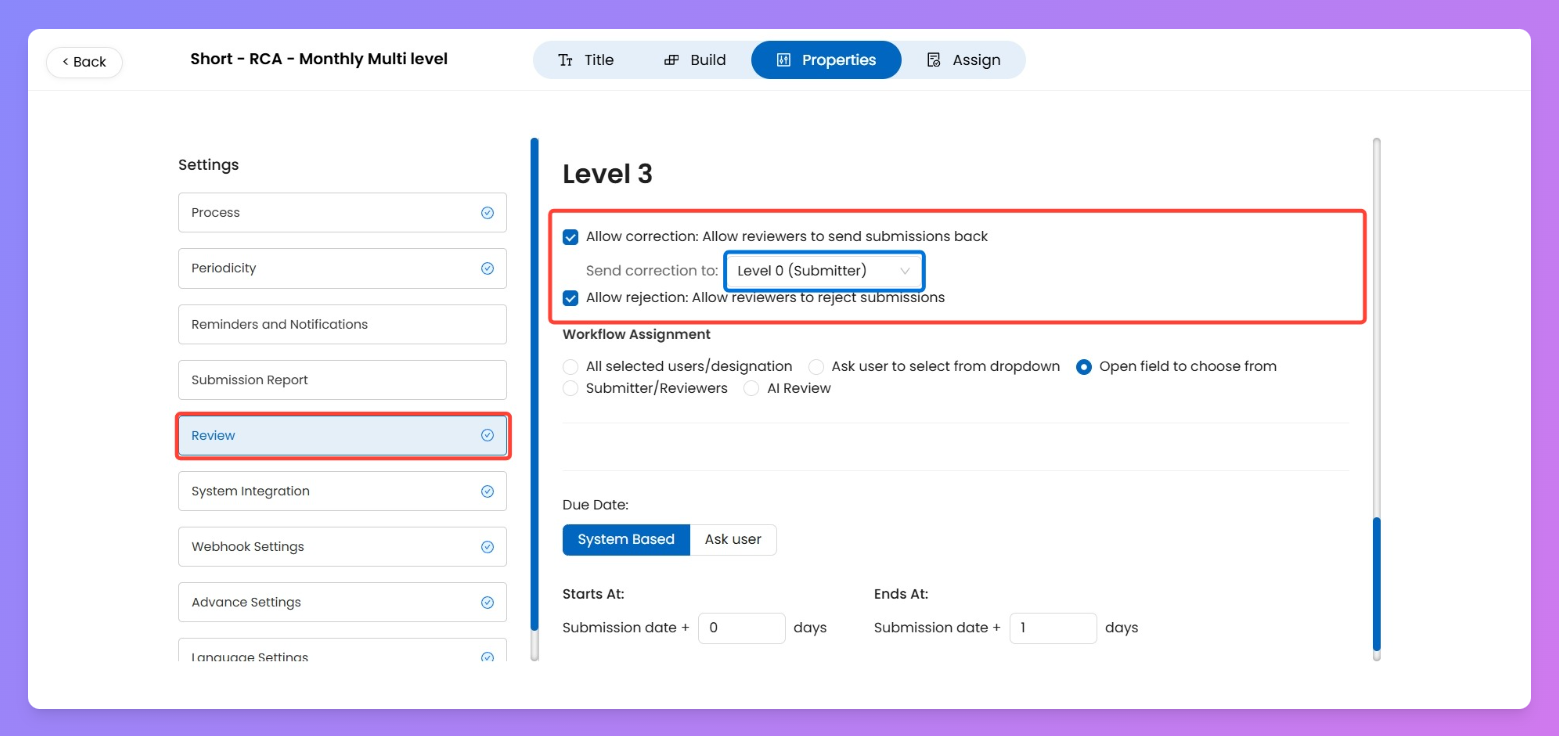
Allow Correction
What: lets a reviewer send the submission back for fixes.
Why: route fixes to the person/team that can actually act (usually the submitter or earlier reviewer).
Tip: pick the lowest level that can fix the issue (usually L0 / Submitter) to avoid bouncing between managers.
Example: L2 sees missing photos → sends correction to L0 so the auditor re-uploads evidence. Status becomes Correction Required.
Allow Rejection
What: gives the reviewer a “Reject” action that marks the submission as rejected.
Why: use when the submission is a hard-fail or must be escalated outside normal corrections (e.g., safety breach).
Example: L1 finds a critical non-compliance → rejects submission so it’s handled separately.
Submit & Close (end the workflow at a level)
What: a checkbox that, when enabled for a level, makes submitting at that level terminate the workflow (no further levels run).
How: check Submit & Close for the level you want to be final.
Why: use when that reviewer is the final approver and you don’t want downstream reviewers to run.
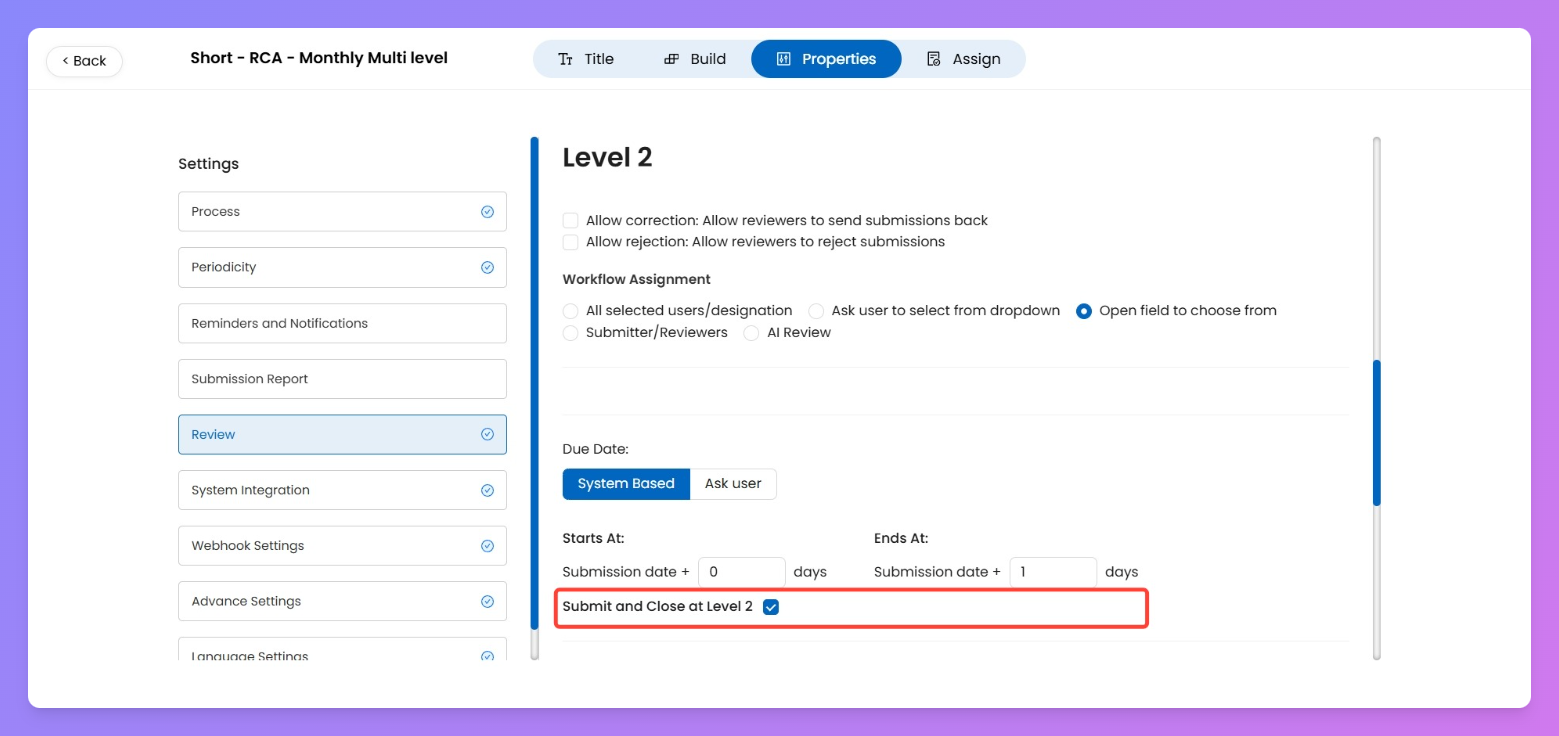
Example: L2 is final approver for a quick checklist → enable Submit & Close at L2 so workflow stops there.
This can only be done on second last reviewer level
Due Dates & Timelines
What: controls when a reviewer’s window starts/ends and who sets the due date.
How: choose between:
- System-based (offsets) — define start / end as offsets relative to the submission (or previous step).
- Ask user — reviewer sets the due date manually when they pick up the item.
Why: enforce SLAs automatically or allow flexibility when the review needs human judgement.
Example: L2 → Start: submission +1 day; End: +3 days gives a 48-hour SLA.
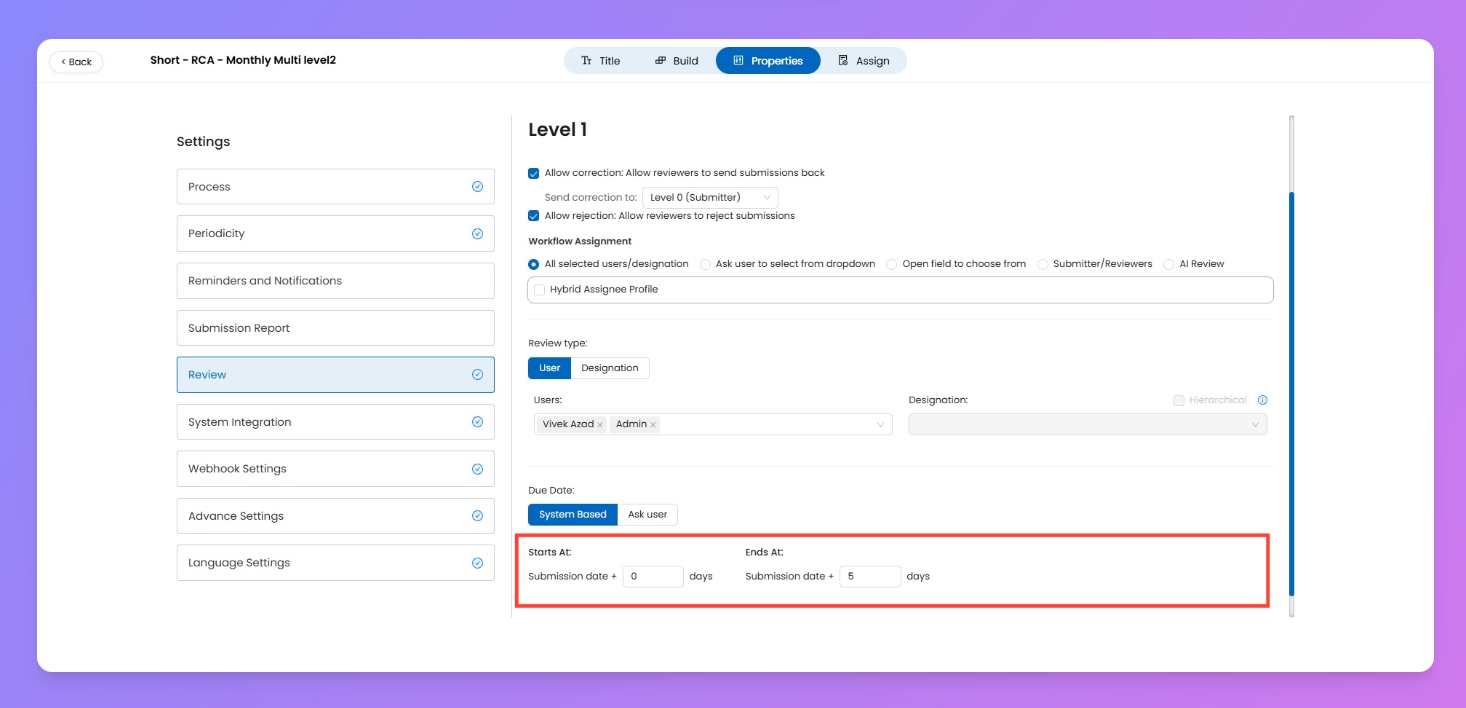
Tip: use system offsets for predictable SLAs; use Ask User for ad-hoc or complex reviews.
Workflow Assignment
Workflow Assignment defines where the submission goes next once a reviewer submits. Each level can be configured with one of these routing options.
All Selected Users / Designation
What: Send the submission to all users or designations you preselect.
How:
- Pick Users → multi-select dropdown, choose specific people.
- Pick Designation → send to everyone with that role.
- Hierarchical: applies across the org.
- Store Hierarchical: limits to that store only.
Why: Use for group reviews where anyone in the group can act.
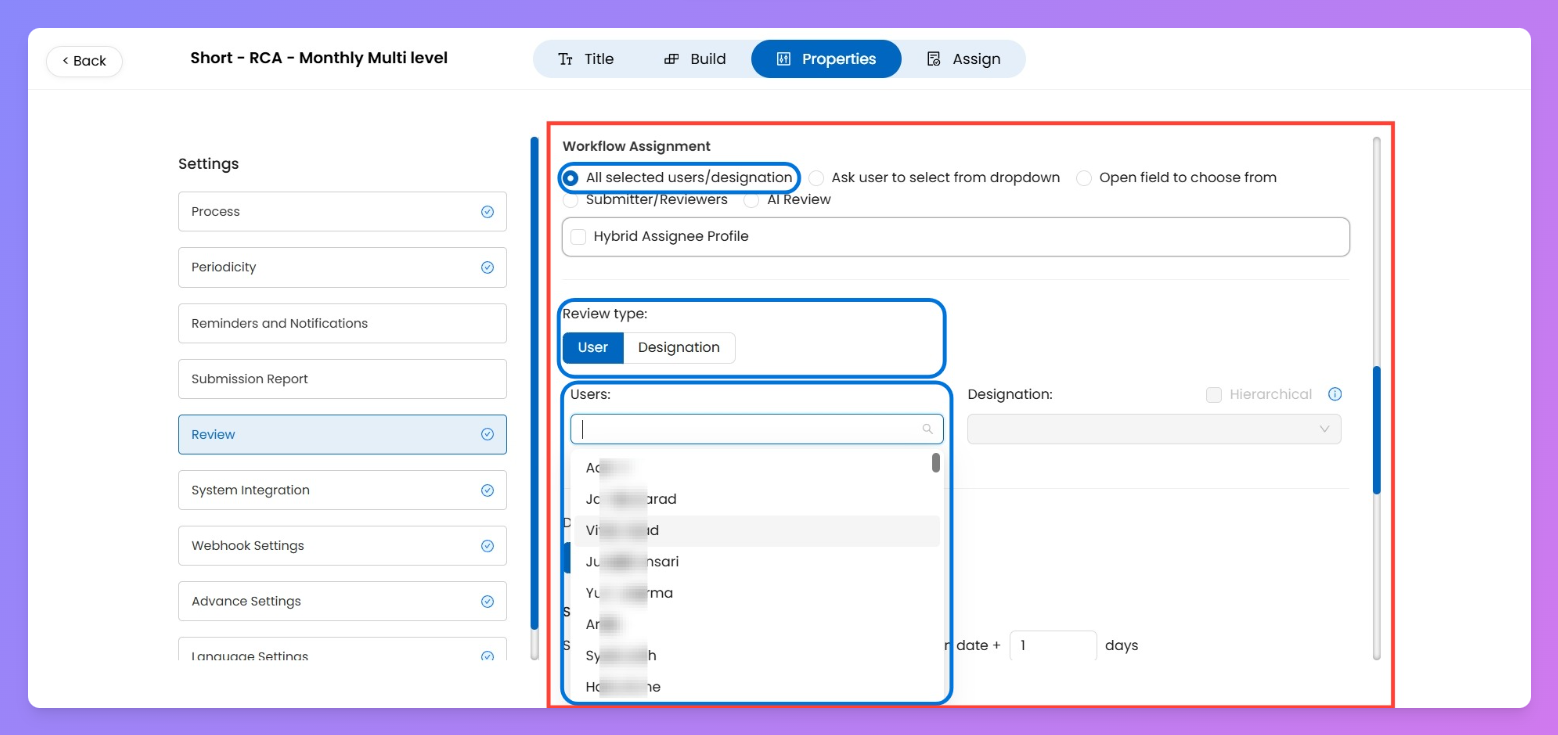
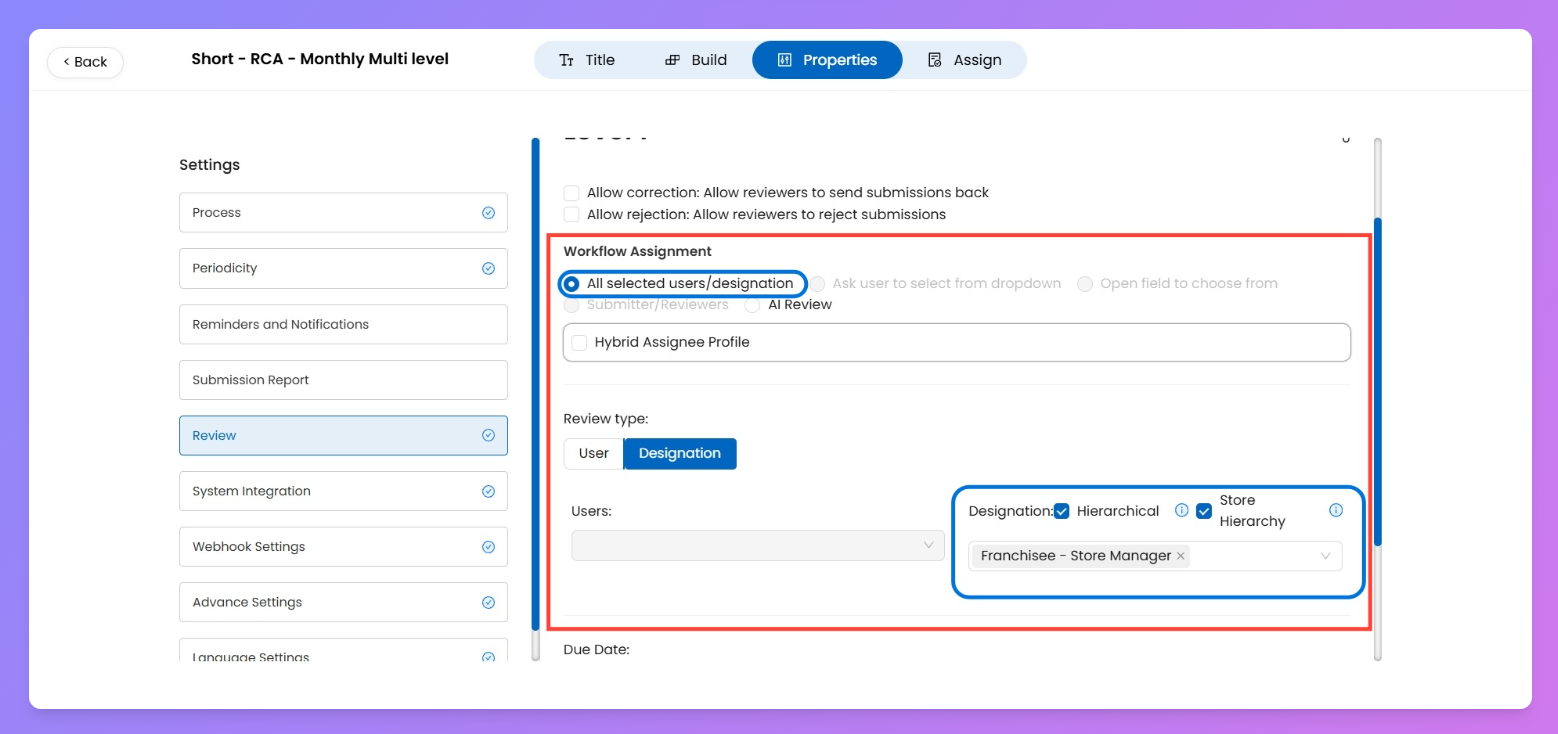
Example: L1 sends to 3 regional managers; any one of them can complete the review.
Ask User to Select from Dropdown
What: Let the reviewer choose the next reviewer from a predefined list.
How:
- Configure a list of users/designations.
- When the reviewer submits, a dropdown appears for them to pick one.
Why: Useful when the “next reviewer” depends on context (e.g., specific department head).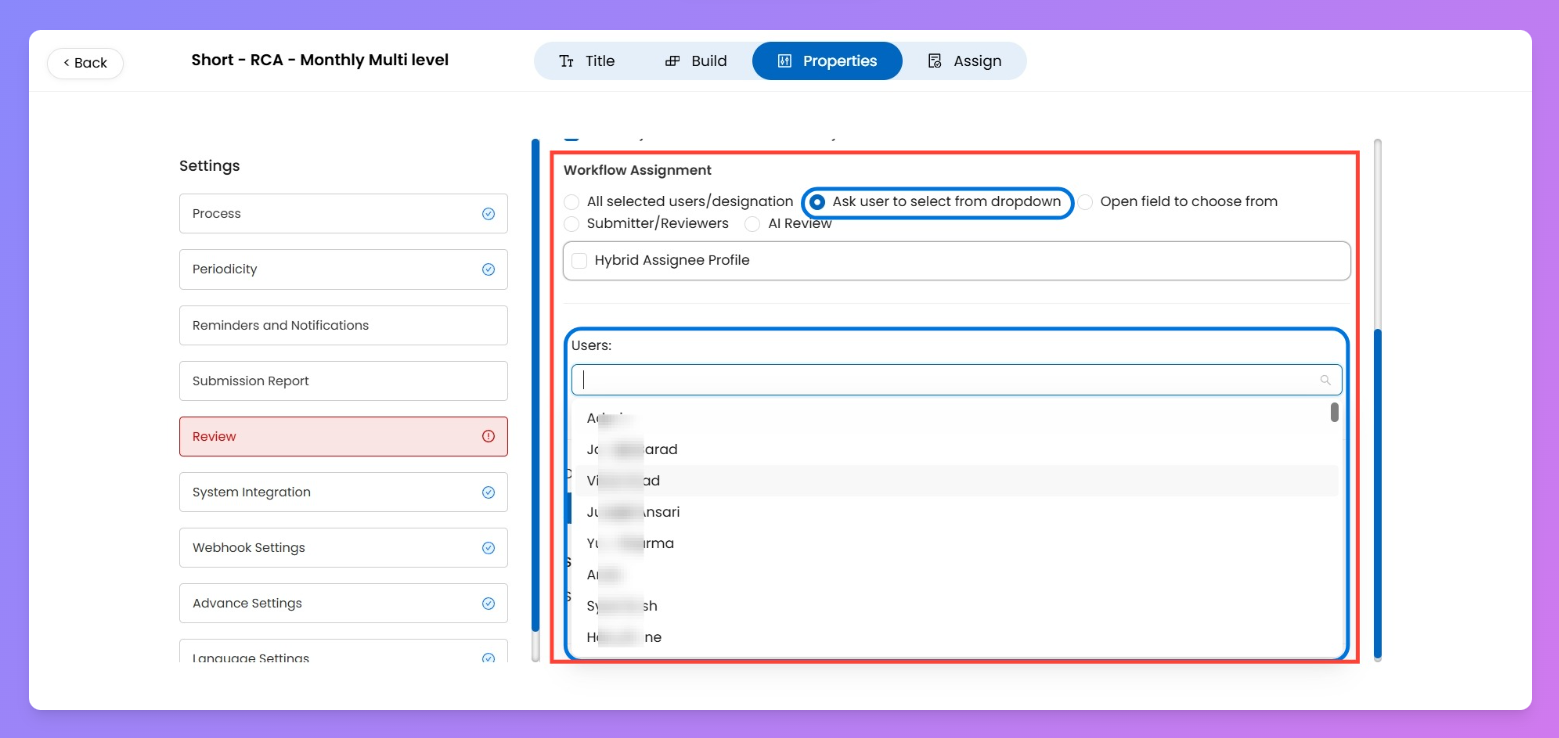
Example: L1 completes → system shows dropdown → L1 selects which Area Manager should review.
Open Field to Choose From
What: Reviewer can search and assign to any user in the org.
How: Select this option → reviewer types/searches a name on submission.
Why: Maximum flexibility when the next reviewer isn’t predictable.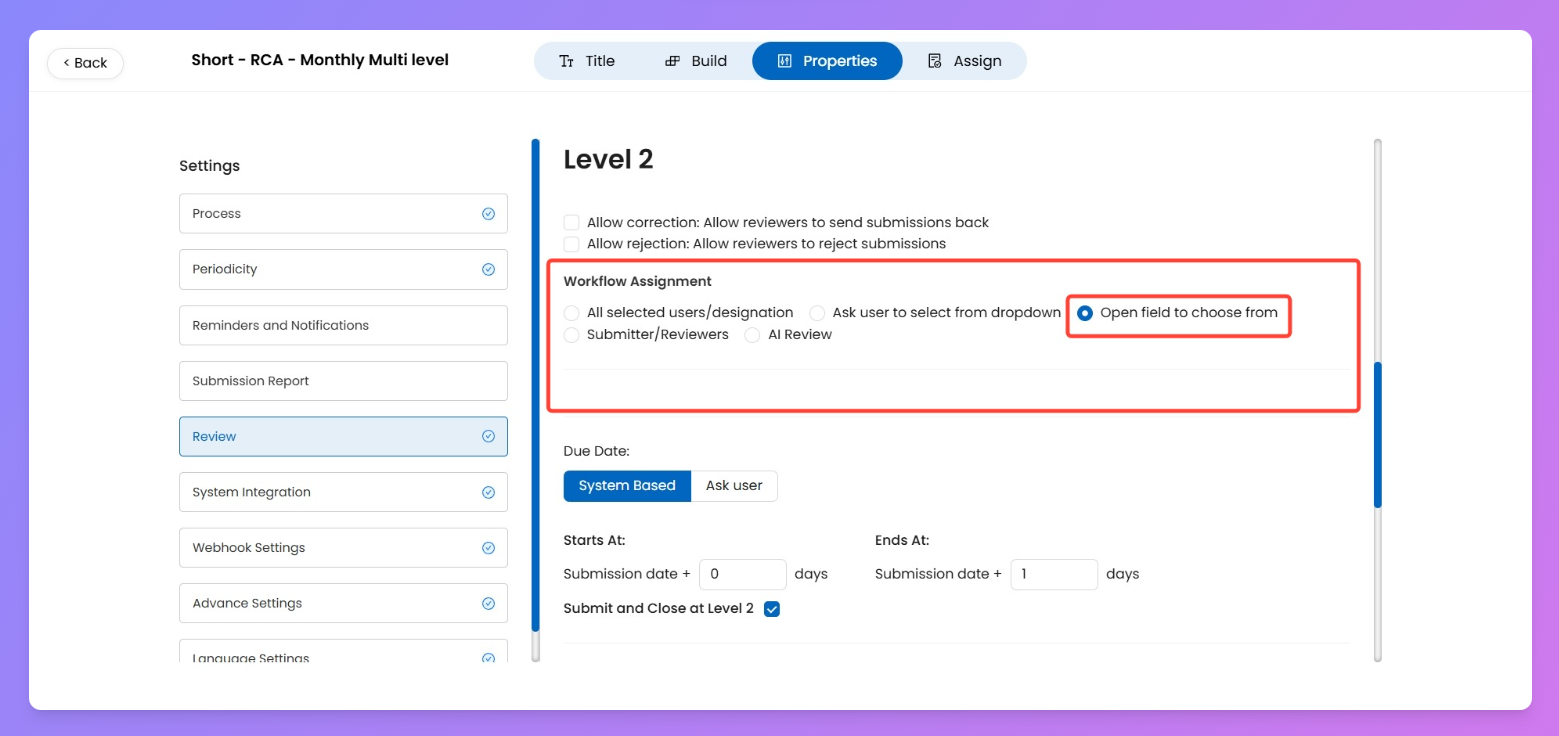
Example: L2 escalates to an external specialist not in any preset list.
Submitter / Reviewers
What: Automatically route back to a prior level (submitter or earlier reviewer).
How: Pick a target (e.g., L0 submitter, or any earlier reviewer level).
Why: Use when work must be revalidated or closed by the submitter/reviewers instead of moving forward.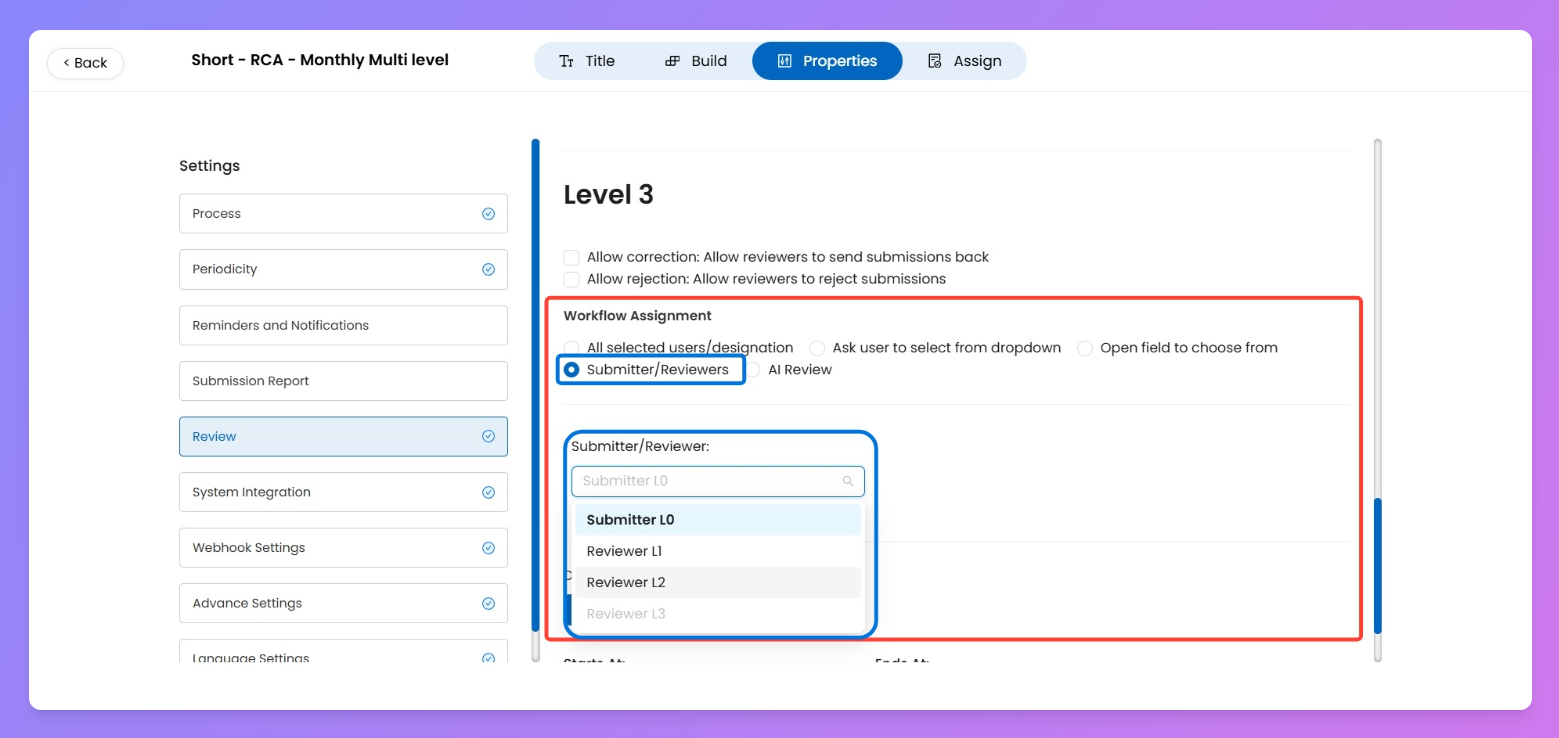
Example: After L3 approves, submission auto-routes back to L0 submitter for final acknowledgement.
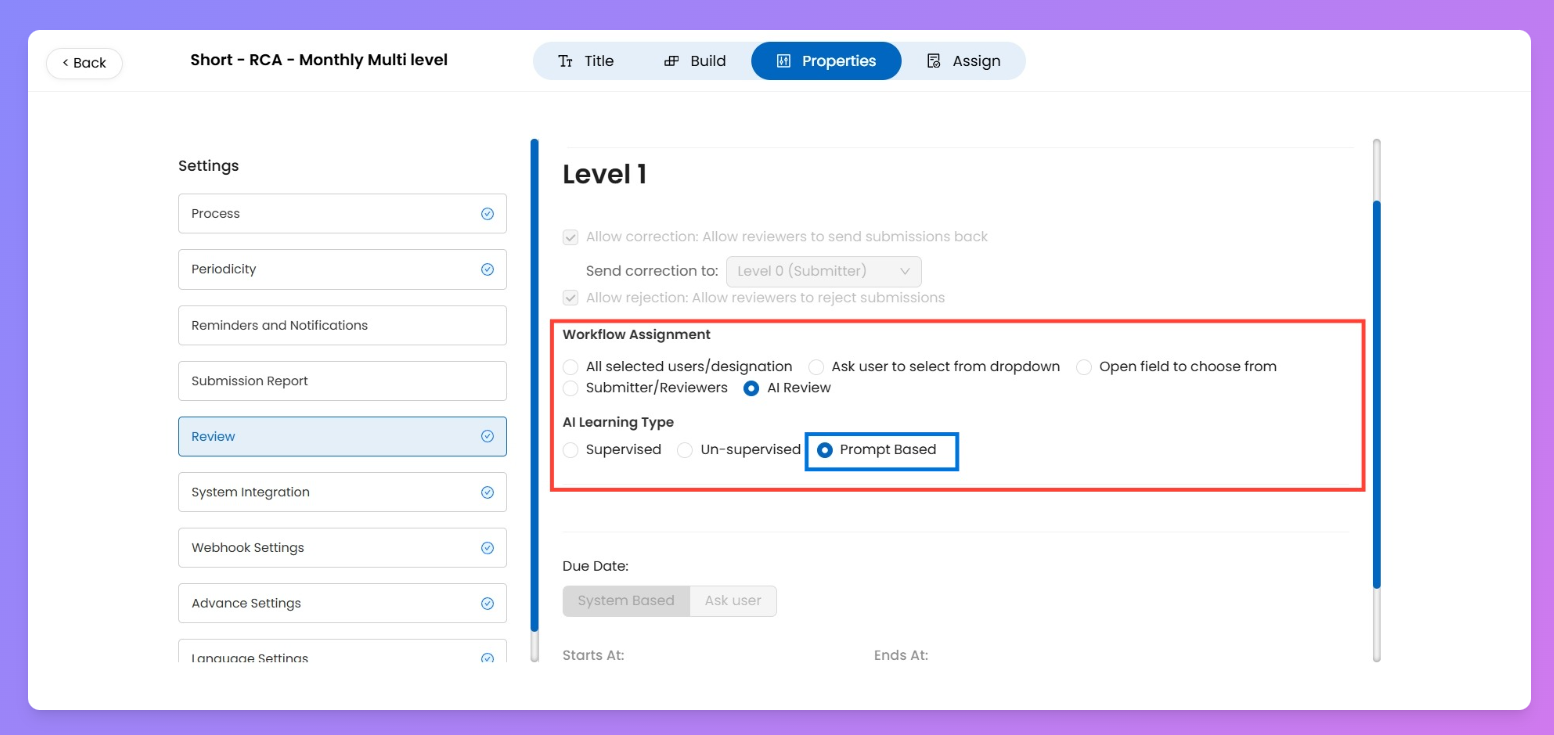
AI Review (Prompt-Based)
What: Assign the review step to AI instead of a person.
Prerequisites:
- Process with Review is ON.
- Question has Review Level Configuration set (Existing / Independent).
- Level selected for AI matches the question’s review level.
How:
- Choose AI Review.
- In question settings, enable AI Review add-on.
- Configure AI Analysis Configuration → Additional Prompt.
Why: Use when you want automated validation + AI comments.
Example: Question: “Are shelves stacked vertically?” → AI outputs Yes and adds a hygiene comment per your prompt.
Hybrid Assignee Profile
What: Lets you route the workflow using a pre-built Assignee Profile created in Creator Mode.
Where it appears: Only when assignment type is either:
- All Selected Users / Designation, or
- Ask User to Select from Dropdown.
How: Pick Hybrid Assignee Profile from the dropdown → select from the profiles available.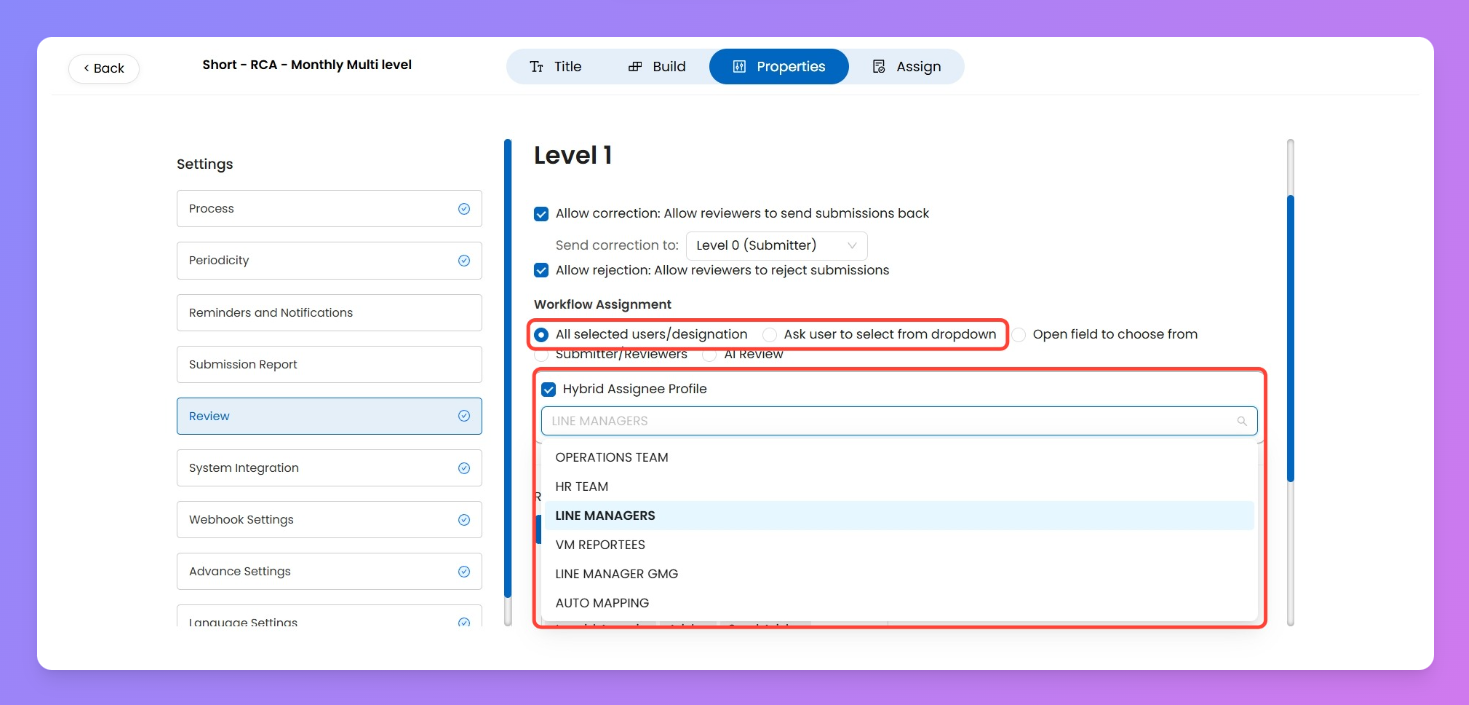
Why: Covers complex assignment combinations not possible with default options.
Example: Profile “Store Ops + Safety Lead” → submission routes to both store manager and safety officer together.
Link out: If you want to know more about Hybrid Assignee Profiles, see .)
Best practices (short)
- Default Allow correction → L0 (submitter) for most levels.
- Reserve Allow rejection for serious issues only.
- Use Submit & Close sparingly — prefer to let downstream reviewers see the item unless you have a clear final approver.
Use cases (1–2 quick examples)
- Multi-level audit validation
- Flow: L0 (auditor) → L1 (store manager) → L2 (area manager).
- Setup: Allow correction (send to L0), Allow rejection disabled.
- Why: ensures fixes go to auditor, managers only validate.
- Critical fail gating
- Flow: L0 fills form → L1 finds critical safety breach → L1 rejects.
- Setup: Allow rejection = ON for L1; Submit & Close = OFF (rejection triggers follow-up process).
- Why: stop progression and trigger incident handling.