What is Setting up process properties?
Before you publish your process, you need to configure how it should behave — from how often it should occur, who should fill it, what notifications go out, to whether reports are visible. That’s what this section is for.
Every setting related to how a process functions — whether it's reminders, submissions, reviews, or system integrations — lives right here. You can tweak these anytime, even after publishing.

Below, we’ll break down each group of settings one by one 👇
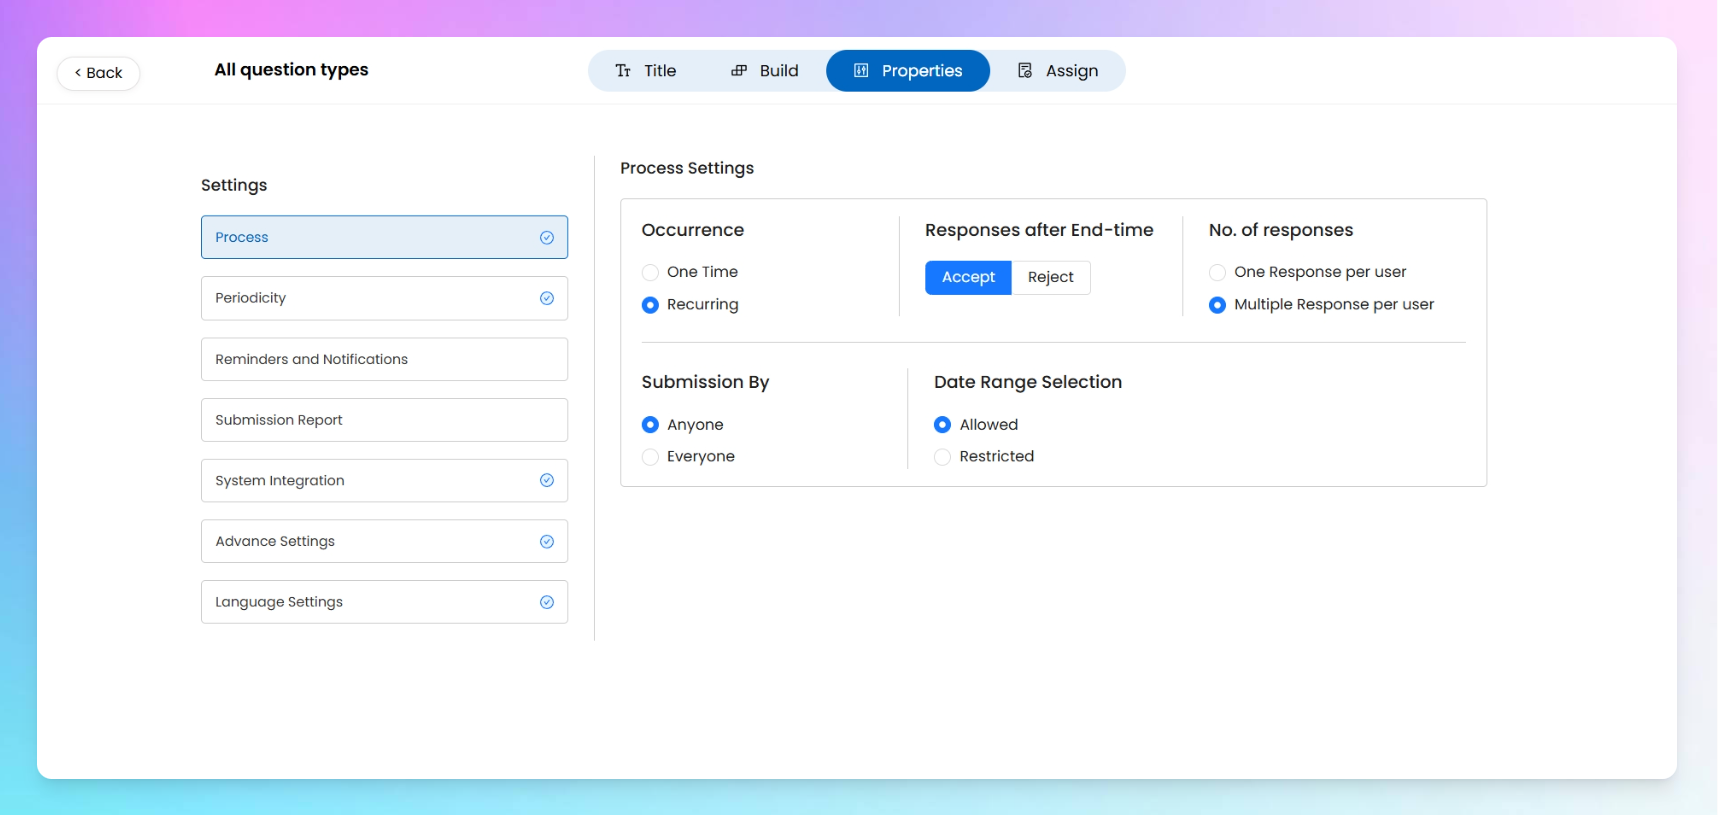
⚙️ Process Settings
This is the core engine room — here’s where you define when the process runs, how submissions work, and who can fill them.
1. Occurrence
Choose whether your process is:
- One-time – Runs just once, typically for ad-hoc activities.
- Recurring – Repeats based on the schedule set in your Periodicity.
Example: A daily morning checklist = Recurring; a one-off incident report = One-time.
2. Responses After End-Time
Decide whether late submissions are okay.
- Accept – Allows users to submit the process even after the set end time.
- Reject – Prevents any late submissions.
Useful when you want to enforce strict time windows ⏰
3. Number of Responses
Control how many times each user can respond to the process.
- One response per user – Each user can submit once.
- Multiple responses per user – Users can submit multiple times if needed.
Example: Inventory count might allow multiple submissions; a safety audit likely won’t.
4. Submission By
Set who needs to submit for the process to be considered “complete”.
- Anyone – Any one of the assigned users can submit.
- Everyone – All assigned users must submit their own response.
This is important when accountability at the individual level matters.
5. Date Range Selection
Decide whether the user can submit for past or future dates.
- Allowed – A checkbox will appear saying “Submit for Past or Future Dates”.
- Restricted – Submitter can only fill for the current date.
Handy for back-dated entries or pre-scheduling if you allow it.
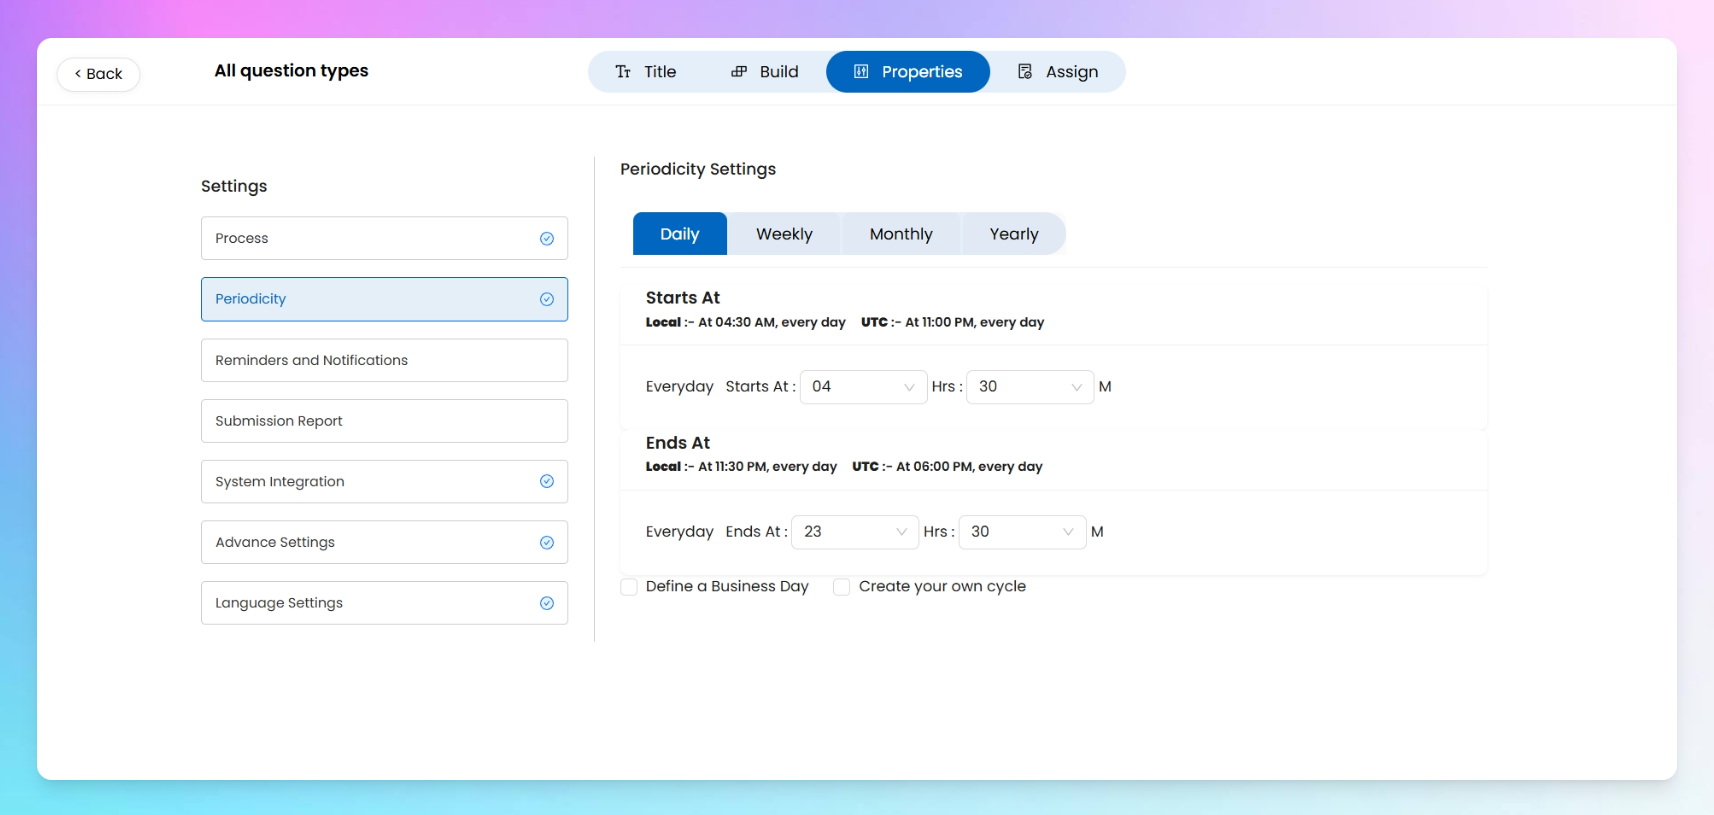
🗓️Process periodicity
This is where you define how often your process should run — whether it’s a daily hygiene checklist, a weekly stock check, or a yearly compliance review.
Taqtics gives you four flexible options: Daily, Weekly, Monthly, and Yearly, each with their own customizable settings.
No matter which frequency you pick, Start Time and End Time (based on your local time) are mandatory.
Let’s break down how each option works 👇
Daily
Runs the process every day.
- Set a Start Time (e.g., 04:00 AM) and End Time (e.g., 04:30 AM).
- This window defines when the process will be active for users to fill.
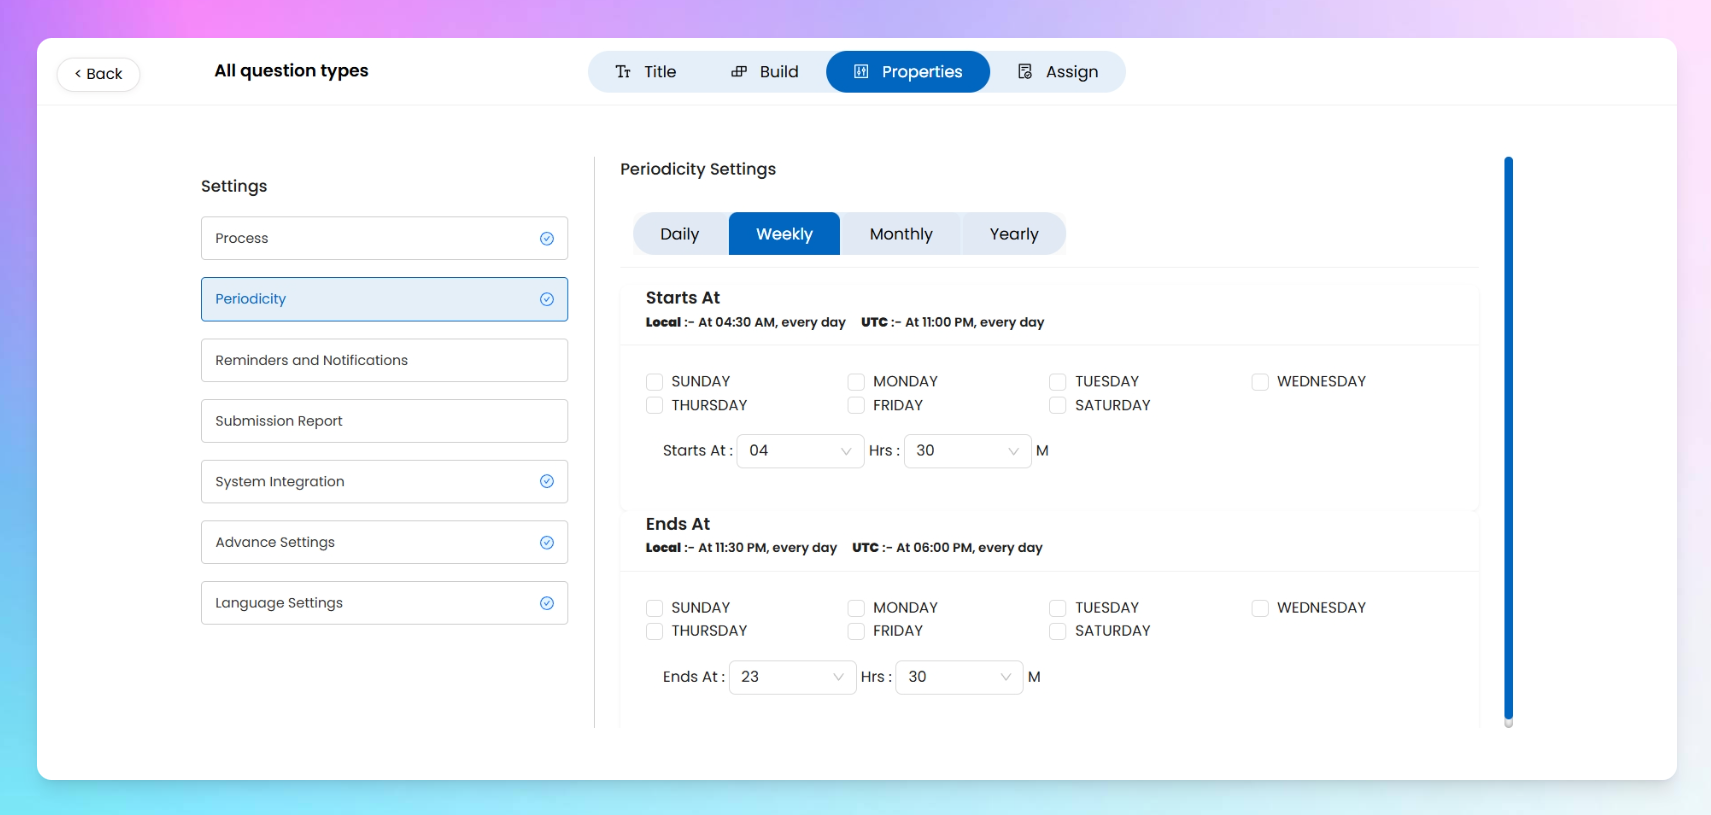
Weekly
Runs the process on selected days of the week.
- Tick the days you want (e.g., Monday, Wednesday, Friday).
- Set a Start Time and End Time for each selected day.
Example: A cleaning checklist every Monday and Thursday between 9 AM–12 PM.
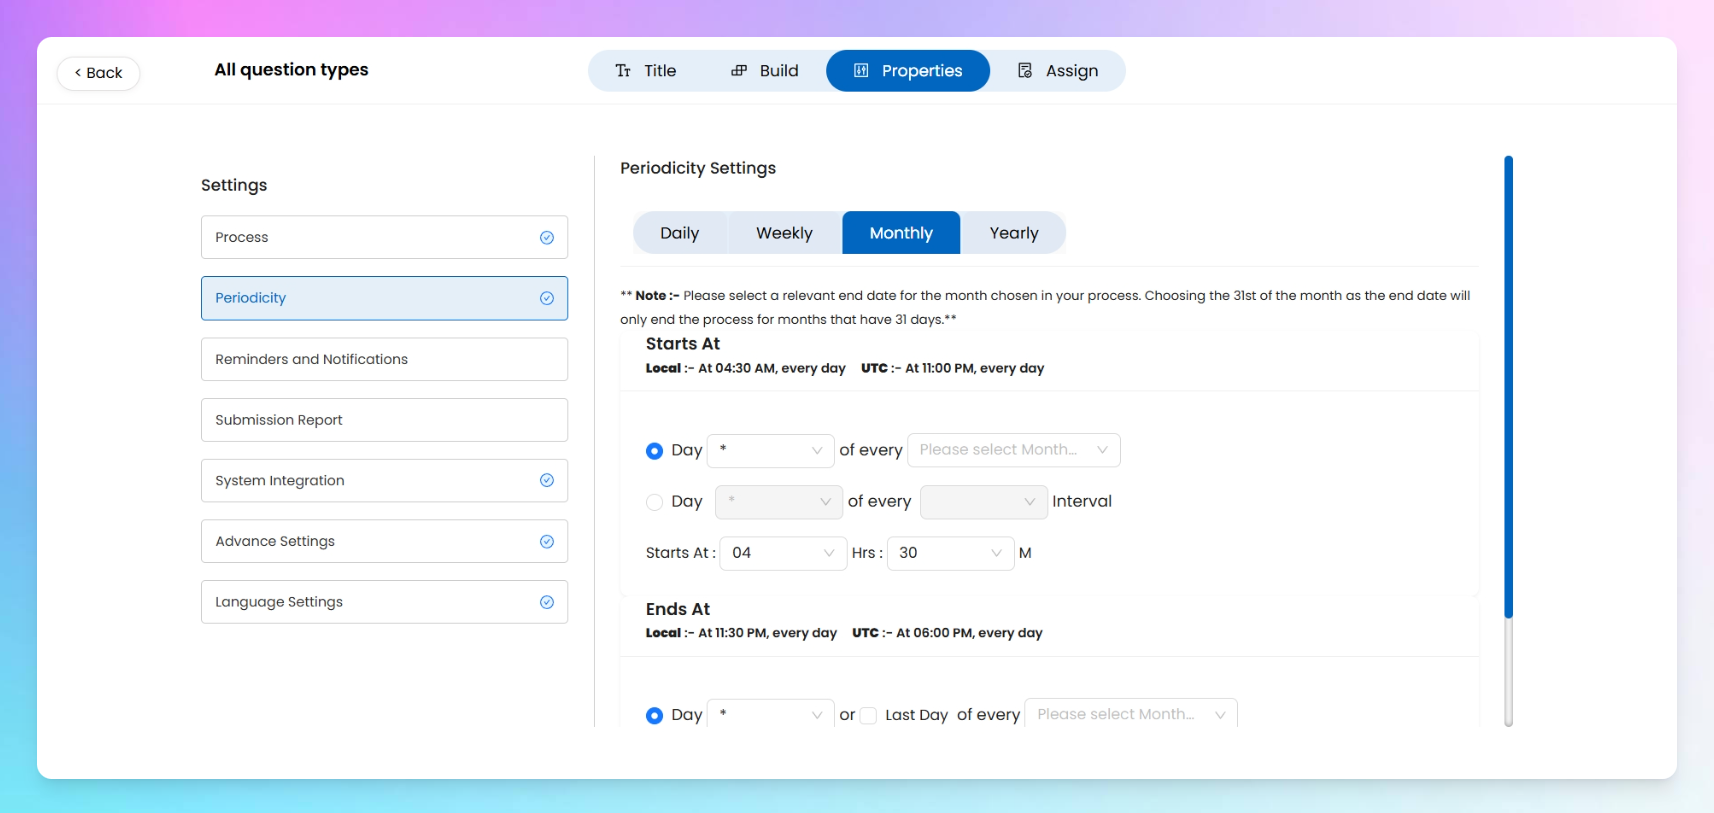
Monthly
Runs the process on specific dates or intervals each month.
You can configure both Start and End sections like this:
- By date → e.g., Day 1 of every selected month (Jan, Mar, Jun).
- By interval → e.g., Day 5 of every 2nd month.
Don’t forget to also set Start Time and End Time.
You can choose multiple months and configure different logic for start and end — super handy for quarterly routines or irregular schedules.
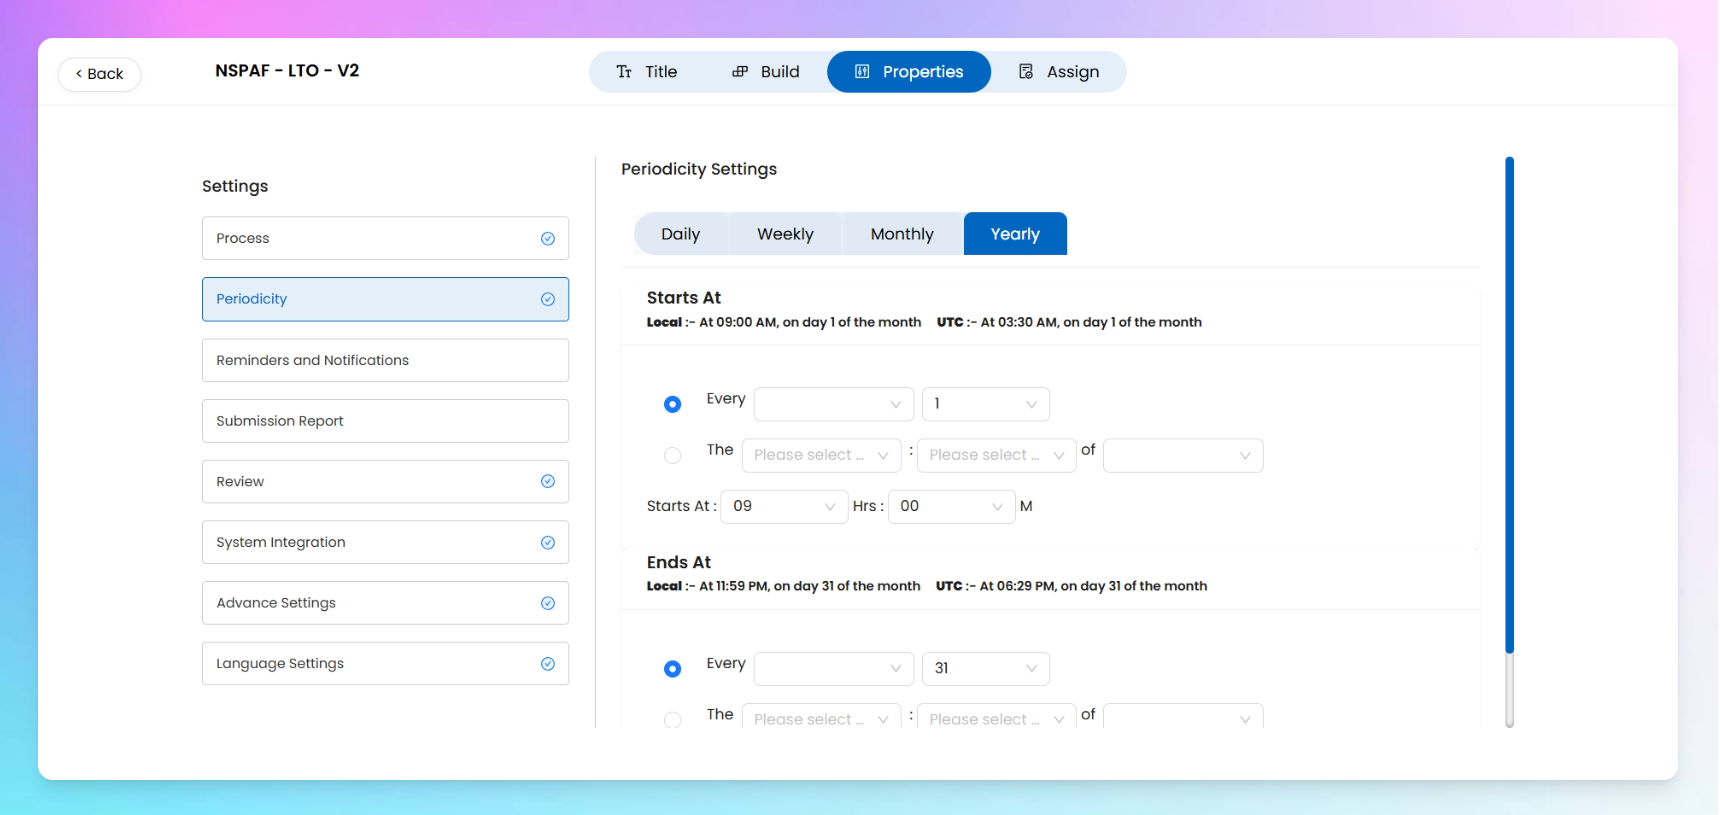
Yearly
Perfect for annual routines or seasonal processes.
In both Start and End, you can configure:
- Specific date → e.g., January 1st every year.
- Custom rule → e.g., 3rd Sunday of April every year.
Then add the Start Time and End Time to complete your configuration.
Example: An annual equipment calibration on the 2nd Monday of February, 8 AM to 10 AM.
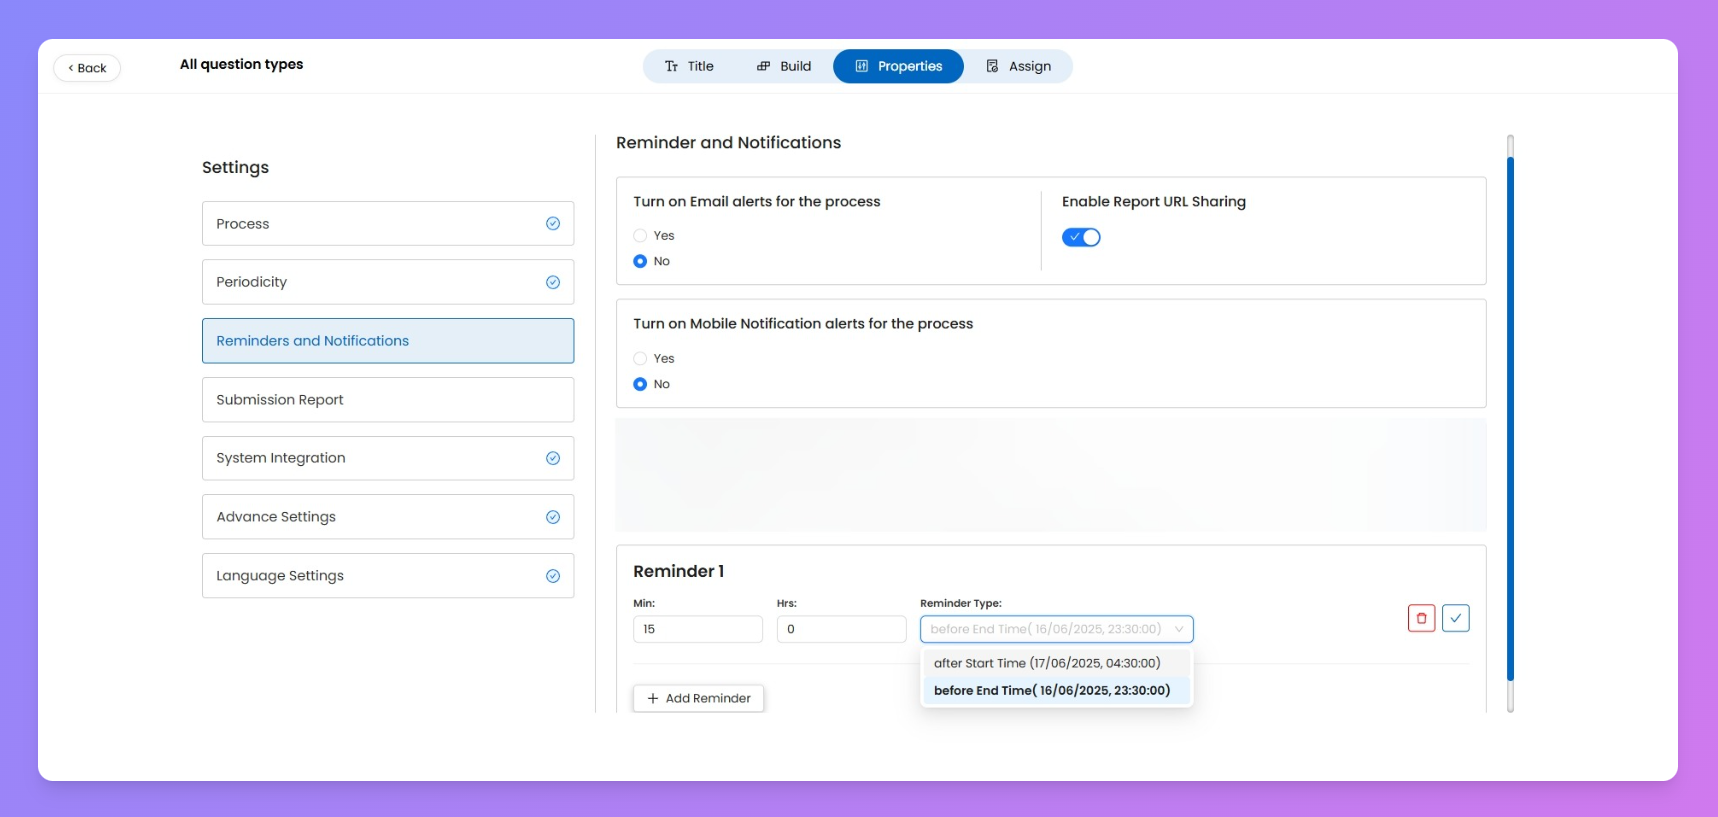
🔔Reminders and Notifications
This section helps you make sure your assigned users don’t miss their scheduled processes by configuring timely alerts — both via email and mobile push notifications.
Email Alerts for the Process
Enable this toggle to send email reminders to all assigned users.
- Yes / No toggle available.
To receive these emails, users must verify their email by entering an OTP.
Mobile Notification Alerts for the Process
Enable this toggle to send mobile push notifications via the Taqtics mobile app.
- Yes / No toggle available.
Add Reminder
Set the timings of your above reminders!
- Click on
+Add Reminderand configure custom alerts.
- Choose how many minutes or hours before or after the start or end time you'd like to alert your users.
Example: Set a reminder for 15 minutes before end time if you want to give users a final heads-up before their submission window closes.
Enable Report URL Sharing
Toggle this on to include a direct link to the process’s Submission Report in the email alert.
- This allows recipients to open the report directly via a URL in the email.
- If you’re sharing the report with an external client or someone without a Taqtics login, keep this off.
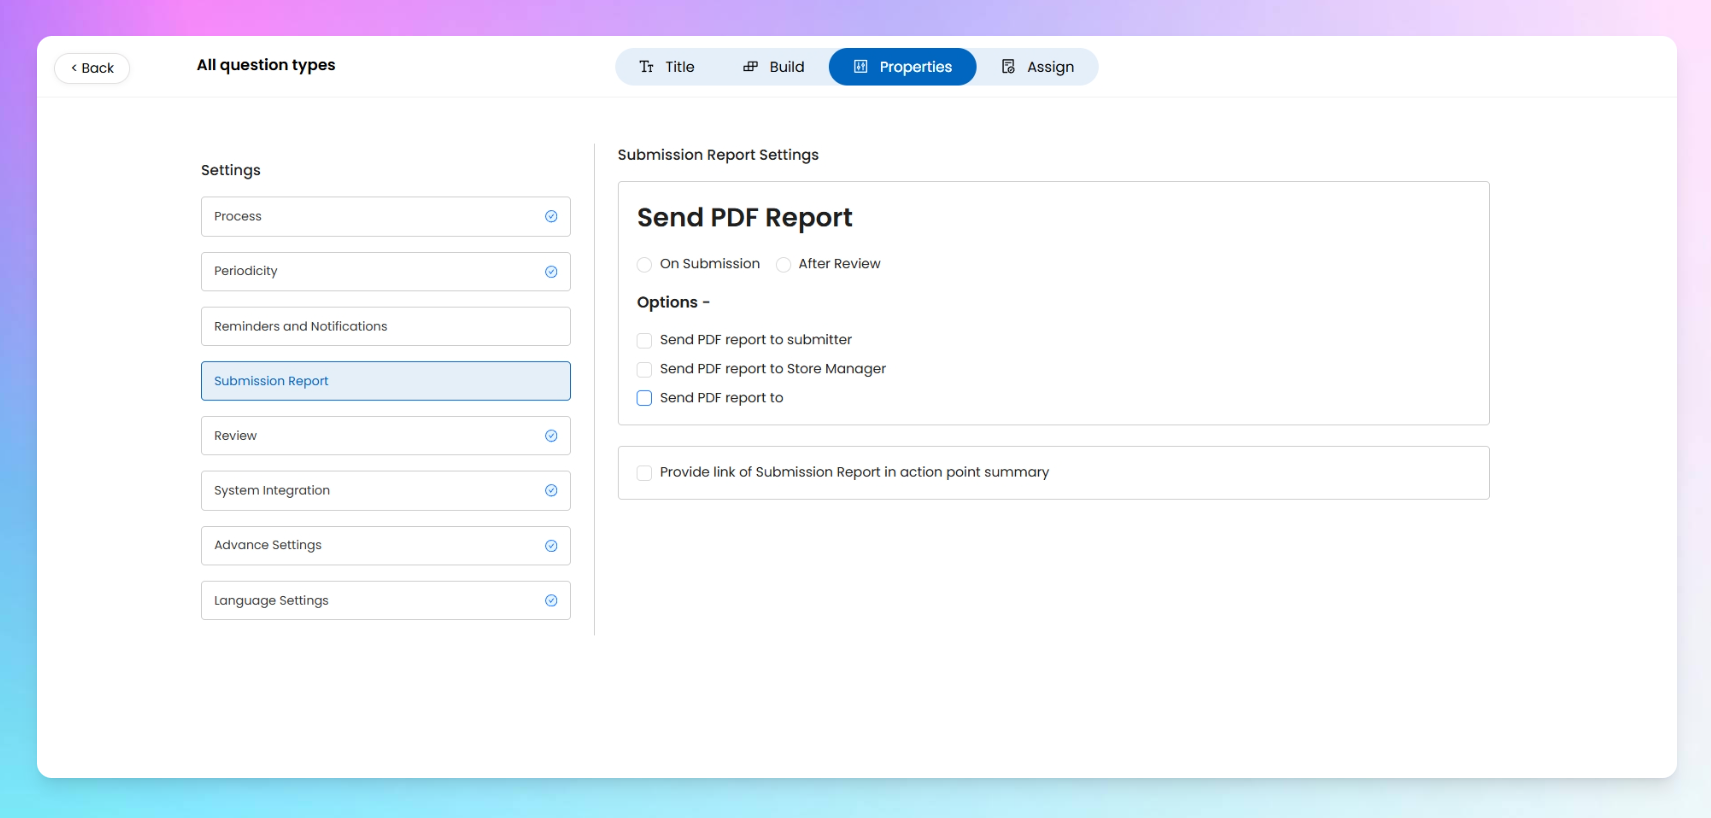
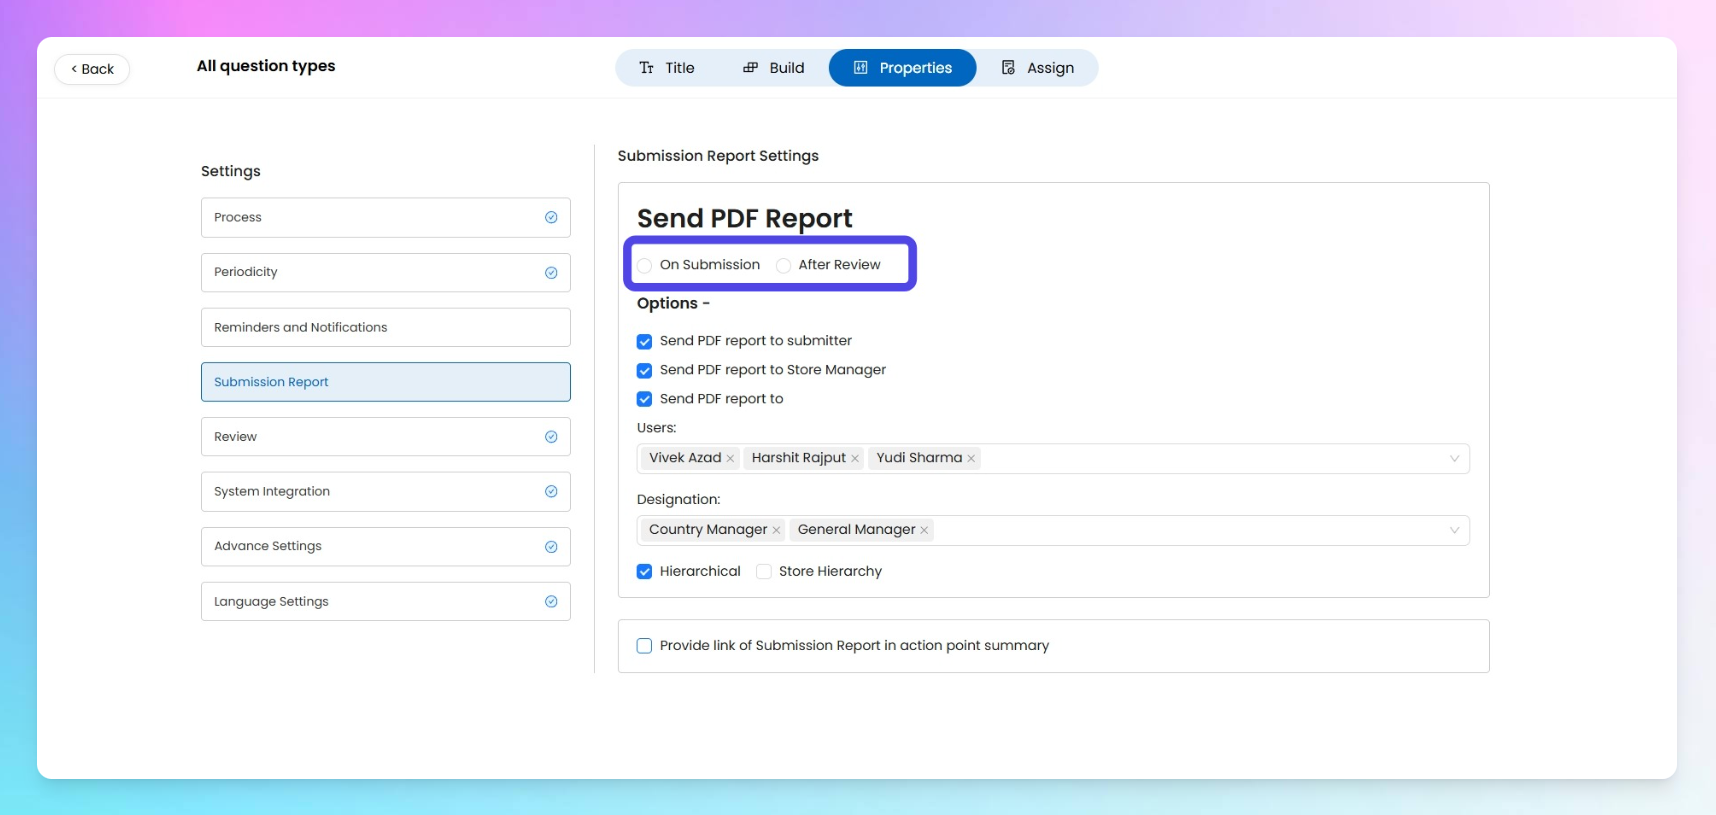
Submission Report settings
Control who receives a copy of the process submission report, and when. This setting works the same whether you trigger it on submission or after review (if you've enabled Reviews in the process builder).
Timing Options
- On Submission: Send reports immediately once the checklist is submitted.
- After Review: (Visible only if Review is enabled) Sends reports post L1/L2/etc. review completion.
Who Should Receive the PDF Report?
Choose one or more recipients:
Option | Description |
Submitter | Sends the report to the user who filled the process. |
Store Manager | Sends the report to the store manager of the store where the process was submitted. |
Custom | Lets you define recipients by specific users or designations. Once you select a designation, two advanced options appear: • Hierarchical • Store Hierarchical |
What's the Difference Between Hierarchical and Store Hierarchical?
These options help route reports correctly within multi-level orgs.
- Hierarchical: Sends the report to anyone above or below the submitter within the selected designation (e.g., all Area Managers in their reporting line).
➕ Ideal when roles are linked in a clean org structure.
➖ Risk: If the submitter is at the top, this may blast the report to many reportees unnecessarily.
- Store Hierarchy: Restricts the recipients only to those in the same store and within the hierarchy.
➕ This ensures only the relevant Area Manager (linked to that store) receives the report.
➕ Prevents unnecessary sharing to unrelated peers or subordinates.
Example: If a user fills the checklist and selects "Area Manager" with only Hierarchical enabled, all Area Managers under and above him get the report. If Store Hierarchical is also selected, only the Area Manager belonging to that store will receive it.
Additional Option
- Provide link of Submission Report in Action Point Summary: Adds a direct report link to action points for better traceability.
Review
Review Settings control what each reviewer level (L0, L1, L2 etc) can do with the submissions.
Continue with 👇
Review Settings Integration Settings
You can use to integrate with 3rd party systems, using external API, For detailed discussion, if you’re a customer of Taqtics, please contact with your Account representative or drop us a mail on support@taqtics.co
Advance Settings
Restrict or Track Location While Submitting
Hide Scores & Compliance from Submissions
Track Visual Merchandising Across Stores
Auto-Assign Users with Dynamic Assignment
Carry Forward Action Points
Create Action Points from Reports
Allow Offline Submission (Beta under development)
Make Reports Confidential
Set Priority & Page Count for Your Process
Public form via URL or QR Code
Apart from internal Processes and Audits, Taqtics also supports Public Forms. These allow you to collect inputs from anyone outside your company (like customers, vendors, or third parties) using a simple URL or QR code.
Continue you 👇
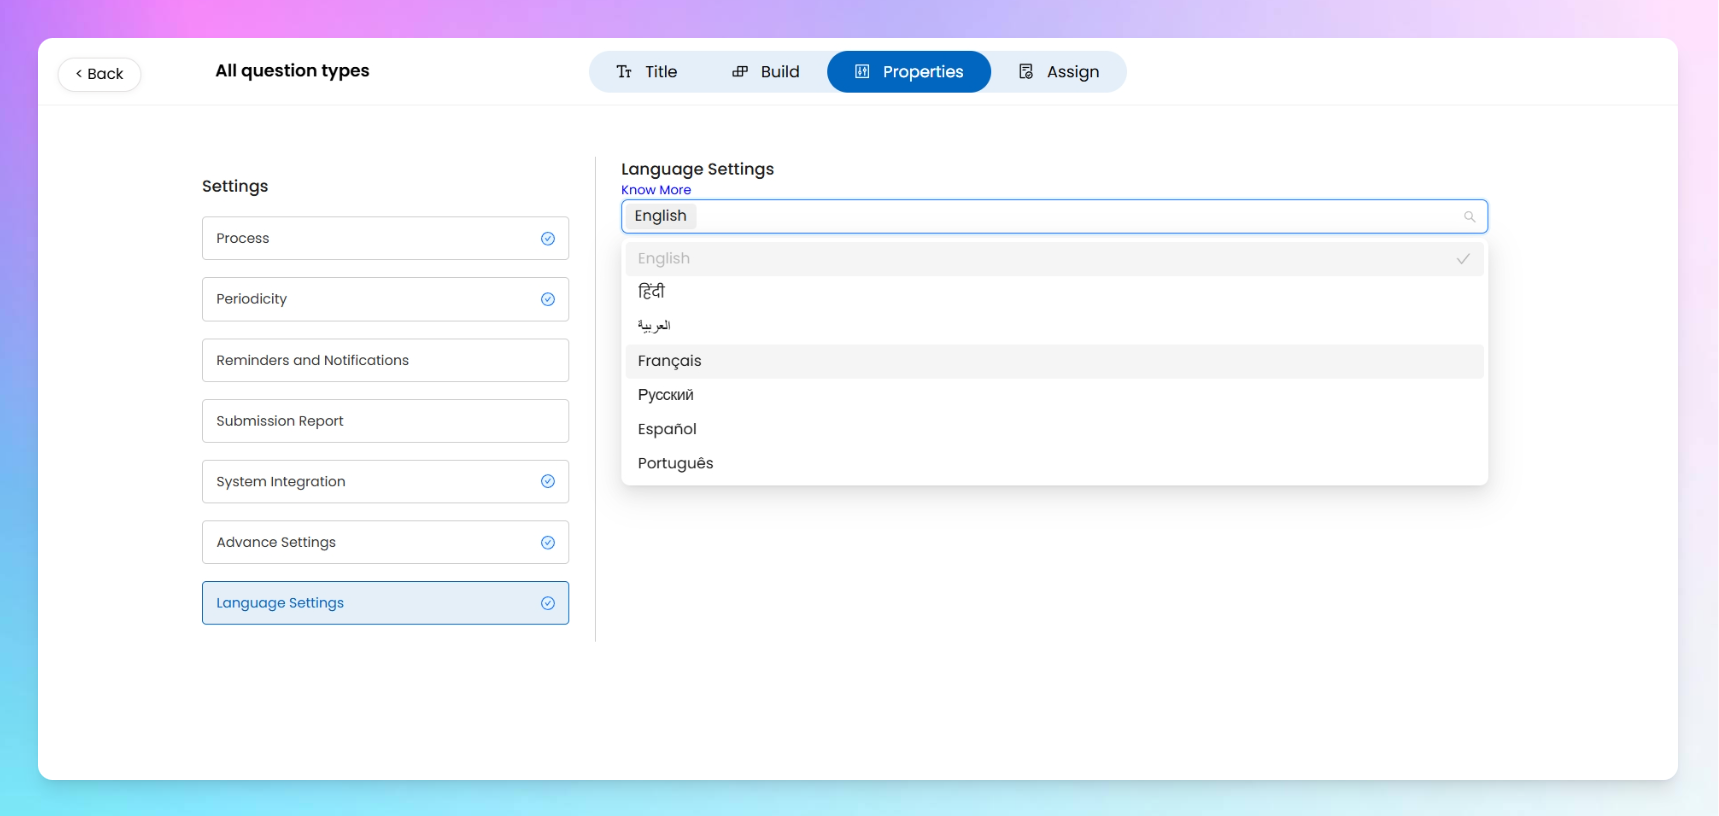
Public Forms Configurations🌐 Language Settings
Taqtics allows you to make your process available in more than one language, so users can read and respond to it in the language they're most comfortable with.
By default, English is selected. You can also choose from other supported languages like Hindi, French, Portuguese, Urdu, etc.
Select Languages to Support
Inside the Language Settings section, choose the languages in which you want to support the process.
Once selected, these languages will appear as options inside the process builder — so you can manually enter the translated content.
Add Translations for Each Question
When you go back to the builder:
- You’ll see a Translate icon next to each section title, question, and label.
- Clicking this icon lets you switch between your selected languages and type out the translated version for each.
Note:
- This doesn’t work like auto-translation. You have to manually enter the text for each language you selected.
- Users will only see the process in their preferred language if you’ve entered the translation for that language.
- The user’s preferred language and the languages you’ve configured in the process must match. Only then will the translated version appear.
How Users See the Translated Process
Once you’ve added translations and published the process:
- Users can select their preferred language in their Account Settings.
- When they open the process, it will show up in that language only if you’ve added the translation.